
Many startups build chat capabilities into their products. For example, most marketplace, community, and social products provide users with a way to communicate with one another. At Copilot, we make client portal software, and an important use case for us is to let service businesses communicate with clients and vice versa using our web-based Messaging App.
In the first iteration of the service, when users sent messages in our web app, we sent out messaging email notifications to inform recipients about new messages. The problem was that any time a user wanted to reply, they had to first navigate to the client portal (i.e. click on the link in the email notification) and authenticate. This introduced a lot of friction into a process that should be as seamless as possible.
In this blog post we’ll dive deep into how we built a system to reply to messages directly from email threads for our Messaging App. We’ll go over architecture details, setting up email receiving, parsing email content, handling errors, limitations, and testing. Along the way we’ll highlight our most important learnings, discuss email client intricacies and edge cases, and explain why, to our surprise, this feature had a strong positive impact on overall email deliverability and open rates. Let’s dive in!
Overview of workflow
Here at Copilot we work on a Serverless stack that is centered around Functions as a Service (FaaS) and event-driven logic using a variety of services AWS offers. These services allow us to maintain an organized architectural system that scales as we scale.
When breaking down the challenge presented to us for the Reply-To emails feature, some key questions were:
- How would we receive emails coming from clients?
- Would we need to store these emails somewhere?
- How would we handle any errors through the system?
- What would be some limitations to consider and their workarounds?
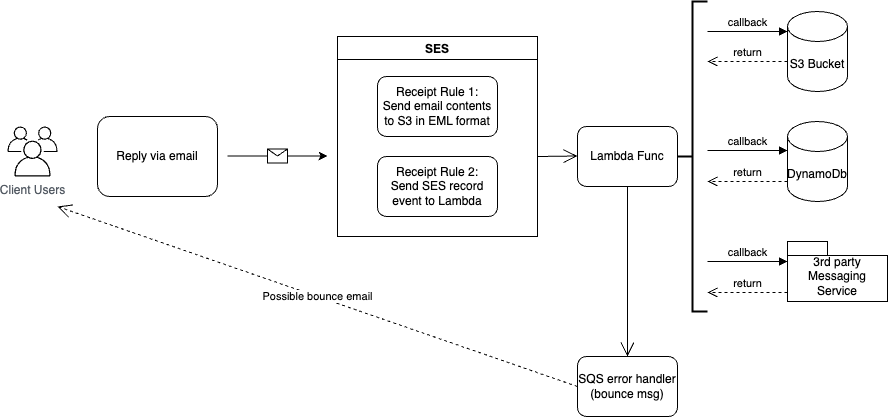
After analyzing and researching possible solutions, we decided that our strategy should be to use SES (Simple Email Service) for receiving the emails coming from our customers that would trigger a Lambda function to deal with the incoming emails and apply our business logic there.
With all this configuration and decisions in place, we could now start to focus on the business logic inside our lambda and figure out how we would parse the emails the way we needed to.
For this to work properly, we would have to store the emails coming in somewhere since SES couldn’t just pass along the entire email contents to Lambda. We would have to configure SES in specific ways to make things work in the system we designed. Luckily SES offers recipient-based control in the form of receipt rules that one can create within a rule set, and this is exactly what we did. We configured a rule set for SES with two basic rules triggered in order. The first, was an S3 action rule where the incoming emails would be placed in a dedicated S3 bucket for later retrieval. The second, was a Lambda action rule to trigger the lambda handler function we would create which would get the email contents from the S3 bucket, parse them, validate them, send them to our 3rd party messaging vendor and delete as they would no longer be needed. If any errors occurred along the way we would send them to an SQS (Simple Queue Service) handler to send possible bounce emails from.
Setting up email receiving
SES supports receiving emails and handles several of the underlying operations involved in communicating with mail servers. To setup receiving emails there needs to a domain that has been verified with SES. This can be done through the AWS console or API and is explained in more detail in the AWS docs here. Once the domain is verified there needs to be an MX record which is used to specify which mail servers can accept emails. Since most domains will already have some MX records configured for receiving emails its best to use a separate subdomain to receive email replies.
// DNS Record to add
Name: notifications.copilot.com
Type: MX
Value: 10 inbound-smtp.region.amazonaws.com //replace region with the AWS Region you use for SES
With a verified domain and DNS configuration, SES is now ready to receive emails. The next step is setting up tasks to perform when an email is received. The goal of these tasks is to load the content of the email so it can be used in the subsequent steps for parsing and connecting with the app. The first task delivers the email to S3 which is used to store the contents of the email that are received from SES. The benefit of using S3 is that you can store emails up to 40 MB. Most email clients don’t allow uploading attachments larger than 25 MB so this setup can receive the majority of emails. The second task is to invoke a Lambda function to process the lambda email. These tasks are defined as rules as part of a rule set. At Copilot we use IaC (infrasture as code) and rely on cloudformation to configure our resources.
// create a parent rule set
receivingRuleSet:
  Type: AWS::SES::ReceiptRuleSet
  Properties:
    RuleSetName: "your result set name" // replace

// rule within rule set to upload incoming emails to s3
forwardToS3ReceiptRule:
  Type: AWS::SES::ReceiptRule
  Properties:
    RuleSetName: !Ref receivingRuleSet
    Rule:
      Name: "s3 rule name" // replace
      Actions:
        - S3Action:
            BucketName: "bucket used for uploading email" // replace with bucket you want to use
            ObjectKeyPrefix: "emails" // to keep s3 organized put all incoming emails in a folder emails/...
      Enabled: true
      ScanEnabled: true
      TlsPolicy: Require
  DependsOn: receivingRuleSet

// rule within rule set to trigger lambda function
LambdaSESReceiptRule:
  Type: AWS::SES::ReceiptRule
  Properties:
    RuleSetName: !Ref receivingRuleSet
    Rule:
      Name: "lambda rule name" // replace
      Actions:
        - LambdaAction:
            FunctionArn: "ARN of your lambda function" // replace, must be in same region as SES
            InvocationType: Event
      Enabled: true
      ScanEnabled: true
      TlsPolicy: Require
One of the things to note about the above setup is that there are no conditions or filters defined on which emails will be sent to S3 and lambda. This means that all domains that are verified with SES and have the inbound DNS records added will be processed. This is particularly useful since Copilot supports white-labelling your domain for both your portal and your emails. In order to support this, we allow users to input the custom domain, ask them to input the required DNS records, and use the SES API to add that as a verified domain.
Parsing the email content
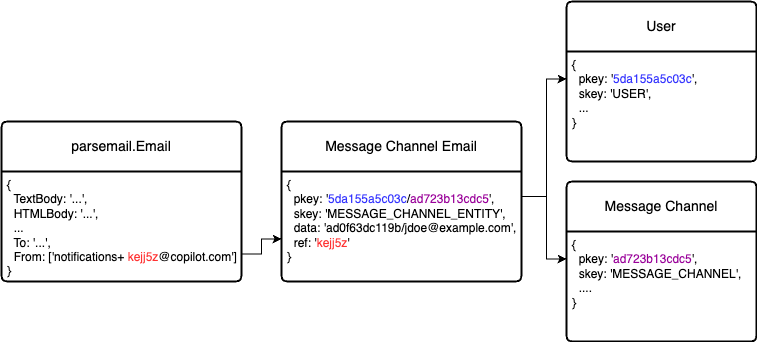
The email contents stored in the S3 bucket by SES are stored in EML (RFC-822) format and the object key for each is the email message ID from SES. In our Lambda function handler we will receive a Simple Email Event from SES and use the message ID within each record to retrieve the eml file from S3 and use the parsemail package to break down the eml formatted file and create an Email struct that has all the necessary fields broken down for us.
func handler(sesEvent events.SimpleEmailEvent) error {
	for _, record := range sesEvent.Records {
		s3ObjectKey := record.SES.Mail.MessageID
		objectPayload, err := s3Client.GetObject(s3.GetObjectInput{
			Key: &s3ObjectKey,
			Bucket: aws.String(<your-bucket-name>),
	}
	if err != nil {
		return
	}
	// Now that we have the eml payload parse to get email contents
	var email parsemail.Email
	email, err = parsemail.Parse(objectPayload.body)
	// can now use Email struct's parts, TextBody/HTMLBody, Attachments/EmbeddedFiles etc..
The TextBody property within this struct is the main one holding the information about the email content we need but we need to parse it one more time since this content will have any email history and possible signature the client uses on their email provider. For that we can use another great package, emailreplyparser, that will allow us to get the client’s exact reply in the email separating out any possible signature, quoted reply history and unnecessary headers into their own individual fragments, giving us strictly the text reply. Note that not all email clients send the same information on their EMLs, some may not send plain/text content therefore we had to verify what content we had access to if not TextBody, we had to parse the HTMLBody.
Lastly as a conditional step, we should check the original Email model to see if any files were sent along with the email, these will be in the Attachments or EmbeddedFiles lists and we can now pass these along to our 3rd party messages vendor.
var email parsemail.Email
email, err = parsemail.Parse(objectPayload.body)
if err != nil {
	return
}
// Get the email reply body using third party parser, note some email providers
// send both html and plain text parts, and some may only send one
var userReplyText string
if email.TextBody != "" {
	userReplyText, err = emailreplyparser.ParseReply(email.TextBody)
} else {
	htmlBodyDoc, err := goquery.NewDocumentFromReader(strings.NewReader(email.HTMLBody))
	if err != nil {
		return
	}
	// when parsing html body in the reply email we expect the
	// original email history is within a blockquote.
	// Since we only need the reply we can remove the blockquote
	blockQuote := htmlBodyDoc.Find("blockquote")
	blockQuote.Remove()
	modifiedHtml, err := htmlBodyDoc.Find("body").Html()
	if err != nil {
		return
	}
	// convert to markdown to remove html tags before passing to emailreplyparser
	mdConverter := md.NewConverter("", true, nil)
	markdownContent, err := mdConverter.ConvertString(modifiedHtml)
	if err != nil {
		return
	}
	userReplyText, err = emailreplyparser.ParseReply(markdownContent)
}
// make request to 3rd party messaging api with the user's reply text
_, err = messageClient.SendMessage(userReplyText, <user-id>)
if err != nil {
	return
}

// Optionally grab attachment data
if len(email.Attachments) > 0 || len(email.EmbeddedFiles) > 0 {
	// deal with files within this block
}
Connecting receiving email to app
Now that we have the eml file parsed and the text reply from the client, we need to (a) ensure the user that sent the email has the right permissions to reply in our messaging app and (b) figure out what conversation this reply needs to be associated with. To do that we have added an id to the Reply-To email address on all our emails for customers to reply to. The email address format is <notifications+someId@copilot.com>; using this format, we can quickly retrieve this ID from the Email struct’s From field and make a GET request to DynamoDB where we have stored a database record with the user’s information as it pertains to the messaging module. This record includes the message channel id, member email, and member id, that we use to validate with the rest of the information from the email coming in.
Ensuring the sender email is the same one as our db record and ensuring the member id is still part of the messaging channel.
With all this validation, we’re ready to send the client’s reply to our 3rd party messaging vendor using the channel id and member id from our DynamoDb record. Using their SDK we can make the request, sending in the necessary information (member id, member’s message, and any attached files).
If this is successful, all we have left to do is delete the eml file from our S3 bucket as it is no longer needed. The client will now see their reply email message appear within their Copilot’s portal messaging channel to ensure all worked correctly and their business workflow has now been simplified.
Handling Errors
Of course we could experience errors along the way of all our business logic (S3 issues, validation or db connections), and for that we decided to add an extra piece of infrastructure to handle this, an SQS error handler. Our entire Lambda code is wrapped around an Error handler that depending on its type (Bounce/Ignore) we can send an SQS message for later handling by another Lambda function.
In the Error handler lambda function we gather the attributes from each SQSMessage event and use SES one more time with its SendBounce API to send an email stating what went wrong on the user’s reply-to email. While of course logging this information for us to debug on CloudWatch.
// SES handler - handle any incoming email events
func handler(sesEvent events.SimpleEmailEvent) error {
	sqsClient = sqs.New(sess)
	for _, record := range sesEvent.Records {
		var e Error // our own Error type
		e = handleSesEvent(record)
		if e.Err != nil {
			e.Handle(sqsClient)
		}
	}
	return
}

func (e Error) Handle(sqsClient *sqs.SQS) (err error) {
	switch e.Type {
	case Bounce:
		// generate the message attributes from the error struct
		var attrs = make(map[string]*sqs.MessageAttributeValue)
		attrs["originalMessageId"] = &sqs.MessageAttributeValue{
			StringValue: aws.String(e.MessageId),
		}
		attrs["recipient"] = &sqs.MessageAttributeValue{
			StringValue: aws.String(e.Recipient),
		}
		attrs["error"] = &sqs.MessageAttributeValue{
			StringValue: aws.String(e.Err.Error()),
		}
		// send to SQS for later handling of bounce error
		sqsClient.SendMessage(&sqs.SendMessageInput{
			MessageAttributes: attrs,
			MessageBody:       aws.String(e.Err.Error()),
			QueueUrl:          aws.String(errorQueueUrl),
		})
		break
	case Ignore:
		// If we choose to not bounce, we will just log any errors coming in
		log.Error().Err(e.Err)
	}
	return e.Err
}
// SQS error handler
func handler(sqsEvent events.SQSEvent) (err error) {
	sesClient := ses.New()
	for _, event := range sqsEvent.Records {
		// sleep 1 second since SendBounce can't be done more than 1 per second
		time.Sleep(1)
		_, err = sesClient.SendBounce(&ses.SendBounceInput{
			BounceSender: event.MessageAttributes["bounceSender"].StringValue,
			BouncedRecipientInfoList: []*ses.BouncedRecipientInfo{
				{
					BounceType: aws.String(ses.BounceTypeContentRejected),
					Recipient:  event.MessageAttributes["recipient"].StringValue,
				},
			},
			Explanation:       event.MessageAttributes["error"].StringValue,
			OriginalMessageId: event.MessageAttributes["originalMessageId"].StringValue,
		})
		if err != nil {
			return
		}
	}
	return
}
Limitations and things to consider
As we worked on this feature we came across some edge cases and even some limitations to our design, which we’d like to share for anyone tackling this problem on their end. With the setup that we had using the 3rd party email parser, we realized after testing, not all email providers use the same format on an email’s EML files. Some used extra spaces between the email fragments making it difficult to separate email parts, some used different variations of markdown, and some provided only HTML format rather than text/plain. Certain email providers changed the casing on the email addresses’ metadata to all lower/upper casing and we needed to adjust this on our logic to ensure we were able to validate case-sensitive information. All these case scenarios made it to where we needed to apply specific logic in order for the parser to function properly, so you should definitely be wary of any shortcomings from the email providers you are wanting to support. Here’s a short list we made during our process.
- Gmail mobile did not add an extra space between an email’s history thread and a client’s signature which was needed to separate the fragments correctly
- Microsoft Outlook doesn’t follow regular markdown, e.g. bolded and italicized text came with the same number of * so it wasn’t possible to differentiate
- Front provider lowercased the reply-to email address
- IOS mail app only sends HTML content not text/plain like most others
Lastly, the parser we used could only parse English language (at the time of this writing) emails due to it needing a separator on the email’s history coming in the form of an English sentence, and it’s not equipped to handle other languages yet. Testing different email providers is key to a great feature like this, so be sure to test as many as you can!
Testing
As most complicated infrastructure heavy projects require good code coverage and thorough testing, we made sure that our testing system would be as close to the real thing as possible.
Using LocalStack was our ticket to ensuring our system would work with any email reply as well as it was easily testable for our dev team to debug and easily understandable for anyone to contribute. The process revolved around creating an integration test that would mimic a call to our SES reply-to-email handler when a new email reply with an eml file came into our system. For this we setup a step-by-step process of what we needed to make sure our business logic ran as if in production. With our setup, we needed a couple of things:
- First, using LocalStack, we needed to create the DynamoDB record that connected a client to the reply-to email and the messaging module.
- Second, we needed to insert the eml as if SES had inserted it when receiving the email from the client, we took an eml formatted string and placed it in our testing module to use as the example, and just inserted the particular test user’s info (email address, email id) to the eml variable, and using LocalStack’s S3 client api we placed the object into our local S3 bucket.
- Third, we created a messaging channel on our actual 3rd party vendor to test against during this process and ensure the user was a member of that channel.
Lastly after all this setup was done, we created the SES Event struct ourselves, placed the needed message ID and invoked our handler manually to start our business logic. To ensure the whole process worked as expected, we made 3 assertions.
- Ensure the handler didn’t return any error
- The S3 object that we initially setup was no longer in our bucket since our handler should’ve deleted it
- Ensure the 3rd party messaging channel had the actual contents of the eml file.
With all this in place, we could test as many eml formatted files as we’d like and our channel should always receive them. LocalStack ftw!
Share this post
Sign up for our newsletter
Subscribe to our newsletter to receive emails about important announcements, product updates, and guides relevant to your industry.
