Back to Blog
How to create a Webflow client portal (in 6 steps)
[Hide]
If you're reading this it's likely that you're searching for a solution to allow your clients to set up user accounts, on your Webflow website.
By doing so, clients can access a personalized client portal on your agency or firm's website. This portal will provide them with access to features such as messages, reporting dashboards, documents, payments, and more.
In this article, I will guide you through the process of creating a client portal on Webflow. Why should you trust my expertise? Well, I actually manage a marketing agency myself (and I worked on the marketing team at Webflow).
I’ve also implemented this exact setup on my Webflow site for my clients — so rest assured, I'll cover all the steps.
Let's dive in.
Can you build a client portal in Webflow?
When it comes to using Webflow for your agency or firm’s website, a common inquiry that often arises is whether Webflow offers a client feature that allows your clients to log in and access important content. The straightforward answer is: it depends.
Okay, hear me out. Webflow does have a memberships feature built-in, and you can use their Logic flows to set up certain automated flows like you can with Zapier. But, this feature is still quite limited (at the time of writing this). It’s great if you have gated content you only want subscribers to have access to — think something like The New York Times.
But, if you want to create a dedicated dashboard for each client, you’ll need to integrate with third-party tools. If you’re super tech-savvy, you might opt to use something like Memeberstack to create your user accounts. But then you need to build out every feature for your client portal in Webflow. It’s doable, but it’s not a great plug-and-play solution.
So, what most consultants, freelancers, agencies, and firms do is integrate their website with a dedicated client portal platform.
This way, they can keep the “backend”, aka their portal app, and the rest of their “front end”, aka marketing site, separate from each other. Yet, they are still integrated and users can easily log in or sign up through your Webflow site.
In this article, I will guide you through the process of setting up a Webflow website (in case you don't have one), creating a white-label client portal, and seamlessly integrating the two to provide an effortless experience, for both yourself and your clients.
6 steps to create a client portal for any Webflow website
Here are six steps to creating your Webflow client portal:
- Setting up your Webflow website
- Creating a ‘Sign up’ and ‘Log in’ button on your site
- Choosing a no-code client portal builder
- Customizing your client portal experience
- Connecting your client portal to Webflow
- Maintaining and updating your client portal
Okay, let’s power through this.
1. Setting up your Webflow website
The first thing you need to do in order to create your client portal is to create a website using Webflow. I won’t go into full detail on creating a Webflow website from scratch. I wrote an article on the Webflog blog about how to do that here if you want to check it out.
For this article, we’ll leverage pre-designed templates instead of building a website from a blank canvas.
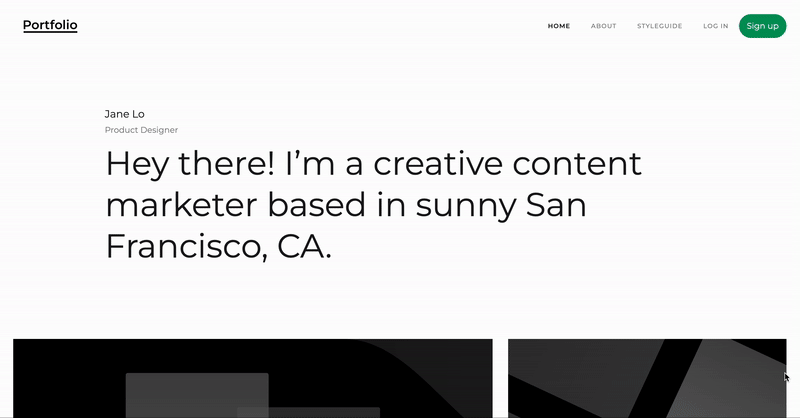
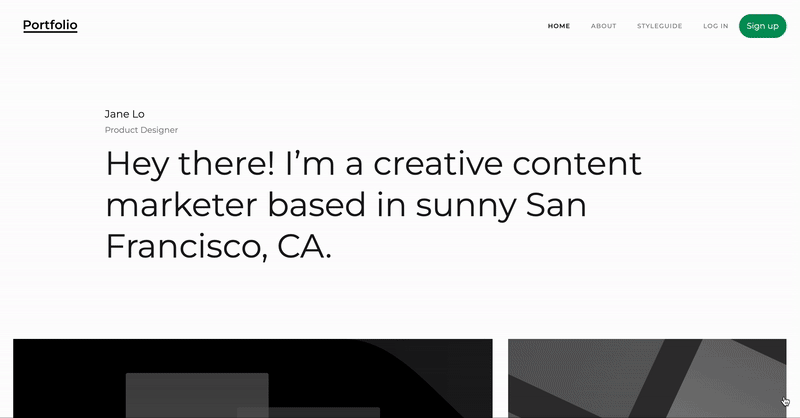
Webflow provides an array of templates specifically tailored for industries and different types of websites. For the purpose of this tutorial let's imagine that we are running a marketing agency (which happens to be my profession). We'll opt for the free Portfolio Starter template.
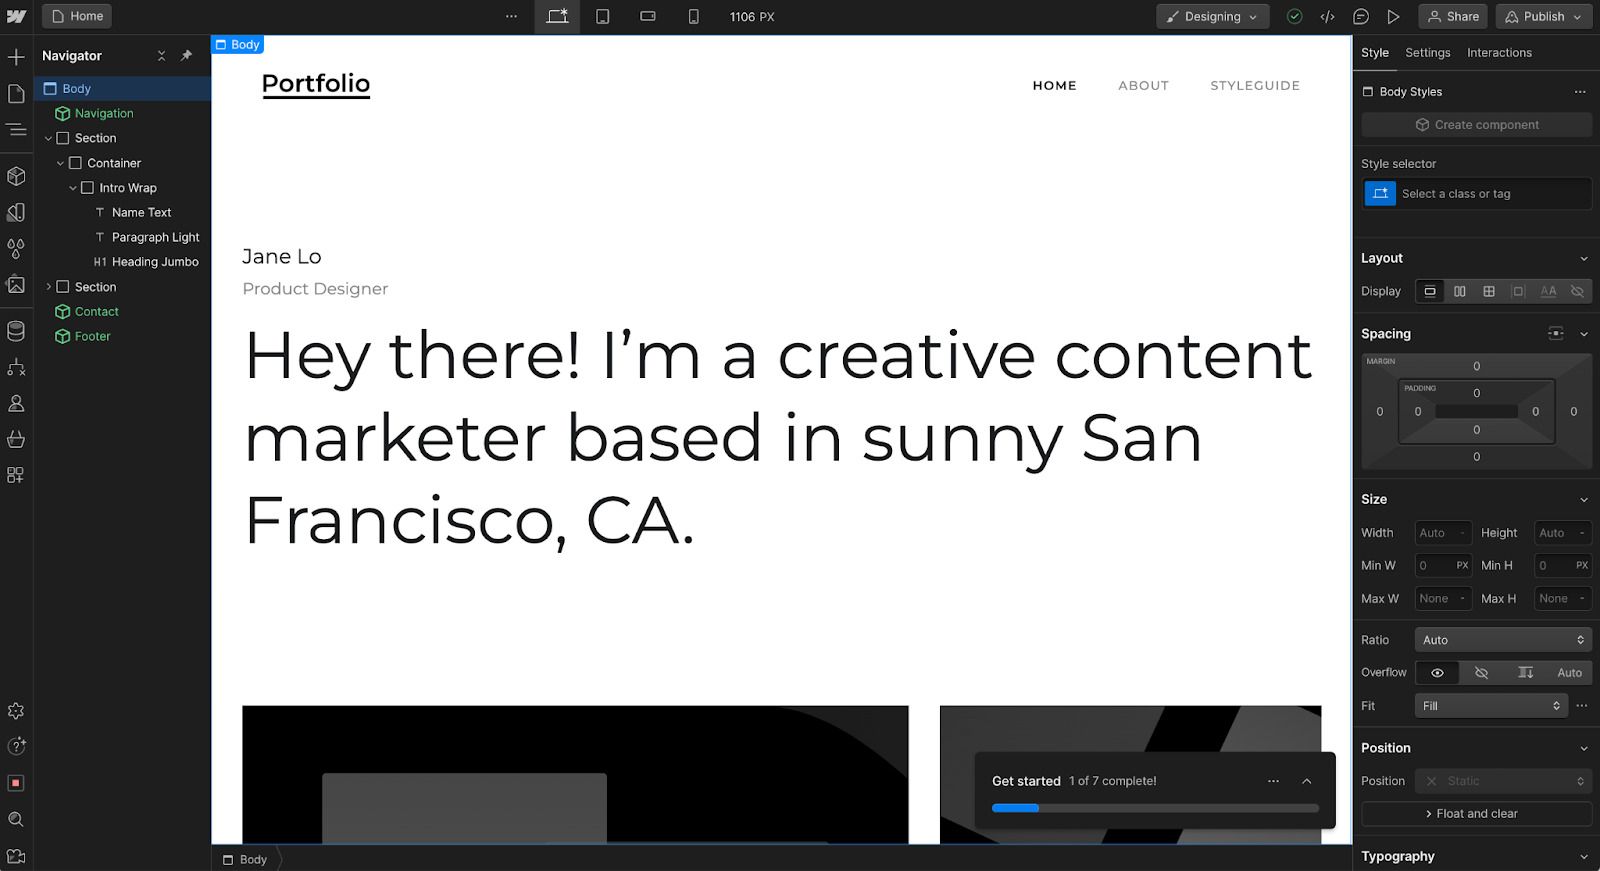
Now to keep things concise and avoid wasting your time, I will leave this template as it is (besides updating the H1 text). However, it is crucial that you update the content, colors, and any branding logos in order to accurately represent your business.
Chances are that if you're reading this article, you already have a Webflow website in place. So let's skip ahead to step two — creating sign up and log in buttons.
2. Creating a ‘Sign up’ and ‘Log in’ button on your site
Firstly, let’s discuss the importance of incorporating ‘Sign up’ and ‘Log in’ buttons on your website. These two buttons play a vital role in establishing an effective gateway for clients to access your services.
Generally, most firms just have a ‘Log in’ button. But creating a ‘Sign up’ button will allow you to give potential clients a “self-service” experience — helping you scale client acquisition by productizing your services.
Creating these buttons is extremely easy in Webflow, way easier than doing it in a website builder like Wix or Squarespace.
First, let’s create our ‘Sign up’ button. To do this, open the Webflow designer and double-click on your navigation bar — this will allow you to edit your navbar. Then, click on the plus icon on the left-hand side of the Designer to add an element. Scroll down till you see ‘Button’.
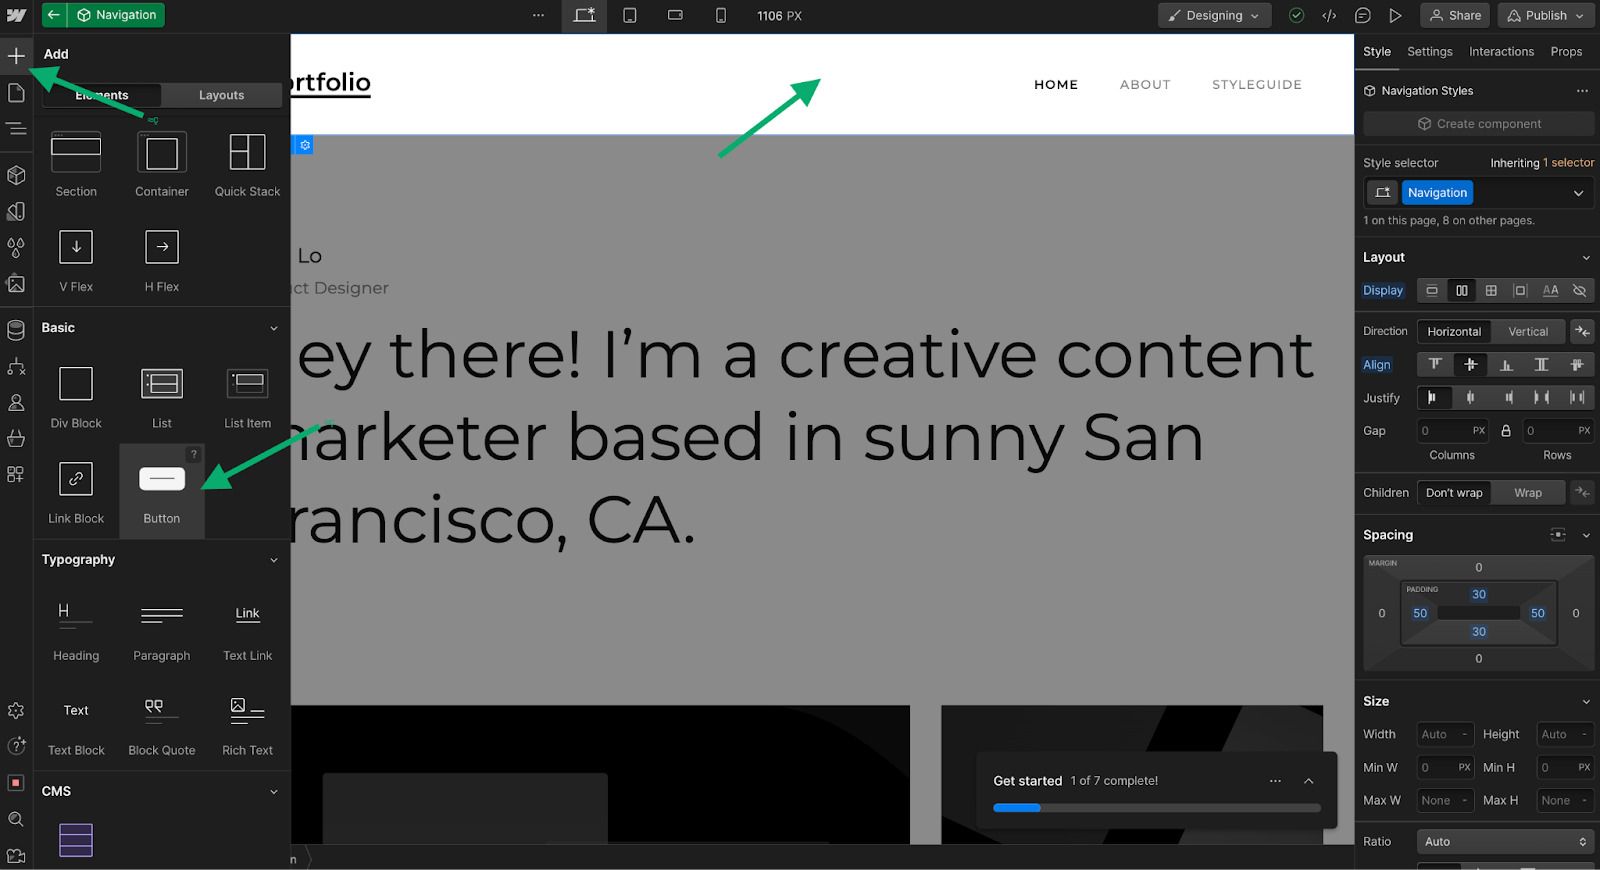
Next, drag the button element next to the rest of the links in your navigation bar. Now, you can edit the button color, text, and styling elements. In this case, I changed the text to ‘Sign up’, changed the color, and rounded out the edges of the button.
You can keep the URL section blank for now, we will come back to this in step five.
Now, let’s add a ‘Log in’ option for our existing clients. By default your sign up button can also serve as a log in button. However, if you want to enhance the user experience and avoid existing clients having to click on the "Already have an account?" link on your client portal sign up page every time they want to log in, it's a good idea to provide a log in option.
We don't need to make this log in option as prominent as our sign up button. We can simply create a hyperlink, with the text 'Log in' next to our sign up button.
To do this, click on one of the navigation items. In this case, I clicked on “STYLEGUIDE” in the navbar. Then just copy and paste the element (Command C and Command V on Mac, CTRL C and CTRL V on Windows).
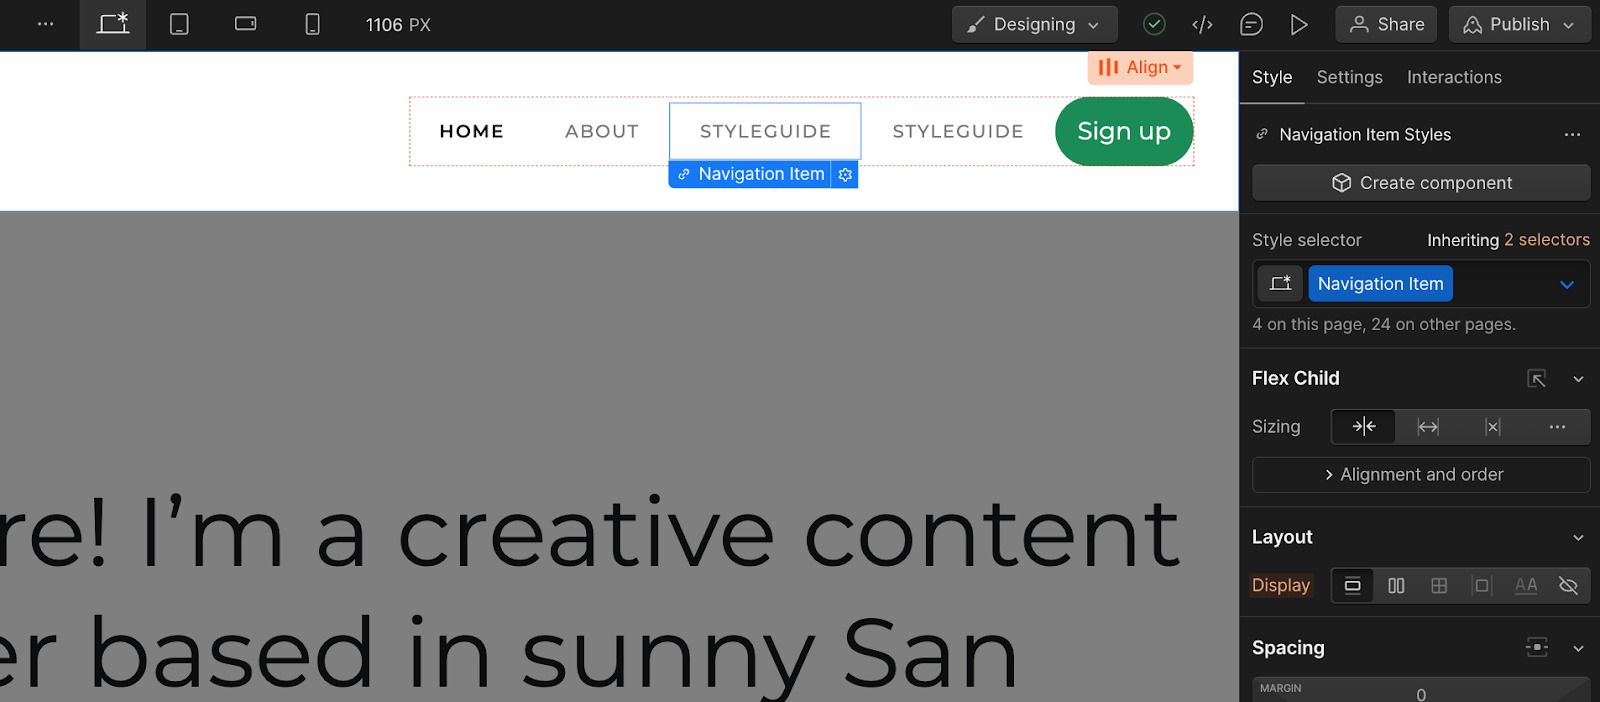
This should duplicate the link. Now, we just edit the text to say ‘Log in’.
You’ll want to make sure that the link type is set to the URL option. Again, just like the sign up button, leave this URL blank for now.
Sweet! Now our Webflow website has a sign up and log in option. The next step is to create the backend portal where our clients will be able to log into.
3. Choosing a no-code client portal builder
With the rise of no-code solutions, it has become incredibly easy to create a client portal. Even if you don't have any coding knowledge, platforms like Copilot offer users a way to establish and manage branded client portals.
By using Copilot, you can grant your clients access to services such as:
All of these can be personalized for each individual client to match their branding and whatever features they specifically need.
Just a quick disclaimer: I'm not a Copilot employee. I am a customer who genuinely loves their platform. There are other no-code tools for client portals that you might want to explore as well. However, Copilot is my personal choice.
If you're interested in learning how to set up and navigate your client portal using Copilot they have guides here.
For the purpose of this article, let’s quickly go through the setup steps. The first thing you need to do is create an account on Copilot's website. Once you've logged into your admin portal, you'll be greeted with the following page:
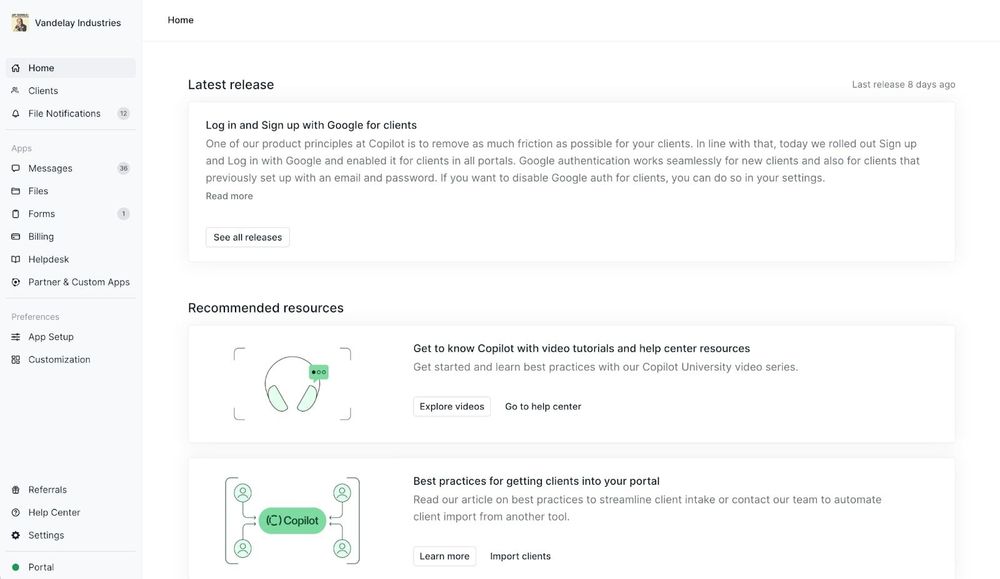
As an administrator, you will have access to a dashboard that provides an overview of your clients, their messages, and various tasks such as managing forms, billing, files, app integrations, and more.
The good news is that setting up a client portal is quite simple. Once you add a client they will be assigned their personalized portal. You can customize the portal's appearance to match either your branding or theirs.
To familiarize yourself with how Copilot operates, you can experiment with their demo portal. However, if you already have an account it would be beneficial to invite a fictional client and take it for a test drive.
To do this (make sure you’re already logged in),
- Navigate to the Clients page.
- Click on New client > Create one client.
- Enter a name and email. Note that you can use the same email you used for your internal user.
- Copy the invite link and paste it into a browser tab. Or, send an email invite to yourself and log in from the provided link.
- Activate the test client.
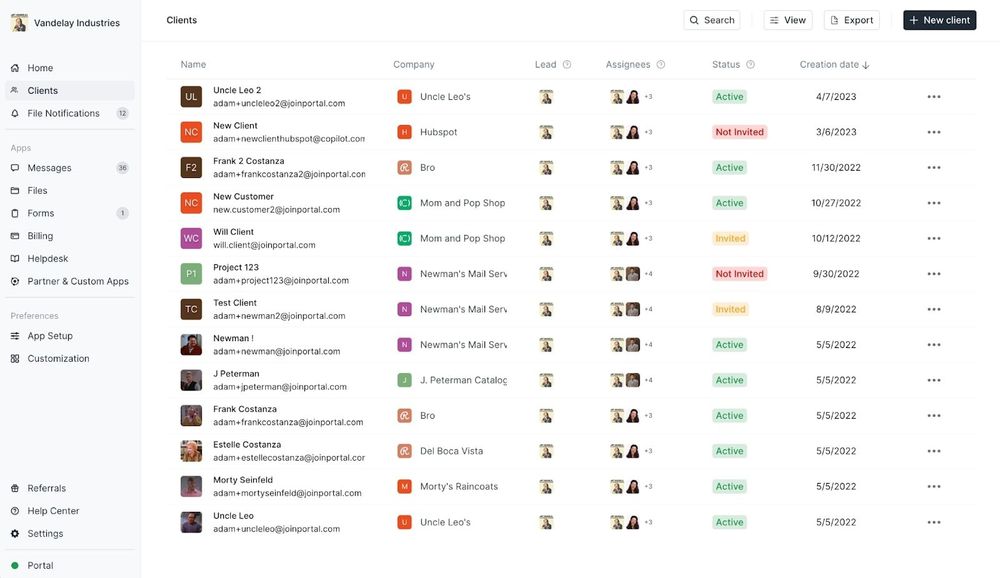
Now, you can see all your clients in the ‘Clients’ tab of your admin portal.
Once you find your way in Copilot, you might want to personalize your domain to match the branding and URL of your Webflow website. Copilot provides a collection of YouTube tutorials that can help you with this process, and various other tasks. However, I will provide a quick explanation of this in the section.
4. Customizing your client portal experience
With Copilot, you have the ability to customize a handful of things like how your sidebar looks, logos, analytics codes, colors, and even the name that shows up for your brand.
For this guide, we will focus on customizing the name of our website URL, also known as our "domain." To make sure that your Webflow site has a client portal with a name that aligns with your brand, navigate to the admin area. Locate the "Settings" option at the bottom corner.
When you do this, the side menu will change in the display settings. Now, look for the option labeled 'Domains’. Click on it.
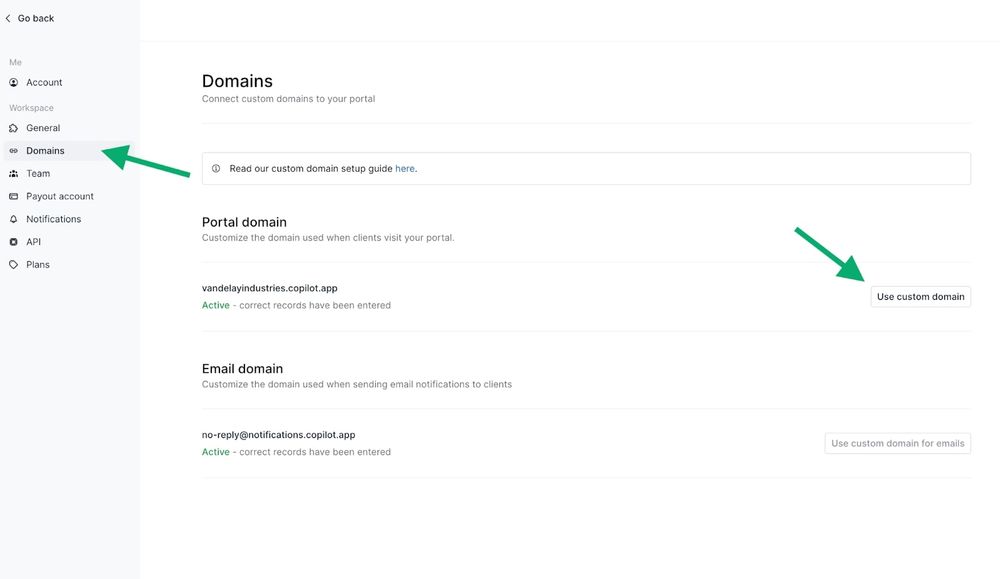
When adding a client portal to your site, many users prefer assigning it has a subdomain on their main Webflow domain. For instance, if your primary Webflow website lives on yourwebsite.com, you can have your client portal live on portal.yourwebsite.com. While "portal" is a choice among most businesses feel free to select any name you prefer.
If you opt for this approach, you will need to configure your subdomain in the DNS settings of your domain registrar. The specific steps may vary depending on where you purchased your domain name. However, there is no need to worry — Copilot has a step-by-step guide on how to do this here.
In our example, we have our main site on copilot.app. However, our exclusive Copilot client area can be found at vandelayindustries.copilot.app. This is the address we will link out to on our Webflow site.
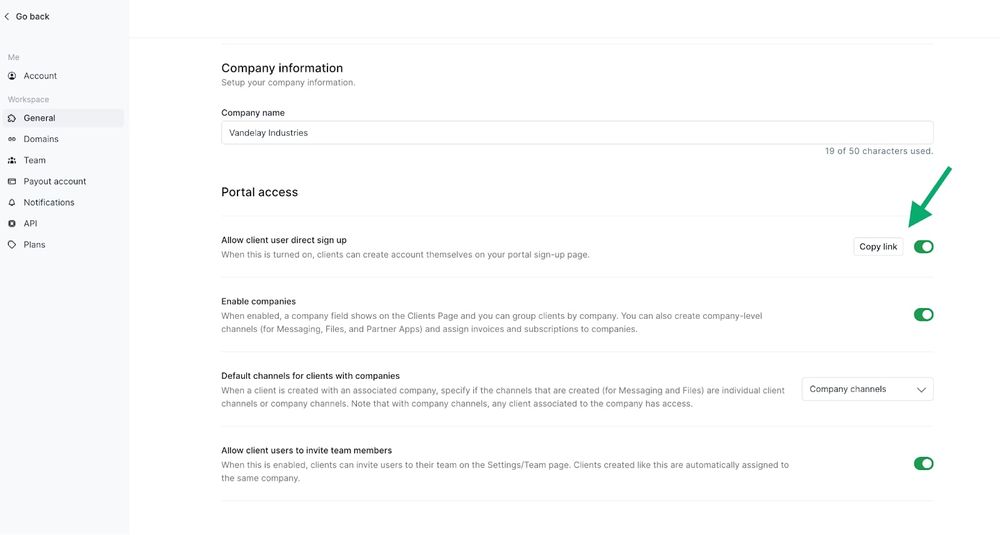
Before we proceed with that step, let's go back to your portal settings and navigate to the 'General' tab this time. In this section, you should enable the option that allows clients to sign up directly from your website called "Allow client user sign up."
You’ll also want to make sure to click on the "Copy link" button. This copied link will be used for our sign up button on our Webflow website.
Now let's dive into how we can make all of this come together!
5. Connecting your client portal to Webflow
Finally, this is the part where we make our Webflow client portal come to life. Because we already went through the process of setting up our website in part two of this guide, this section should be fairly quick.
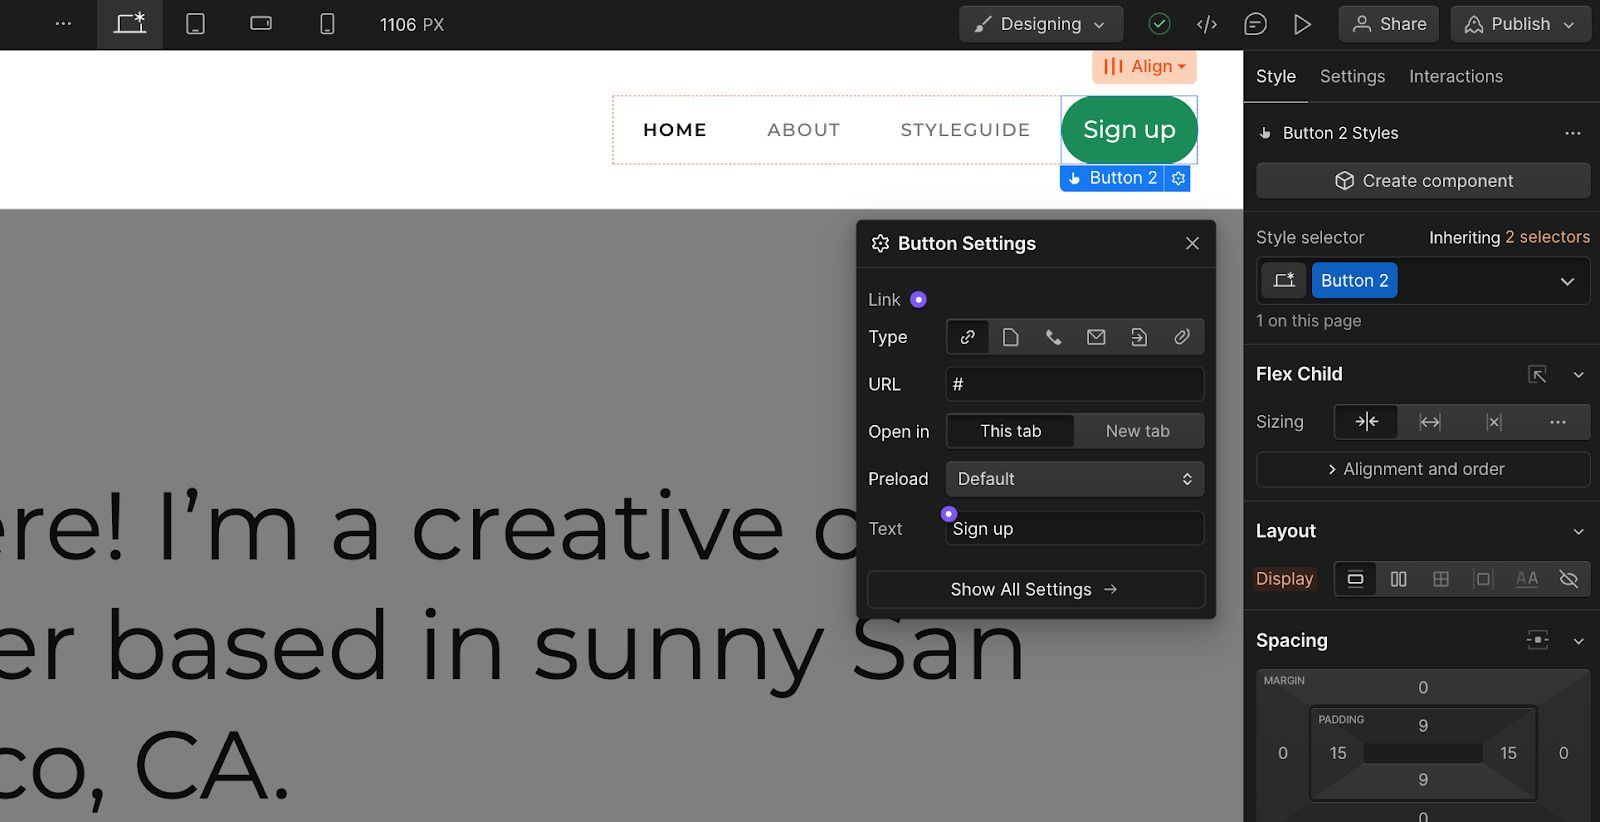
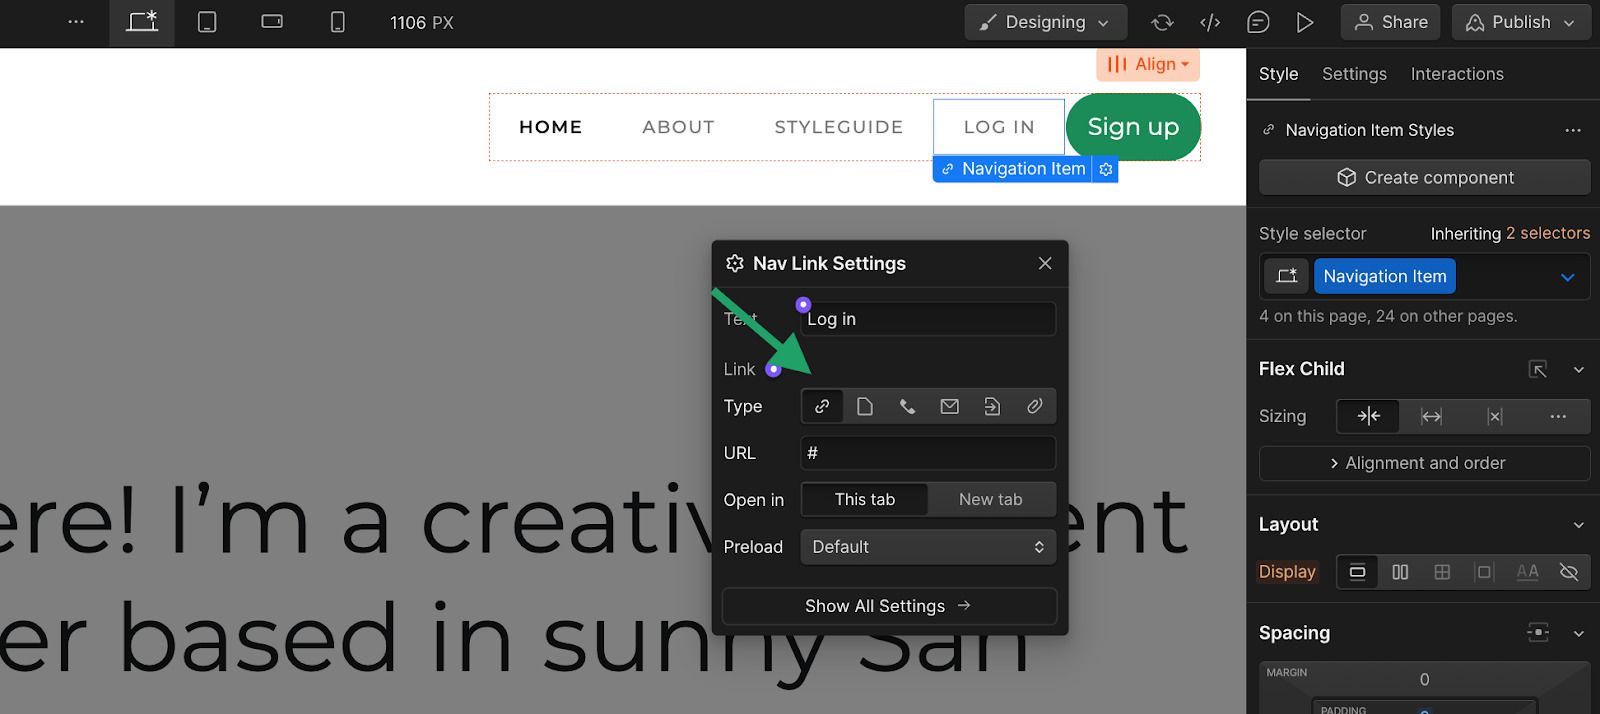
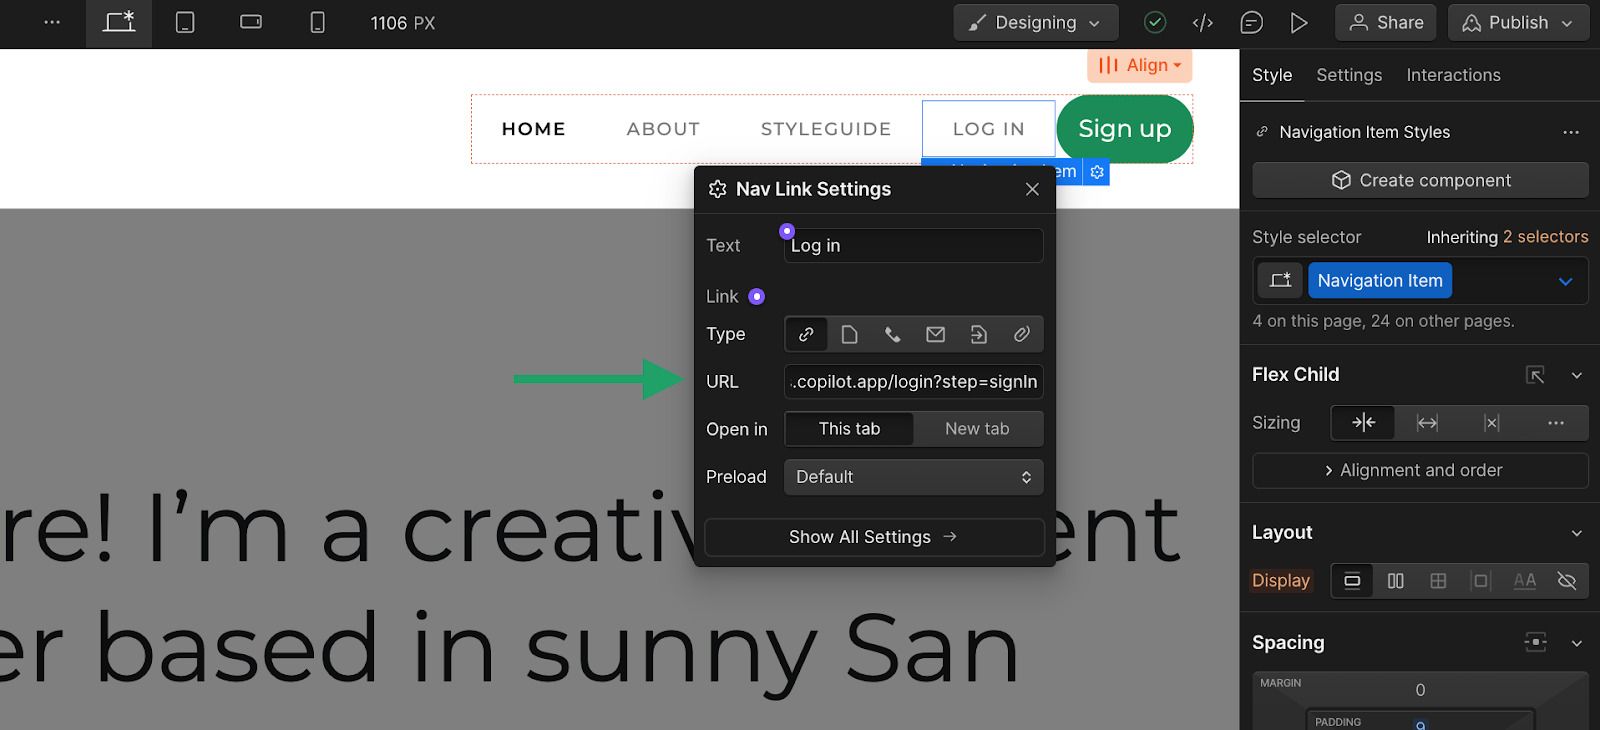
The first step is to go back to our Webflow Designer. Double-click on the navigation bar and click on the ‘Sign up’ button we created earlier. When you click on the button, you’ll see a small settings gear icon. Click on it.
Now, just paste the sign up link we copied from the previous step (see the last screenshot above).
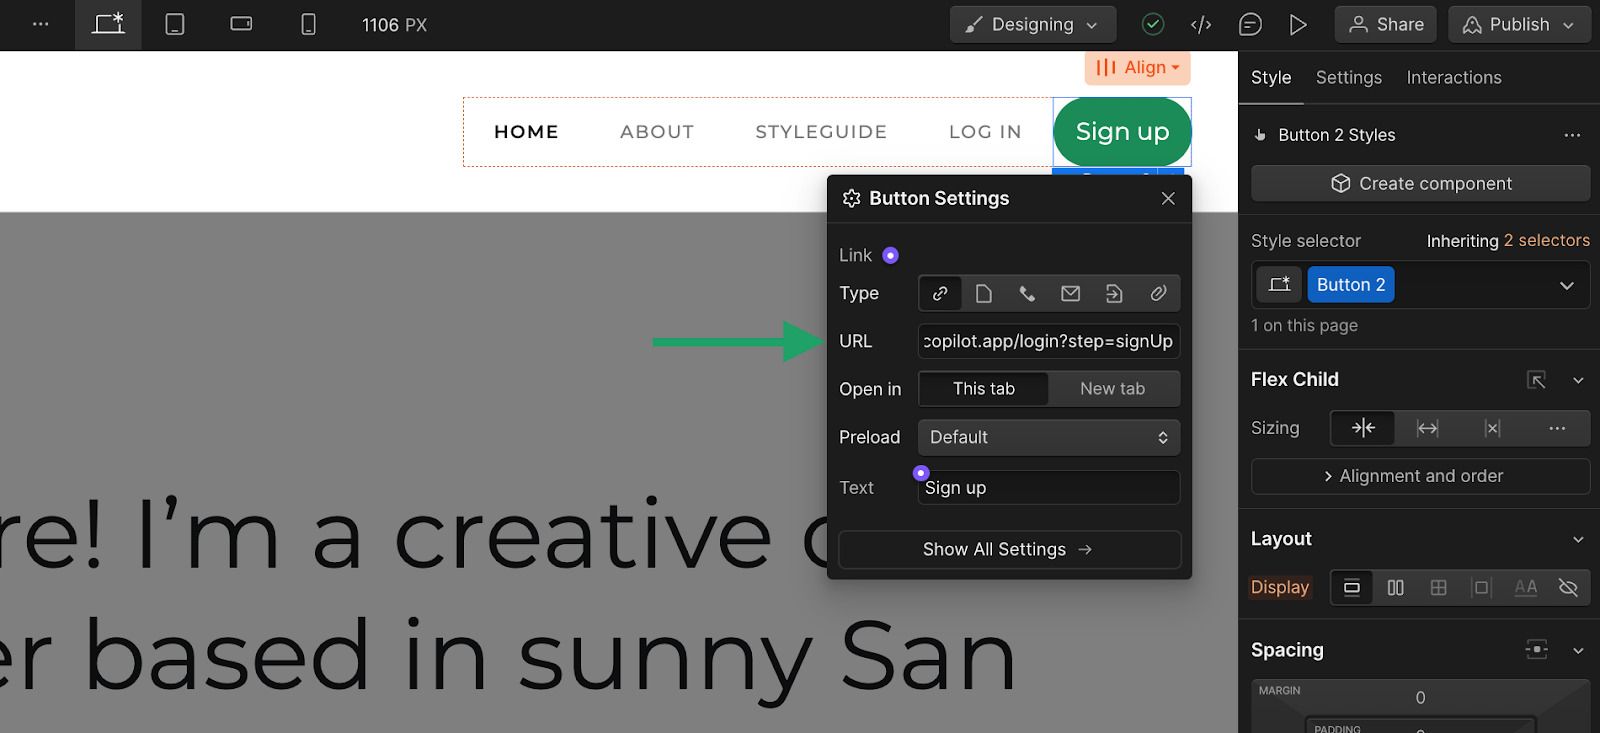
You can also set this link to open in a new tab if you’d like. It’s just a personal preference. For this example, I’m just going to have it open in the same tab.
And there we go! Here clients can sign up via Google or their own email.
Just to note, your sign up page can also be customized with your own background image and logo (the example is from the demo portal).
Okay, now let’s make our ‘Log in’ button work. This is going to be a very similar step to getting the sign up button to work. But, we’ll need to copy our log in link this time. To get this link, click on “Already have an account?” on your portal sign up page.
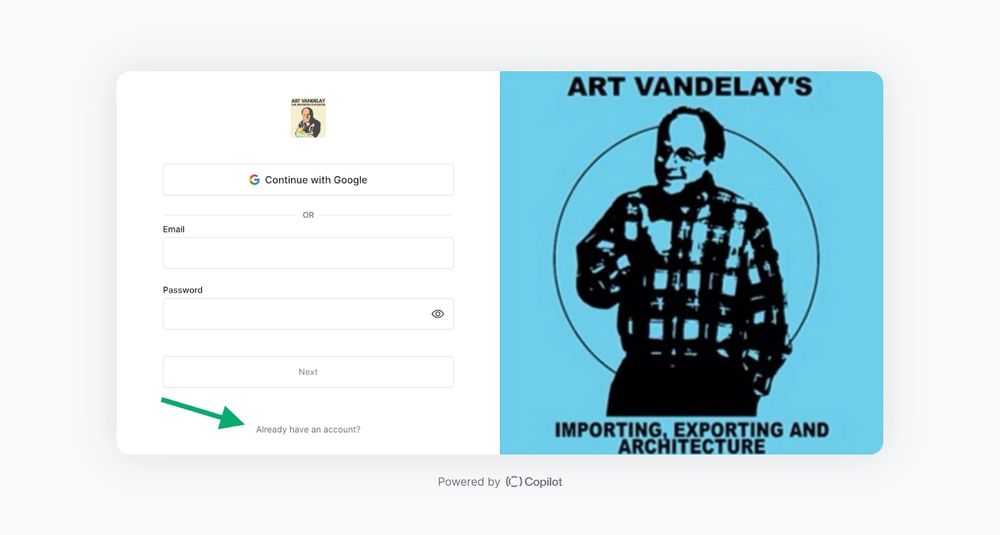
This will open your log in page for your client portal. The URL will have a small difference compared to your sign up link — having ‘?step=signIn’ at the end of your client portal login URL.
Copy the link of your log in page and head back to your Webflow site editor to paste this link into your ‘Log in’ link button.
Now, let’s test the ‘Log in’ link.
Great! Now we have a fully functioning Webflow client portal.
6. Maintaining and updating your client portal
Once you've finished creating a client portal for your Webflow website, it's important to keep an eye out for integrations that can enhance your Copilot client portal based on the needs of your clients.
Integrating apps with Copilot is similar to tending to a garden — it requires maintenance, occasional pruning, and a keen eye for improvements.
Your clients are the ones who truly understand how well things work since they use them daily. Gathering their feedback through the Copilots forms feature will help you identify areas where enhancements can be made.
Depending on the services you offer, you can also incorporate features like content calendars, SEO dashboards, spreadsheets, and much more directly into your client's portal for easy access.
Copilot Automations also allows you to streamline your client onboarding process and automate repetitive tasks within your workflow.
The look of your client portal also matters. If you notice any branding updates over time, such as changing button colors, feel free to make those adjustments. While UX is important, your UI is what your clients will be looking at every day — so make it pleasing to the eye.
Conclusion
Congratulations on navigating the process of setting up a Webflow client portal! We began by creating our Webflow website and making sure that the essential ‘Sign up’ and ‘Log in’ buttons were in place. Then we discovered a no-code client portal builder like Copilot, which made it incredibly easy to integrate a client portal with our Webflow website.
Finally, we enhanced the user experience within our client portal by customizing its features to perfectly meet the needs of our clients. As you move forward, it's important to remember that regularly updating and maintaining this new client portal is also crucial. It's not a one-time setup. but rather an evolving tool for efficient client communication.
Share this post
Sign up for our newsletter
Subscribe to our newsletter to receive emails about important announcements, product updates, and guides relevant to your industry.
