Back to Blog Home
How to create a Notion client portal to win more clients

When I left my 9-5 career to become a content marketing freelancer, the first app I downloaded on my Mac was Notion. I quickly began creating process docs, editorial calendars, and SOPs for how I was going to run my business.
But, as I started to sign clients, I came to realize that clients really care about work visibility and the overall experience.
The truth is, most service providers don’t offer a great experience for their clients. Often, when I sign a new client, I hear complaints about how they didn’t like the interaction they had with a previous agency.
This led me to become obsessed with my own client experiences. And being a big fan of Notion, I started looking around on the web on how I could create a Notion client portal.
The thing is, Notion is great at project management. And there are a lot of great guides on how to create a client portal with Notion (hopefully, like this one). But many of them don’t mention that a client portal is more than just project management.
Whether you're a design agency, a boutique marketing agency, or a freelancer, chances are you’re juggling a lot of different tasks. From finding clients and closing deals, sending invoices, and managing client projects.
In this article, I’ll go over how to think holistically about everything in your service-based business and how to use Notion successfully. On top of that, I’ll also go over how you can use Notion in tandem with more robust no-code client portal builders to create a client experience that puts you in the top 1% of service providers.
Alright, let’s dig in.
How to use Notion as a client portal (in 5 steps)
Notion is an amazing productivity tool. While it’s not really designed to act as a client portal, many users create custom solutions to manage their client projects with it.
I’ll walk you through four steps on how to approach using Notion as a client portal, with the first step going over what you need to know about Notion when interacting with clients. Alright, let’s get started.
Here are four steps to creating a Notion client portal:
- Understand Notions flexibility for client portals
- Setting up your workspace (with templates)
- Integrate client portal features
- How to create a collaborative workspace (that’s safe)
Let’s go over each step in more detail.
1. Understand Notions flexibility for client portals
At its core Notion is a blank canvas to manage all of your projects — from work responsibilities to personal tasks. This means you can create whatever workflow you want.
Generally, Notion is used by companies to manage their project tasks, knowledge base, and internal documents. To be honest, it’s a great platform for task management and I use it every day. Well, every “work” day. But you get the point.
However, some service-based businesses, like freelancers or agencies, attempt to use it as a client portal tool. And while it’s certainly possible to use Notion as a “client portal,” and I’ll show you how in this section, it does come with its limitations.
I’ll go over more of the limitations in a section towards the bottom of this article, but the main ones to be aware of are its sharing capabilities and billing.
If you have zero employees and you’re essentially a freelancer, Notion is great to start managing your client projects with because it’s virtually free. It’s the tool I used when I first started my freelance marketing business.
The tricky thing here is how you give access to your internal team and external clients (you don’t want clients accessing information from your other clients or your sensitive company information).
There are two paths you can take here.
Path 1 is to publish your Notion pages publicly and share the link. This is free to do, but it’s not secure as anyone with the link can access the page.
Path 2 is to invite clients directly to your Notion account so they can access their client portal. This way is secure, but you have to pay per person you add. This can quickly become expensive.
And if you want to give clients some editing access (like when they need to sign a contract you uploaded or send a support ticket for your team), you’ll also have to pay from day one.
But, this doesn’t stop people from creating custom solutions to manage their firms or agencies. So, let’s go over how to use Notion as a client portal.
2. Setting up your workspace (with a template)
Because Notion is such a versatile tool and can be used for so many different use cases, how you set up your workspace is totally up to you.
But that’s not a really helpful answer on how to set up your workspace, so I’ll go over some things you should be cognizant of as a business working with clients.
Here’s the thing: your client experience is the most important thing in your business. Better client experiences lead to more referrals, which leads to more deals and money in your pocket. At its core, this is why service providers start to think about client portals and giving their clients a central place to get a birdseye view of what’s going on with their working relationship with you.
Let’s go over what your client portal should have.
What your client portal should have
Your client portal should be a balance between internal organization for you and your team and also a place where you can create an amazing client experience.
Let’s split this up into two sections: 1) What your client portal needs for your internal team and 2) what your client portal needs for external clients.
Here’s what a good client portal needs for your internal team:
- A billing and subscription management center where you can send branded invoices and create recurring subscriptions so you won't have to constantly hunt down unpaid invoices
- A CRM to manage all the clients you’re working with (and check on unpaid invoices and project progress)
- A place where you can upload contracts to be signed via eSignatures
These are some of the core features you need internally to make sure you’re getting paid and managing all your legal stuff. You also need some other things, but these are also things your client will need as well. So, let’s go over those.
Here’s what a good client portal needs for your clients:
- An onboarding section equipped with intake forms and questionnaires
- A project management section that shows timelines and tasks to be done
- A document hub where you and your client can upload documents to be reviewed and/or signed
- A communication center where you can talk to your clients and give them a place to give you feedback or additional request
- A resources hub, or helpdesk, where clients can answer their own questions without having to ping you or your team
Okay, now that we know what a robust client portal should have, I have some good and bad news. The bad news is that Notion does not have some of the core features you would expect from a real client portal platform — like billing and eSignatures.
The good news is that some of the core things you need to create a solid client experience can be done in Notion. And the other good thing is that Notion has tons of templates you can use so there’s no need to start from complete scratch.
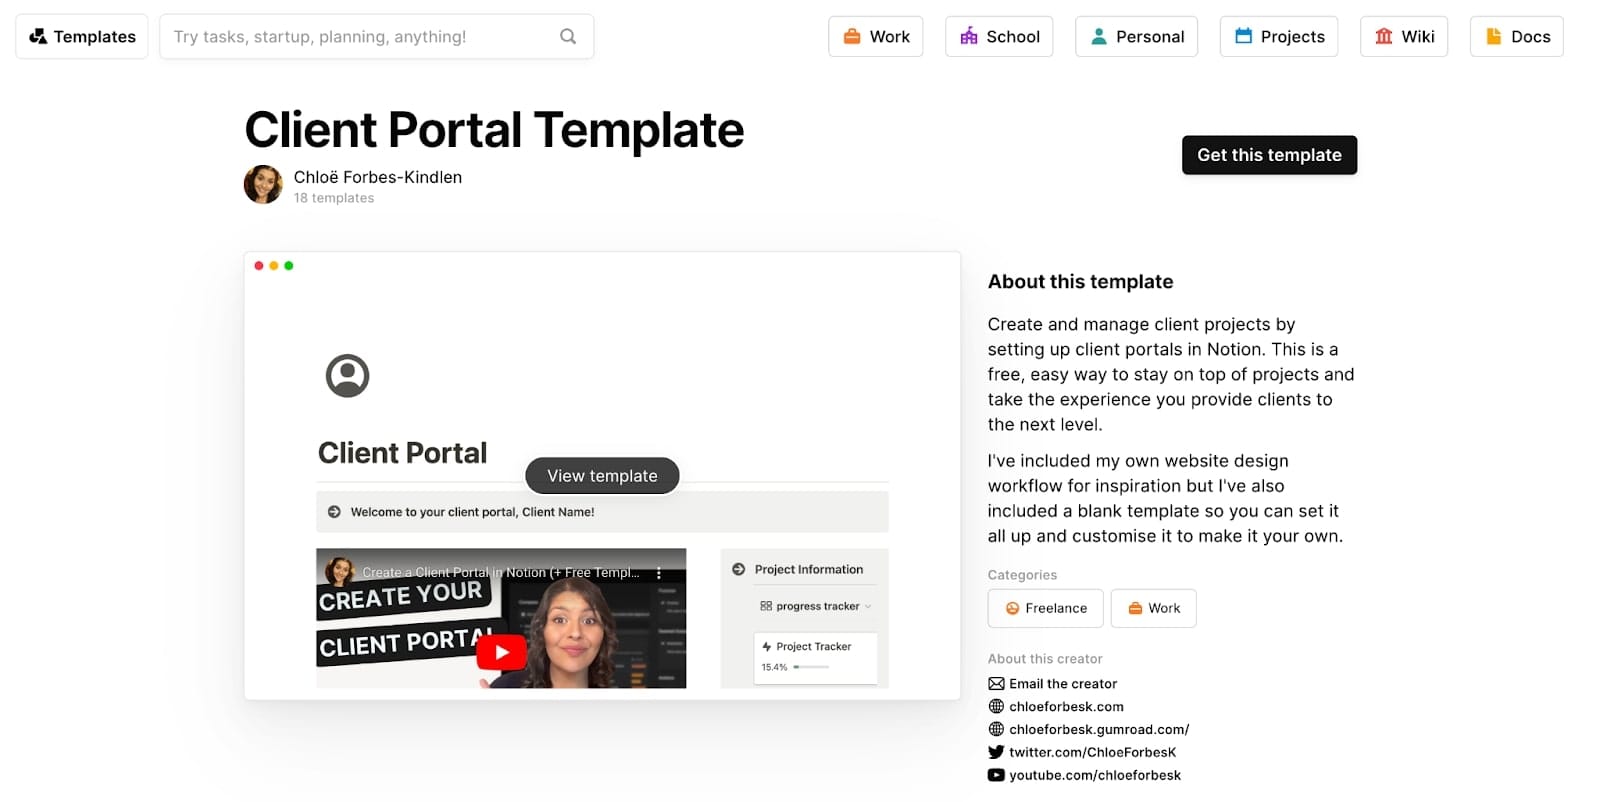
For the sake of this article, I’m going to use a free Notion client portal template created by Chloë Forbes-Kindlen.
Once you add this template to your Notion workspace, it will look like this:
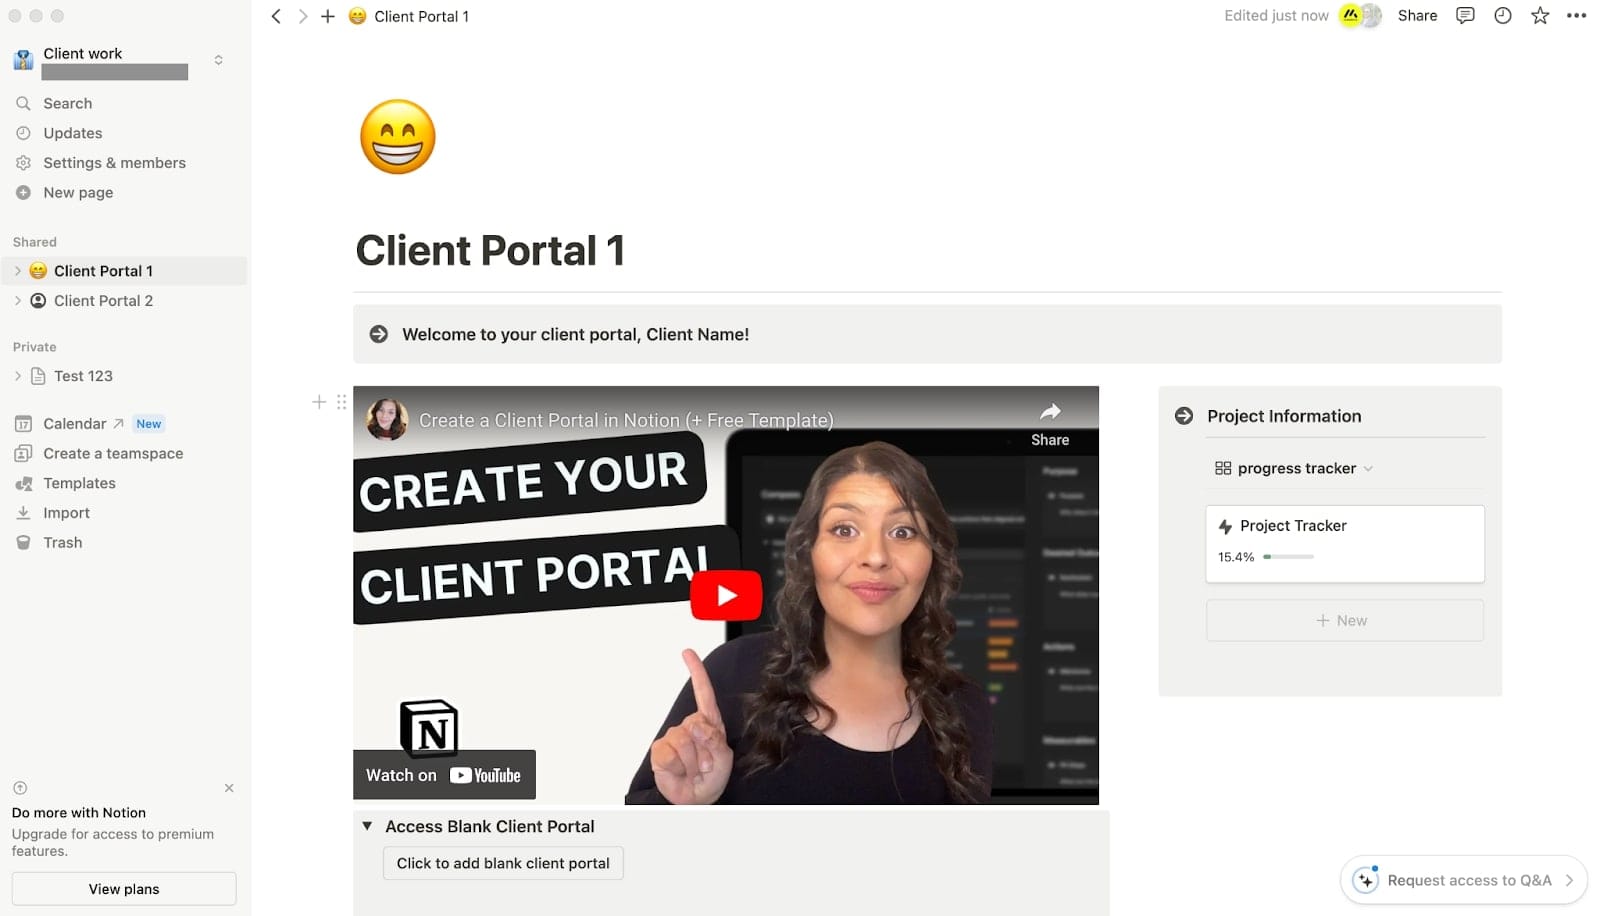
Chloë has a video that walks through the entire client portal which is a huge bonus. In fact, if you decide to use this template as your client portal, the video embedded in the template is a place you can use to upload a Loom video for your clients on how they can navigate their portal.
This template is split up into five sections:
- Project steps
- Project timeline
- Documents
- Meetings
- Resources
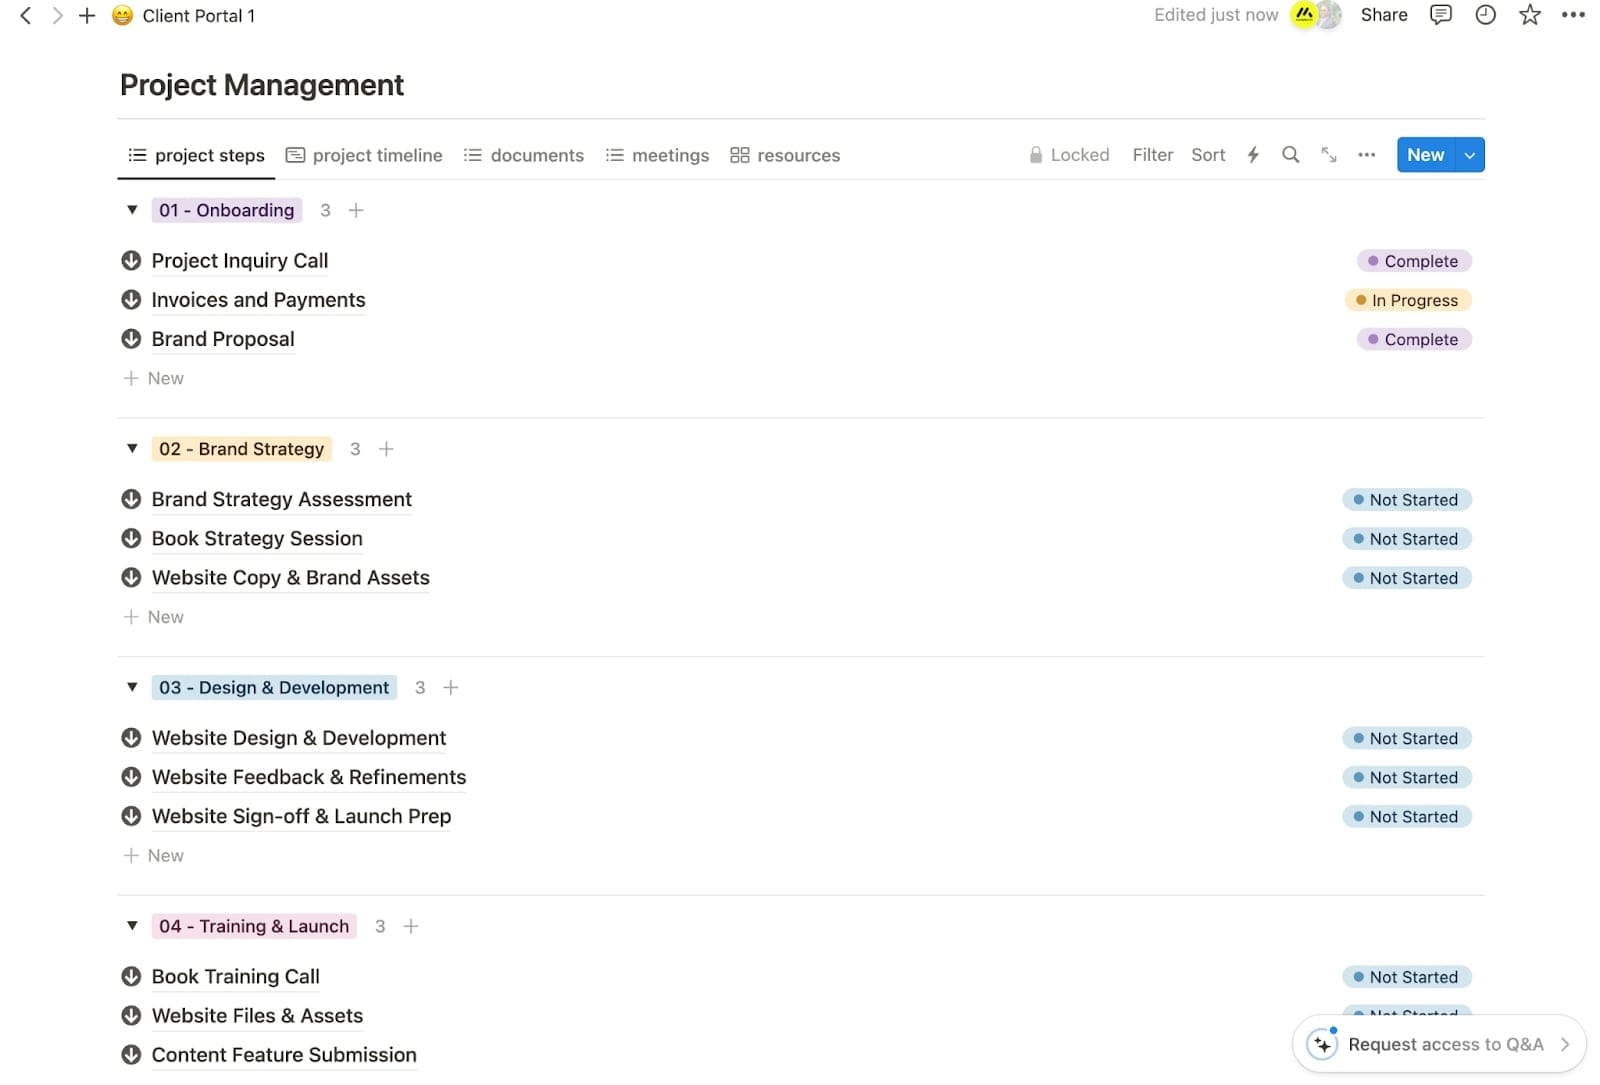
Project steps are essentially where you can track what you need to do for each client you sign, from onboarding to shipping tasks.
This template is primarily designed for design and marketing freelancers, but you can easily edit the text to what is relevant for you.
I’m not going to go into too much detail on all the features in this client portal, but hopefully, by now you understand what you should be looking for in a Notion client portal. If you want to learn more about how to navigate this template make sure to watch this video:
But what I will go over are the other tools you’ll need to integrate with this template for it to become a somewhat robust client portal. Let’s go over those.
3. Integrate client portal features
Besides being just a project and task management tool, if you want to create a comprehensive client portal with Notion you’re going to need features like invoice generation, contract generation, calendar/meeting management, and billing features.
The Notion template we are currently using does have a few sections where this can be added to the client portal. For example, you may want to use a tool like Calendly to set up video calls with your clients.
In the “Onboarding” section of the Notion client portal, there’s a section called ‘Project Inquiry Call.’ Clicking into this section shows this:
Chloë has left a section called ‘[Insert scheduler]’ (see green arrow in the screenshot) where you can add either a Calendly link or an embed. Luckily, Notion has an integration with Calendly that you can use and add to this section.
For this section, what you can also do is create a client intake form. So instead of hopping on a call (after you’ve already signed a client), you can request information async. But more on this later.
The other important thing you need to integrate with this Notion template is a payment solution so you can get paid for your services.
In this template, there’s a section called ‘Invoices and Payments’ that looks like this:
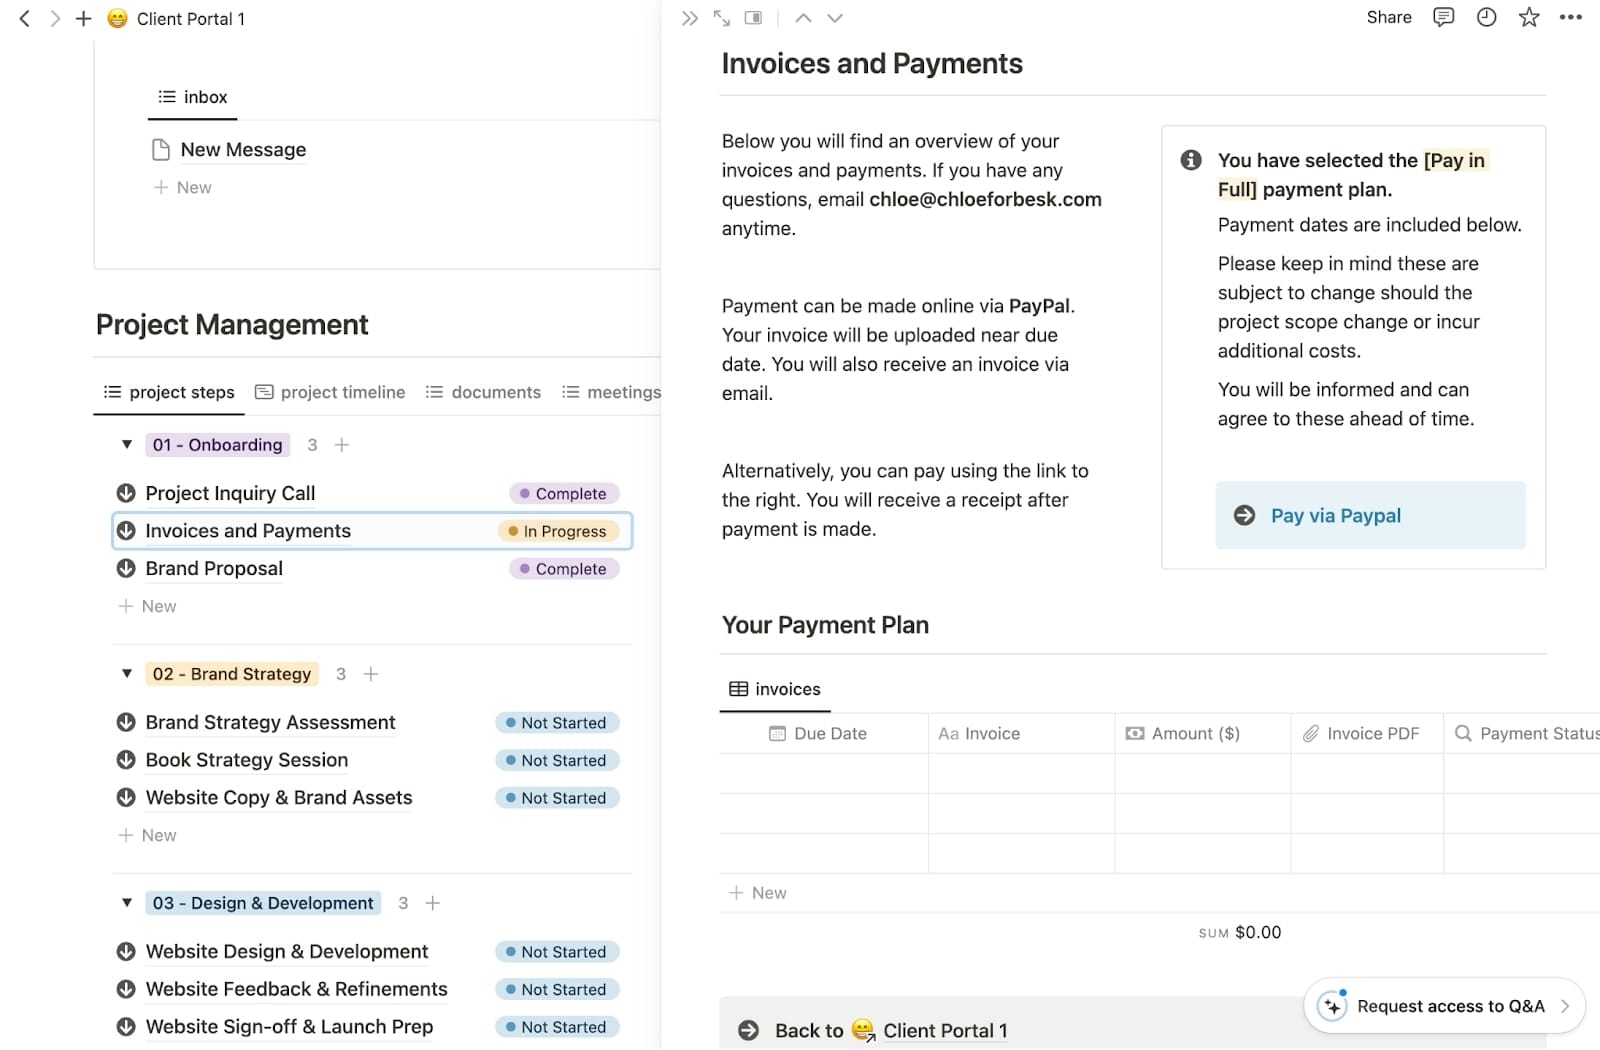
Here you’ll want to replace the text with your own email and method of payment. In this case, the template mentions the use of PayPal. But you can also replace this with a commonly used tool like Stripe.
Many service businesses love Stripe because you can create payment links and simply link out to a checkout page via your Notion client portal.
For me personally, I love Stripe payment links. But you do end up having to pay a small transaction fee which you can either put on your client or yourself. But if our goal is to create a great client experience, we generally don’t want to put those transaction fees onto our clients. And it’s also not ideal for us to lose a percentage of our hard-earned money to a payment gateway system.
So, what many freelancers, myself included, opt for is direct ACH bank transfers. This will require you to generate an invoice that you then send to your clients, along with your banking details, to be paid manually. It does take a bit longer for the money to hit your bank account this way, but you avoid paying transcription fees and maximize your profits as much as possible.
For this, you’ll ideally want a client portal tool that can generate branded invoices, or because Notion doesn’t have this, you’ll want to use an invoice generator like this one.
If you opt for the invoice route, you can download your invoice as a PDF and upload it to your Notion client portal where your client can access it. But, from personal experience, it's usually best to just email the invoice to your client so you can CC anyone (like a finance or accounts payable team) who fulfills your invoice.
Okay, so far we’ve created a client portal in Notion using a template, we went over what features you need in a client portal (both from an internal and external standpoint), and we went over what needs to be integrated with this template to make it feel more like a real client portal.
Now, we need to make sure that there is a seamless interaction between you and your clients within your Notion client portal.
4. How to create a collaborative workspace (that’s safe)
Sometimes client data is sensitive. You may even be required to sign an NDA (non-disclosure agreement) before you begin working with a client. Because of this, you want to make sure that everything is secure and can’t be accessed by anyone else publicly on the web.
Also, if you’re working with multiple clients at a time, you don’t want one client to be able to access another client’s client portal.
In this case, you’ll need to invite individual users to their own client portal in Notion. In Notion, you have Workspaces and Shared Page. Your Workspace is essentially your own company. But the Shared Pages are your individual clients.
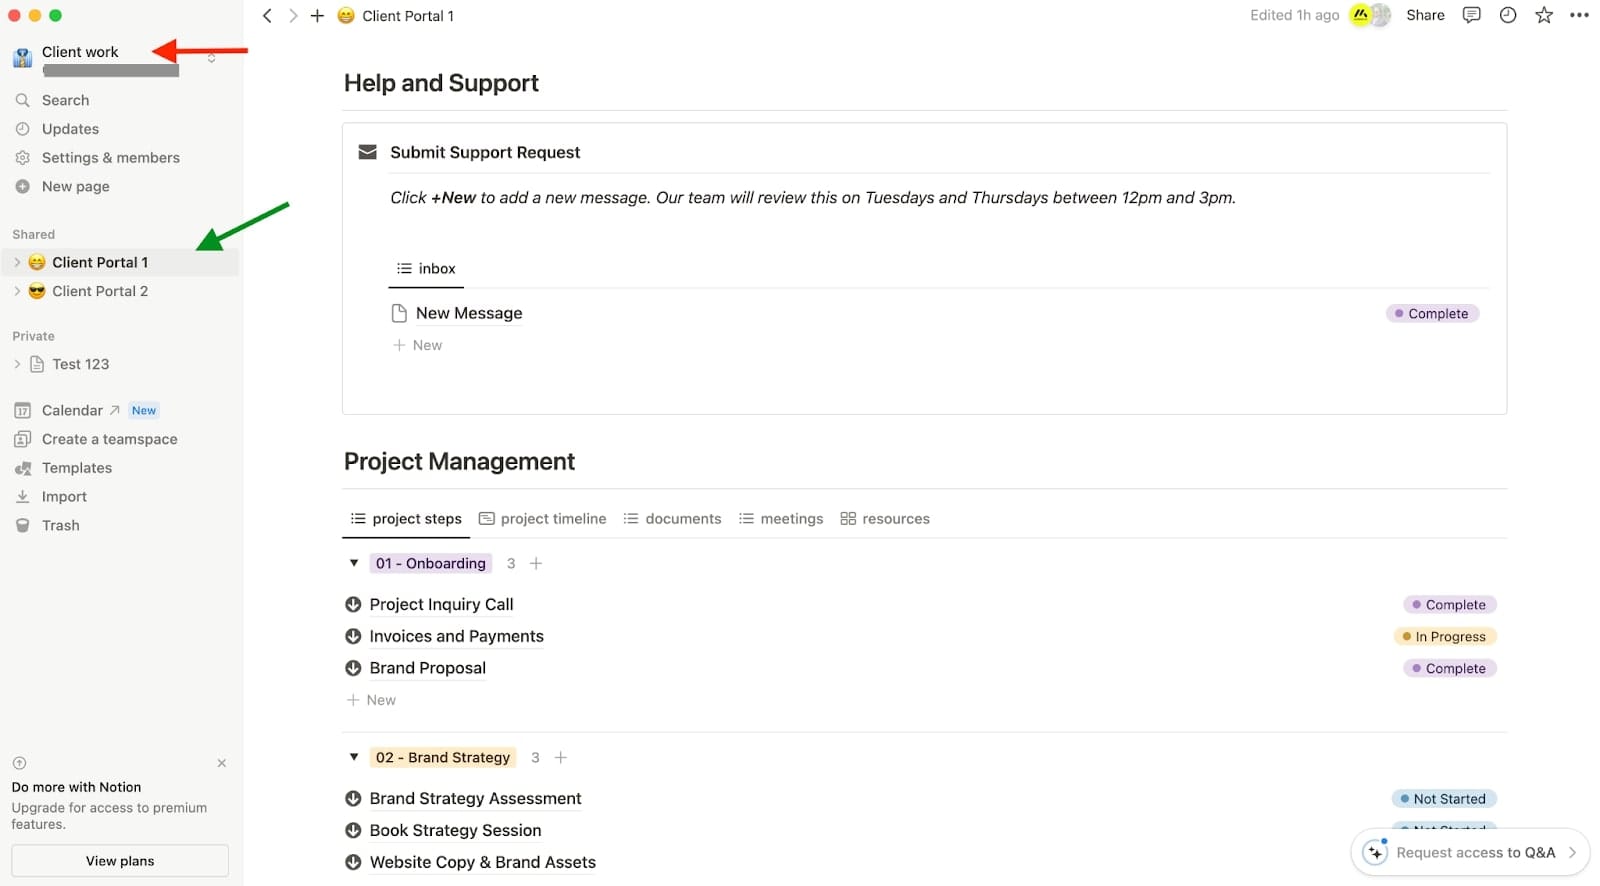
In the screenshot above, the red arrow indicates the Workspace and the green arrow indicates the Shared Page. I’ve labeled two different clients, ‘Client Portal 1’ and ‘Client Portal 2’. When you invite your clients, you are going to invite them only to their individual Shared Page. They will be able to see your company name, which in the case of the screenshot I’ve labeled as “Client work.”
But, they won’t be able to see your other Shared Page when shared correctly. As in, Client 1 won’t see that there’s is another shared Shared Page called ‘Client Portal 2’.
To invite someone to their Shared Page, you want to click on the ‘Share’ button in the top right of your Notion client portal.
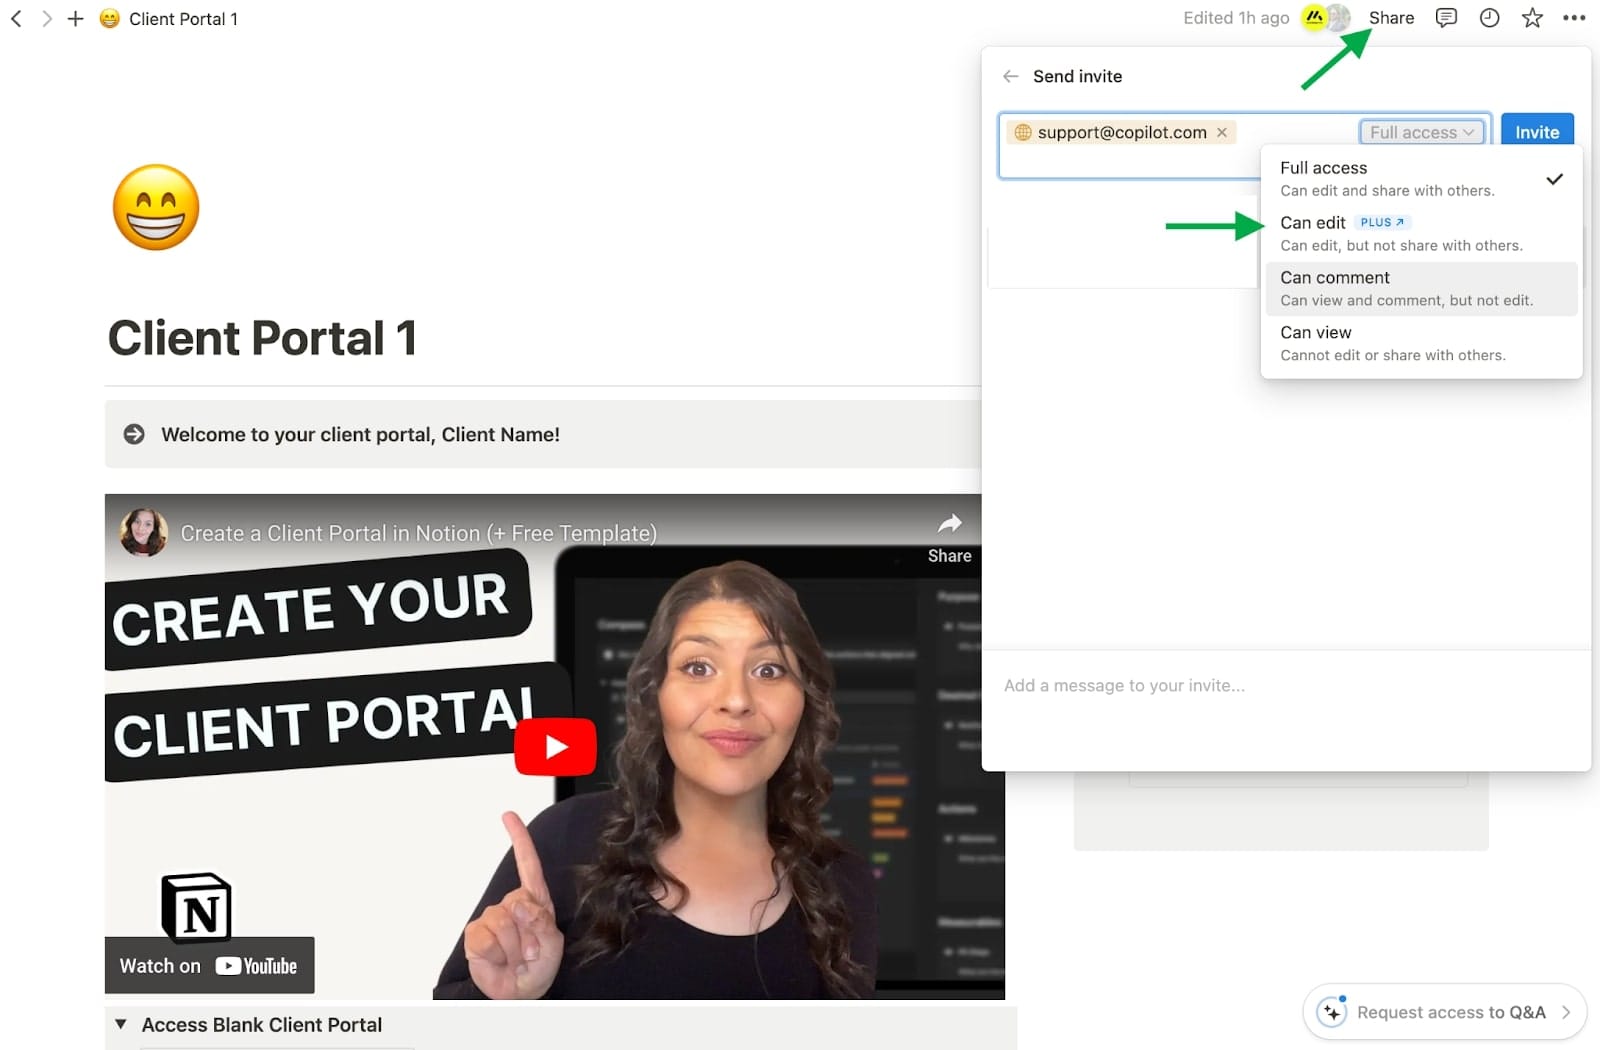
Then, you simply add their email address so they can get an invite to join via email. When you do enter their email, you will be given a few permission options.
Ideally, you want to click on the option ‘Can edit’ so your client can go through and add support tickets or upload any documents like signed contracts. This feature, however, requires that you upgrade from your free plan — which will run you $10 per month for each person you add.
This is where some freelancers and agencies run into their first main issue when trying to use Notion as a client portal. The costs can rise very quickly. You might have a client that wants to add a handful of users. Or even when you have multiple clients, you’ll have to pay for each person you add that can edit.
Regardless, now you know how to set up a client portal in Notion. To be honest, it’s pretty straightforward because you can use a template. And there are plenty of premium templates that are also great.
But, besides using a template, you need to know what features matter for your business and for your clients. You also need to know what extra tools you need to use and integrate with Notion to create a seamless client experience.
Because of this, while Notion is a great task management tool (honestly probably the best out there), it may not be the best option for creating white-label client portals.
Limitations of Notion as a client portal
Agencies and freelancers like using Notion as a client portal because they can manage different project stages in their business. Often, I’ve heard people who use Notion as a client portal say that they love how their sales team can manage deals and what stage they are in, and that their account managers can also manage project tasks and timelines — all in one place.
And for these use cases, Notion is great! At the end of the day, it’s a project management and productivity suite.
But some things Notion falls short on (because it’s not really intended to be a client portal) include:
- Having to pay per individual user and client you onboard (raising costs way up)
- No way for clients to sign up or log into their client portal with their own account or through Google authentication
- No messaging options
- No invoicing or subscription payment options
- No white-labeling (can’t customize each portal to fit your client's brand)
- No built-in contract and proposals
- No seamless integration with an existing website
This is why many service providers opt-in to use a dedicated client portal software — especially, if you already have a portfolio website (as a freelancer) or an agency website.
At the end of the day, your client experience is the most important thing as a service provider. Of course, the work and results you deliver are super important. However, how your clients’ perception of you will determine whether you get a consistent stream of clients through word-of-mouth referrals.
This is why I moved away from using Notion as a client portal. Don’t get me wrong, I still use Notion every day as a project management and editorial calendar tool for my content marketing agency.
However, I manage all of my client interactions and payments with Copilot. And no I am not an employee of Copilot. I’m a customer, which is why I was invited to write this article.
But, I’m not here to throw shade on Notion or say that you have to use either Notion or Copilot. You can actually use both because Copilot is like a central client portal that can easily integrate with pretty much any software you can think of. There’s also a Zapier integration for Copilot so you can create tons of automations in your business.
Alright, let’s go over some ways Notion and Copilot complement each other.
Why you should embed Notion in a more complete client portal like Copilot
As mentioned earlier, using a tool that’s designed specifically for client portals is probably a better way to go when it comes to your client experience.
Thousands of service businesses use Copilot to manage and grow their service businesses because of its user-friendliness. Copilot’s main mission is to help agencies, firms, and freelancers create a jaw-dropping client experience. So, naturally, many of their features reflect what service businesses are looking for.
From dedicated sign up and log in pages for clients to fully customed client dashboards, you can do it all in Copilot.
The great thing about Copilit is that it comes equipped with built-in features such as:
- Automations for easy client onboarding
- Built-in messaging app with email notifications
- A billing app that creates branded invoices and recurring subscriptions
- A files app where you or clients can upload and securely store documents
- A contracts app where you can prepare, sign, send, and manage eSignatures
- A forms app where you can create intake forms and client questionnaires
- A helpdesk app where you can create a knowledge base full of content
But besides having built-in apps, Copilot also has an app store where you can integrate other tools directly into your client portal.
Tools like Airtable, Google Sheets, Looker Studio, ClickUp, Calendly, and many more. This way, if your client is already used to using a project management tool like ClickUp, you can easily embed ClickUp dashboards into their Copilot client portal.
With that, let’s get into how to embed Notion with a Copilot client portal.
How to embed Notion into Copilot
Integrating Notion into Copilot can significantly enhance your client portal by combining the amazing project management capabilities of Notion with the client-focused features of Copilot.
I won’t go into detail on how to set up a Copilit client portal but you can check out another article I wrote about it here.
Normally, project management tools allow you to use an iFrame to embed dashboards into other tools. However, Notion has implemented a same-origin restriction that prohibited iFrames on any other website.
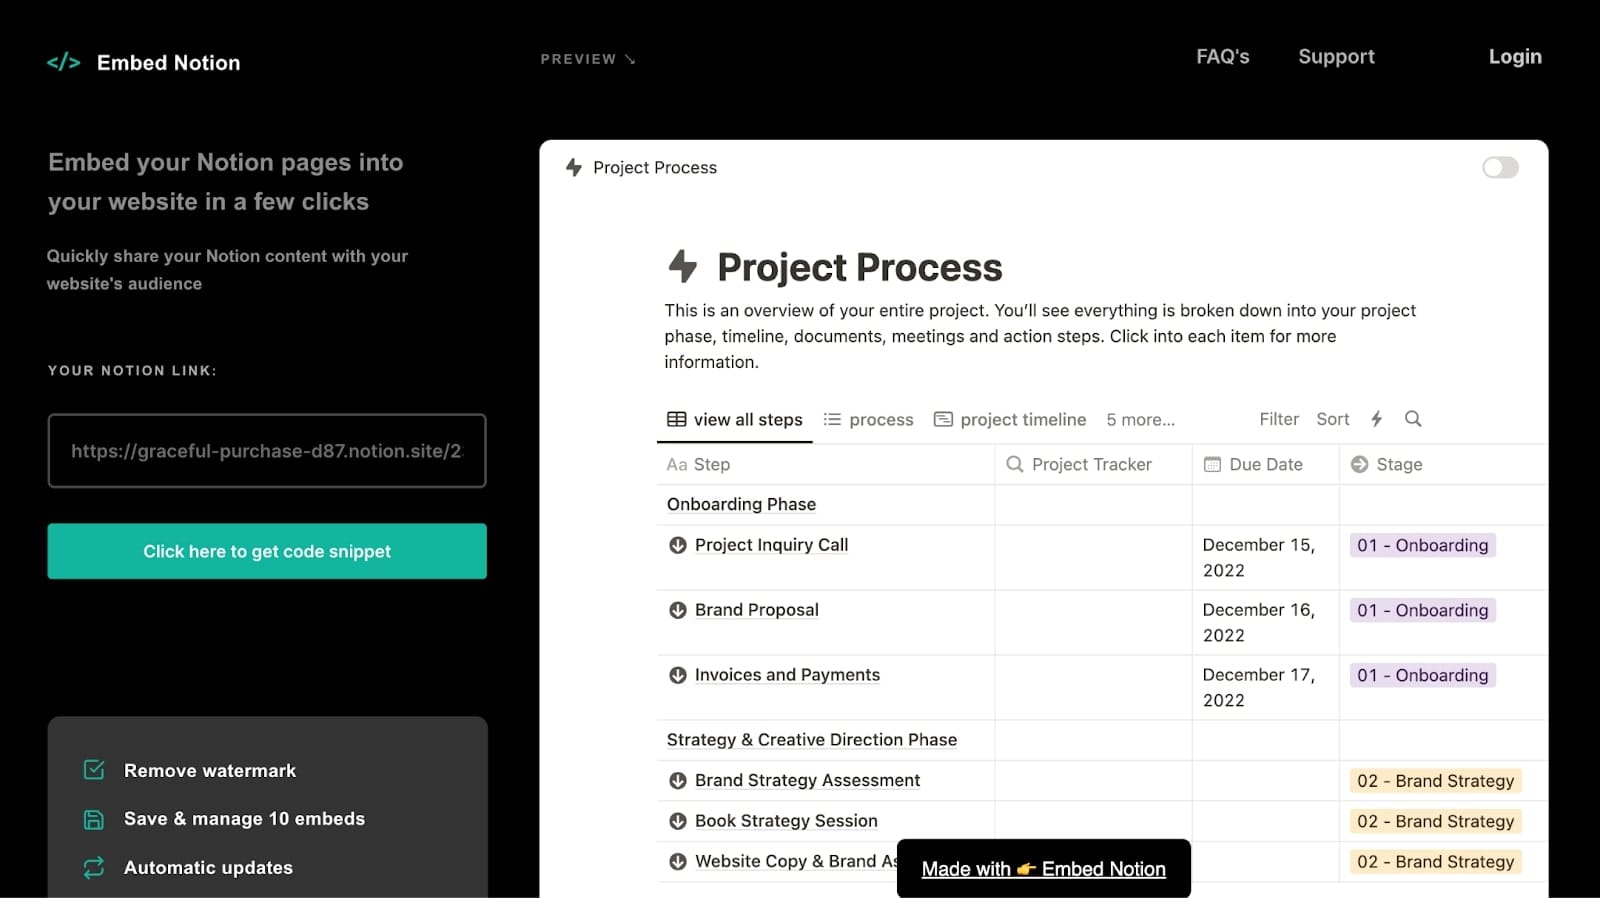
Because of this, we’ll use a tool like Super or Embed Notion to allow us to seamlessly integrate Notion with Copilot (or with any other tools for that matter).
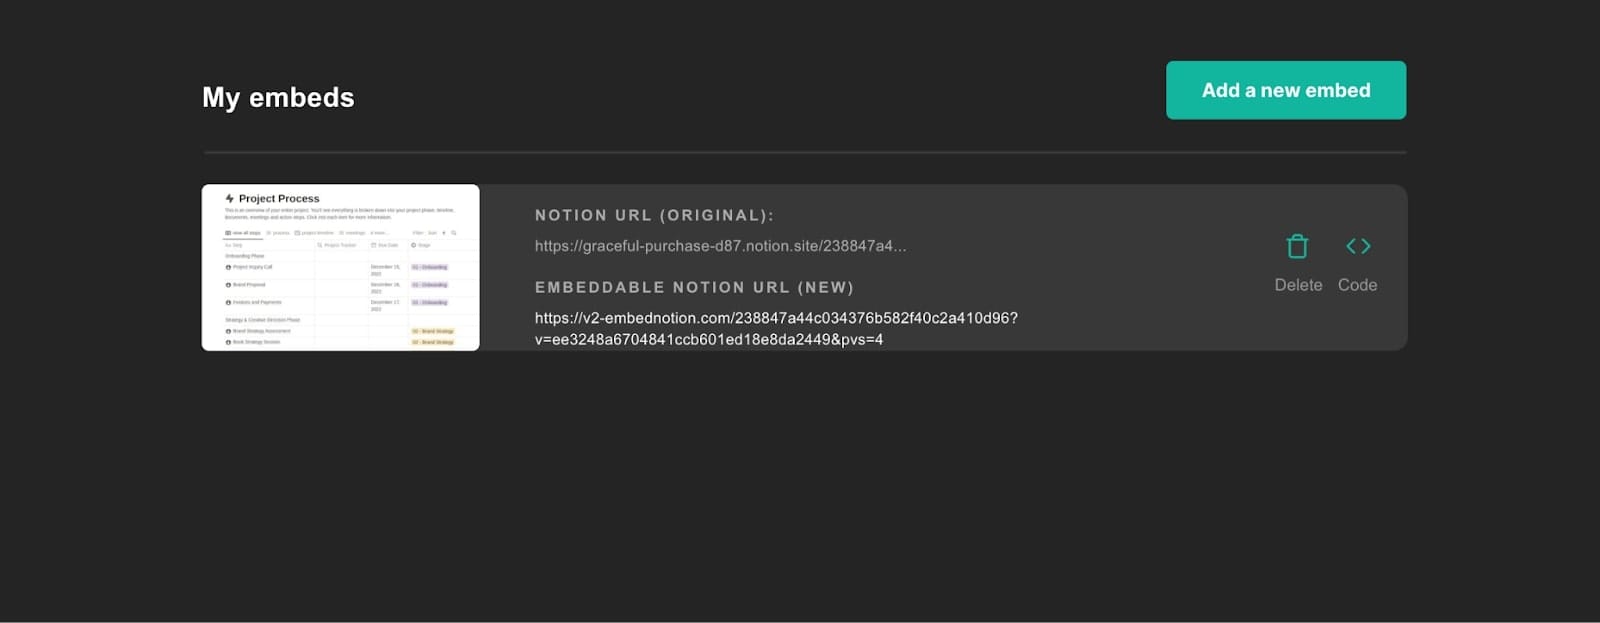
For the sake of this tutorial, I’m going to use Embed Notion (they have a free option). Once you create an Embed Notion account, you’ll want to copy your Notion client portal link and paste it into the platform.
You can find your Notion client portal link the same way you invite users to their Shared Pages (what we went over previously in this article).
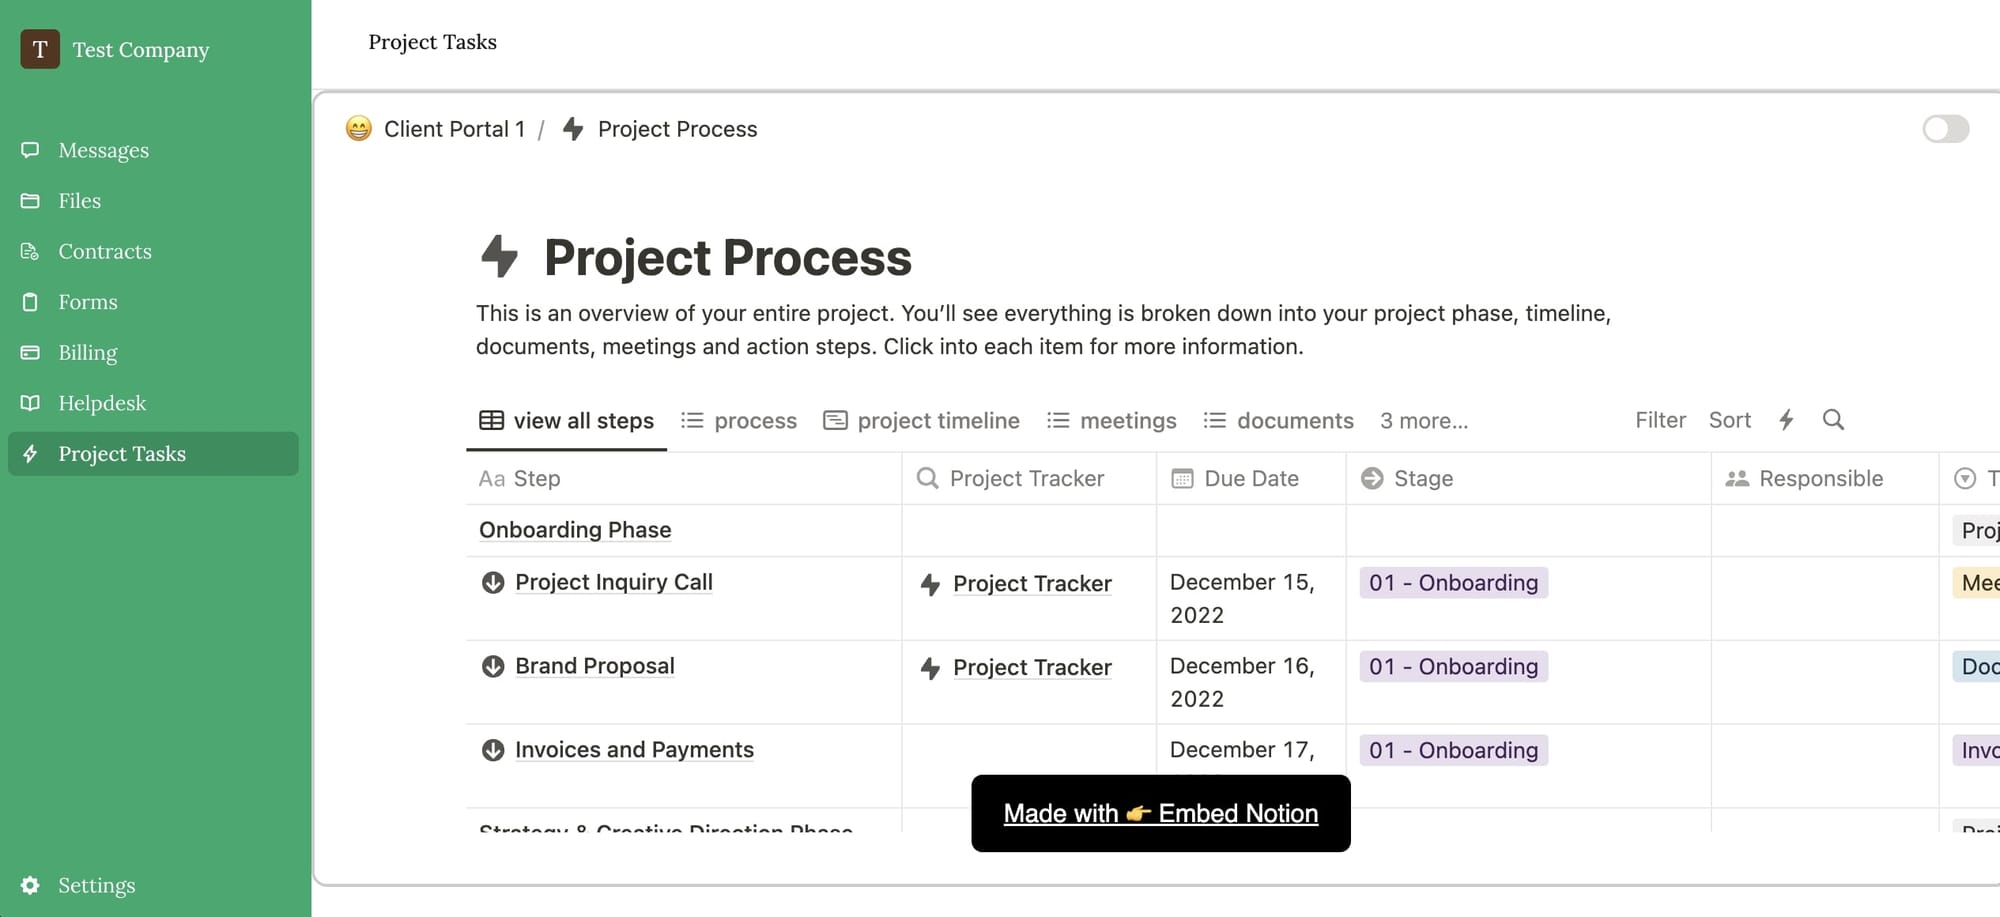
Note: You don’t want to just paste a link to your Notion client portal. If you’re using Copilot, that is your client portal. The point of using Notion is to embed the project management section into your Copilot dashboard. This is because in order to embed Notion, you’ll need to Publish your page(s). So you want to only do this with project task pages and no pages that have sensitive information you wouldn’t want live on the web.
In this case, I published the page “Project Process” in my Notion client portal. Next, I copied the link to this webpage and pasted it into Embed Notion. Here’s what it looks like:
Next, you want to click on ‘Click here to get code snippet’. You be prompted to make an account, but the first embed is free. Once you do that, you’ll be redirected to a new page where you can copy your embed code.
Next, you want to go into your Copilot client portal and go to the section called ‘Partner & Custom Apps’. Here you’ll see an option to add your first embed in Copilot:
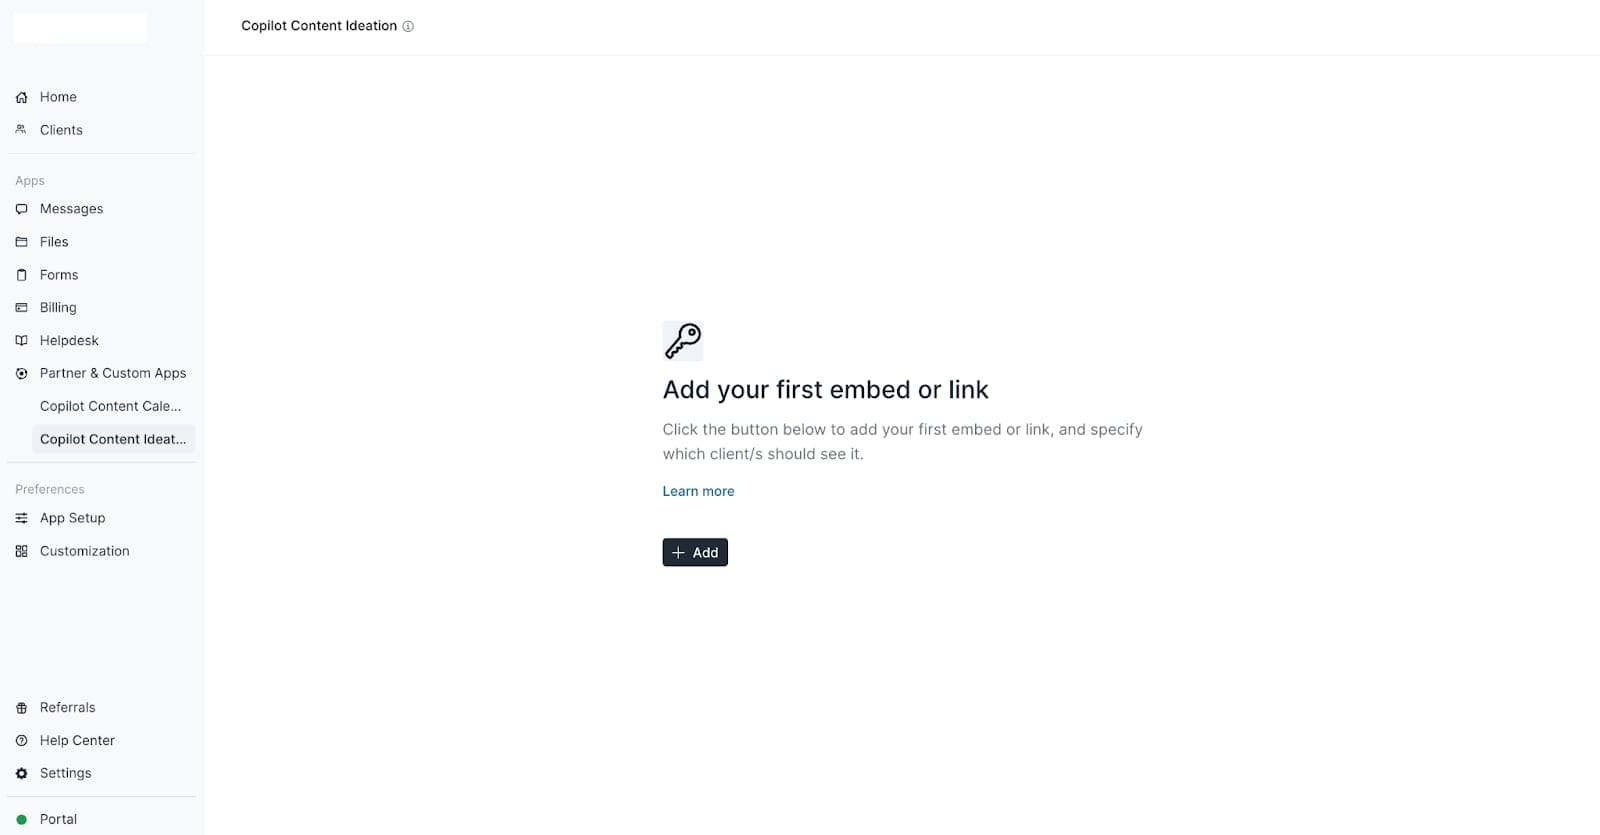
Click on add, select your client from the dropdown, and then paste the embed code that Embed Notion generated.
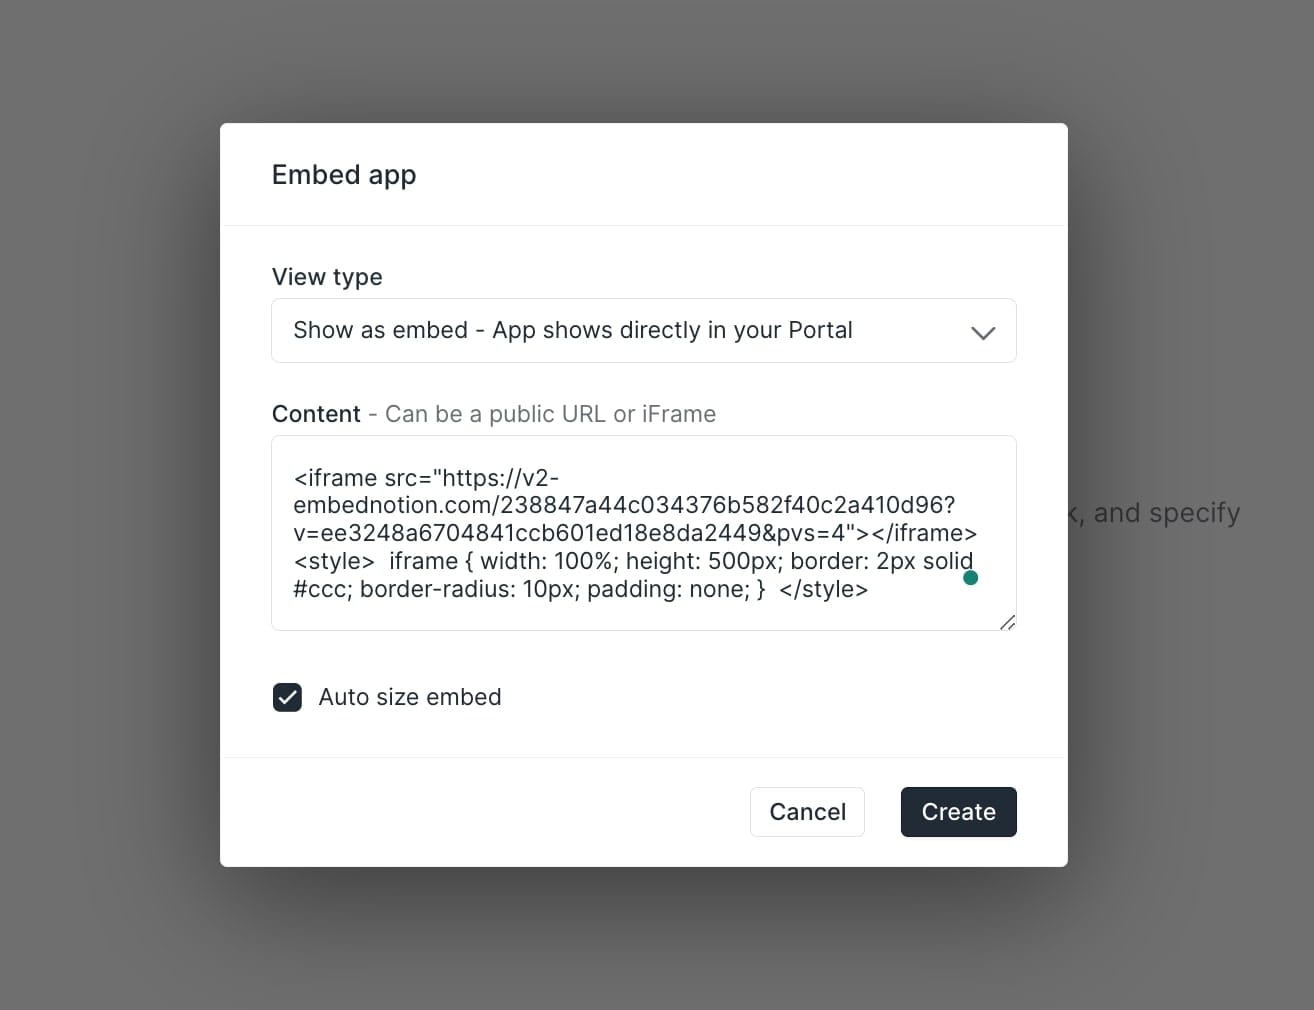
Then, click ‘Create’. And there you go! Notion is now embedded into your Copilot client dashboard.
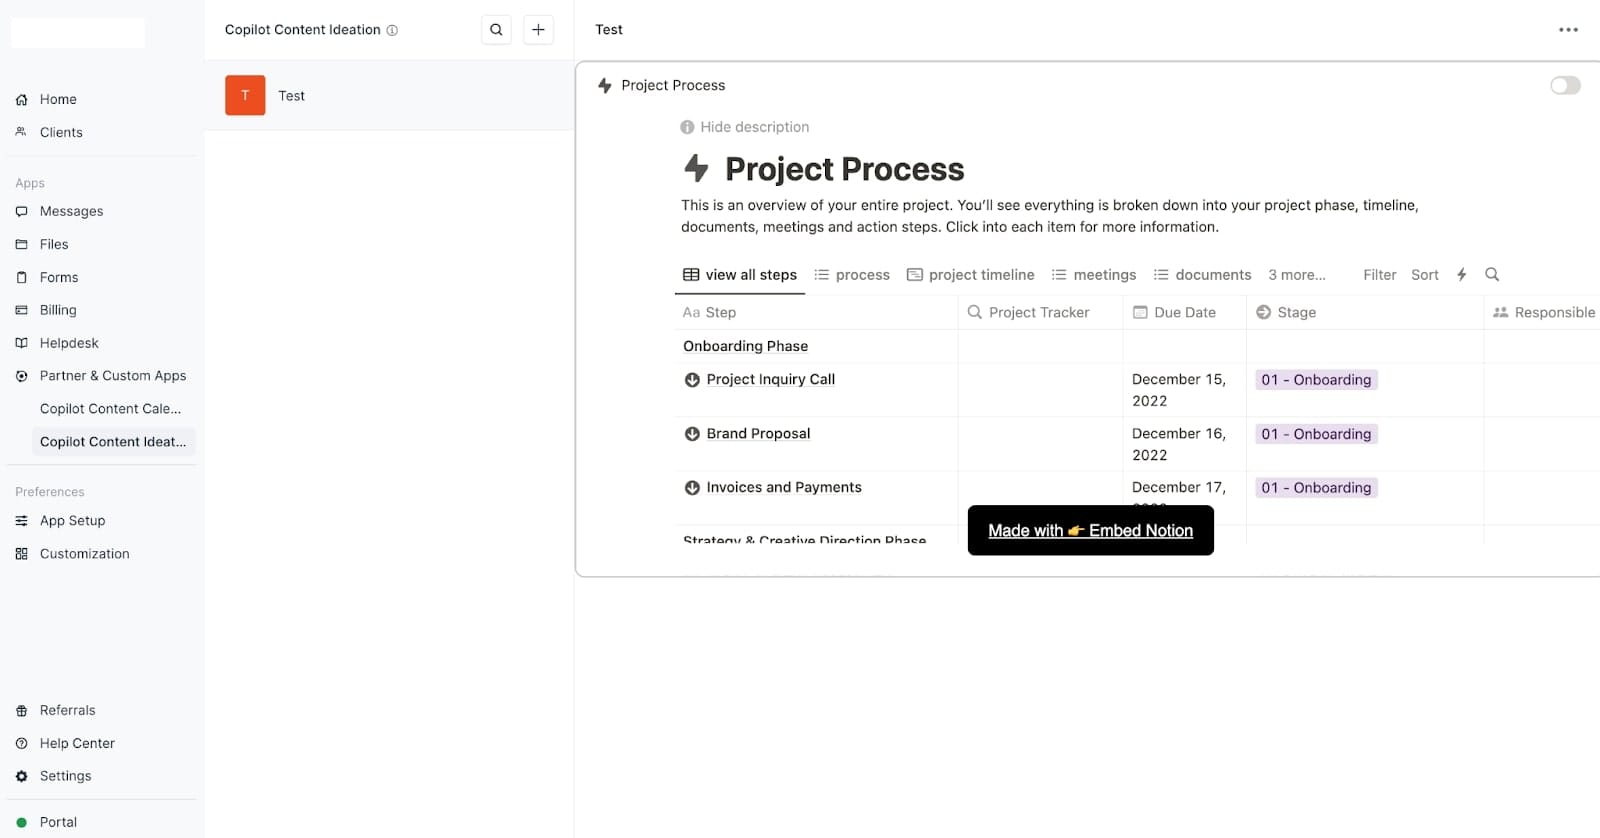
Now, every time you edit your Notion content it will directly reflect in your client portal. However, note that the screenshot above is the view you see from your admin portal.
In Copilot, you can create customized branding and views for different clients you may have. So, the view your clients see will look slightly different than the view you see — depending on how you customize your clients' portal.
In the example of the screenshot above, this is what the client-side of the portal will look like:
And there you go! You now have a robust client portal equipped with features like billing, messaging, contracts, and much more. And, you also have the robust project management capabilities of Notion — all in one place!
Conclusion
As you can see, creating a Notion client portal has its pros and cons. The pros are that you can manage projects holistically in Notion — from sales stages to service delivery. You also get to use one of the best task managers on the market.
But, the cons are that Notion is not really designed to be a robust client portal. You still need other tools to manage contracts, payments, messages, and user logins. You can “duct-tape” these solutions together, and it works fairly well if you’re a freelancer. But if you’re managing multiple clients, and have contractors and employees internally, things can quickly become disorganized — not to mention, expensive with Notions pay per seat business model.
This is where a client portal tool like Copilot comes into play. Starting at just $29 per month, for up to 50 clients, Copilot gives you everything you need to start, manage, and grow your service business.
Copilot also has a free 14-day trial so you can play around with it before you decide to commit to anything. Even better, Copilot put together a demo client portal so you can see how things work when you have multiple clients at the same time. Be sure to play around with a demo portal and hopefully, you learned a thing or two from this article!
Share this post
Sign up for our newsletter
Subscribe to our newsletter to receive emails about important announcements, product updates, and guides relevant to your industry.
