Back to Blog Home
How to create a customer portal for any website (in 6 steps)

When I first started my freelance business, I knew providing a great client experience was at the top of my list of things I had to get right.
Of course, I needed to be great at providing my services. But, I also needed to stay organized and show my clients that their decision to do work with me (and not someone else) was the right one.
After some research, I started to realize that some of the largest agencies out there had their own client portals for their customers.
So I went on the hunt to figure out how to create my own.
In this article, I’ll go over exactly how to create a client portal that will impress your customers and make them want to stick around for the long term.
What is a customer client portal?
A client portal is an online platform that allows you and your clients to securely manage the client relationship in one place. Client portals should let you send documents, send out invoices, manage tasks, and centralize communication — all in one place.
If you’re running a service-based business, client portals are a great way to improve your customer experience as it gives your clients a way to log in to a section of your website and manage projects in a self-service manner.
Whether you’re a large firm, marketing agency, or freelancer, a white-label client portal can help you create a great customer experience — helping you retain clients for long periods of time.
Why you need a customer portal for your clients
Many agencies and freelancers work with clients in an ad-hoc manner. They have tons of different tools duct-taped together — from messaging platforms, invoicing software, customer service software, task management, and reporting dashboards.
When you approach your business in this way, it can make you look unprofessional and disorganized. Plus, your clients don’t want to jump through multiple tools.
But this doesn't mean you can’t use multiple tools.
In fact, the best customer portals are configured in a way where you can “be messy” on the backend, but your client sees you as someone who’s super organized.
On the back end of your portal, you will be able to manage all of your client relationships with ease — making sure documents are signed and invoices are paid in a timely manner. And on the front end, each individual client will have access to their own clean dashboard where they can respond to any tasks you’ve assigned to them, or where they can get project updates.
A client portal helps you and your customers stay more organized while giving your clients an amazing user experience many service-based businesses don’t know how to provide.
For the TLDR (too long; didn’t read), you should seriously consider creating a client portal for your business because:
- It helps you bring all of your tools into one central place
- It helps your clients gain visibility on projects
- It gives the impression that you care deeply about your client's experience
- It helps you manage all of your client’s tasks and payments in one place
Now that we know why customer portals are so important, let’s talk about what a customer portal should include.
What should a customer portal include?
There are a few different ways you can create a customer portal. However, it’s important to make sure you know what your portal needs.
Here are a few key things your client portal solution should include:
- The ability to integrate with your existing tools
- Multiple billing options (Invoices, Subscriptions, Credit, ACH)
- File uploads
- Messaging
- Helpdesk, FAQ, or knowledge base
- Separation between your portal and your client's portal
You want to have a portal that is customizable and flexible for every type of client you have.
It’s not one size fits all.
The thing with many client portal tools is that they force you to use their own features, making many small businesses go through the learning curve of having to learn a new platform for task management and invoicing.
So it’s important to have a client portal that can integrate with your existing apps and tools. Sometimes clients want to use a specific tool that your portal may not support, so creating a customer portal that is flexible enough to give your clients a great experience is critical for making you stand out.
In the rest of this guide, we’ll go over how to create a fully customizable client portal that will separate you from other service-based businesses. Oh, and this portal will be able to integrate with any website you currently (or don’t) have — be it a WordPress site, a Webflow site, a Wix site, a Squarespace site, a Shopify site, or a fully custom website.
6 steps to create a customer and client portal
Here are six simple steps to creating a custom client portal:
- Determine Your Tech Stack
- Use a No-Code Portal Builder Like Copilot
- Customize Your Portal
- Integrate Your Apps and Payment Methods
- Invite Clients
- Integrate Your Portal With Your Website
Okay, let’s dive into each one.
1. Determine your tech stack
Before you jump headfirst into launching your portal, you need to get a solid understanding of what tools you currently use to run your business.
For example, you might use a tool like Airtable to manage tasks or create a content calendar. You also might use DocuSign to send and sign contracts. And you might use Stripe or ACH for payments to bill clients.
You might even use Google Spreadsheets or Looker Studio for marketing or SEO dashboards.
Whatever the case, make a list of all of the tools you are currently using and what each one is for. Here is an example of all the tools I use for my own freelance marketing business:
- Airtable for a content calendar
- Slack & Copilot Messaging App for communication
- Ahrefs and Looker Studio for SEO reporting
- Stripe for invoicing and subscription payments
- Calendly for scheduling meetings
- Typeform for client questionnaires
- Loom for client demos
As you can see, it’s a lot. And I often have to bookmark all of these, or create a new Chrome account, for each client that I have just so I don’t lose track of everything.
But this is what I used to do.
Now, I still use some of the tools like Airtable and Looker Studio, but I’ve replaced a few tools like Typeform and Stripe with my new no-code client portal.
This brings us to our second step, finding a client portal solution that works with your existing tech stack.
2. Use a no-code portal builder like Copilot
During my journey of trying to create a customer portal for my clients, I first tried to build one from scratch. I use Webflow for my business website and wanted to create a portal where my clients can make an account and sign in at any time without hitting me up.
I also wanted this portal to look and feel similar to my existing website, hence why I first tried to build it from scratch.
But then I discovered Copilot after it became the top product of the day on Product Hunt. The pricing seemed quite reasonable for what it was. So I signed up, started integrating it with my site, and after a few days, I was hooked. And now I’m writing this on the Copilot blog as a customer of Copilot because I love the tool so much.
Copilot has a free demo portal you can play around with to see all of its features.
You can check it out here.
The thing that I love about Copilot is that they have an app marketplace that can integrate with all of my existing tools. And there’s even a Zapier integration I can use to automate different tasks as a solo freelancer.
For example, I can create an automation to email a client a welcome email when they first sign up. Or, I can create an automation to send my client a thank you email or gift after they pay their first invoice.
For the remainder of this article, I’m going to walk you through this guide as if I were a marketing agency providing content services — but Copilot is not limited to just marketing professionals.
Tons of accountants, firms, local businesses, and freelancers also use the platform. And Copilot is SOC 2 compliant, so there’s a high level of security and authentication that goes into managing your clients’ accounts.
Creating your account
The first step is to create your free Copilot account and start setting everything up.
Once you create an account, you’ll go through an onboarding process that will ask for your company name and what URL you want your portal login to live on.
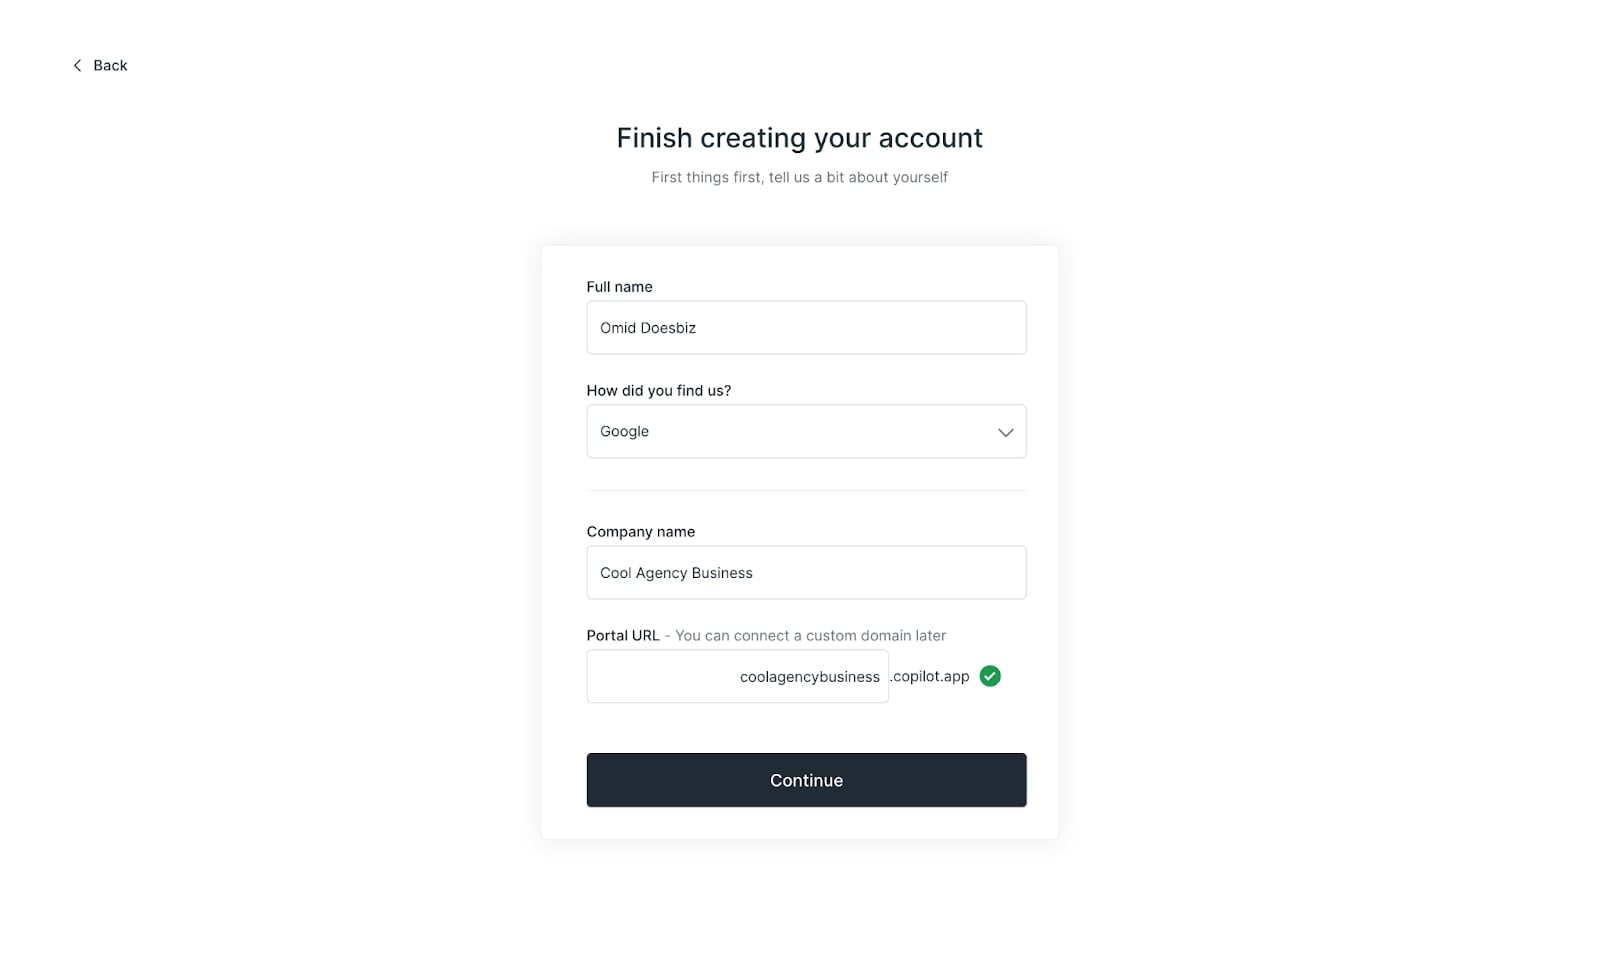
When you create a free Copilot account, your URL will be on a “copilot.app” subdomain. But you can change this later to your own domain to make it more customizable.
For example, if your website is coolagencybusiness.com, you can make your client portal live on something like portal.coolagencybusiness.com — removing any sort of Copilot branding.
Next, you want to follow through with the onboarding process until you reach your main dashboard:
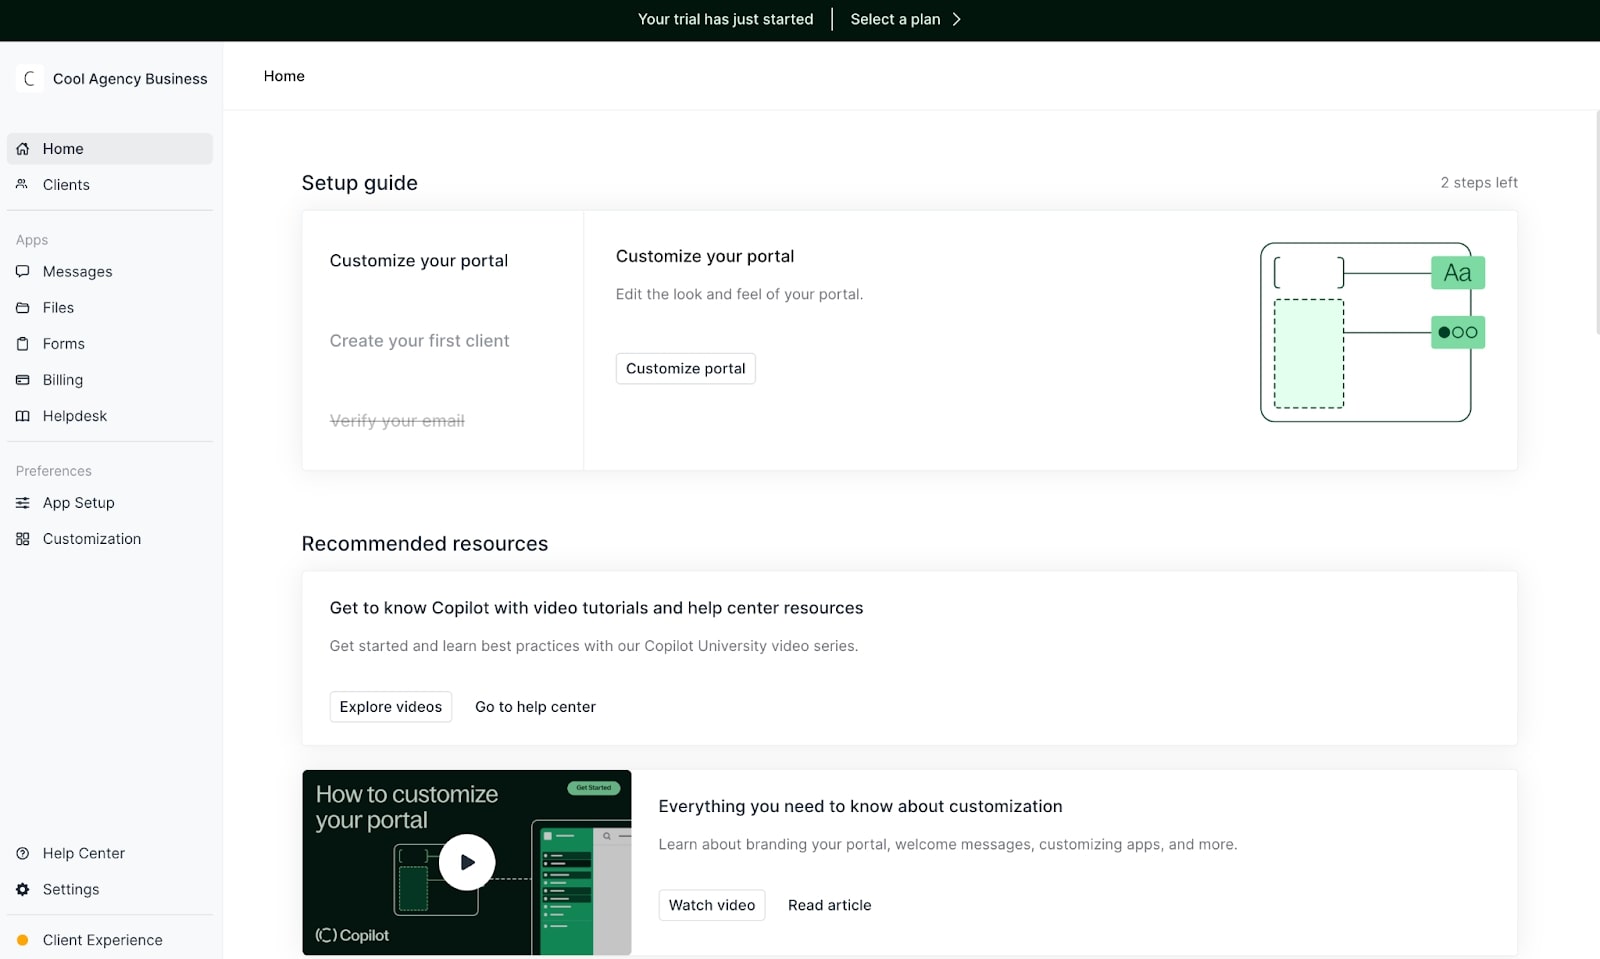
Here, you can follow the guided setup process to customize your portal and get everything up and running.
3. Customize your portal
If you want to check out a video tutorial on setting up your Copilot account, you should definitely watch this video:
But for the readers out there, let’s walk through the setup process.
Once you get to your dashboard, it’s time to customize your portal on your backend.
Click on “Customization” in the left-hand column of your dashboard. Here, you can customize your brand name, configure your brand colors, change fonts, and add your company logo.
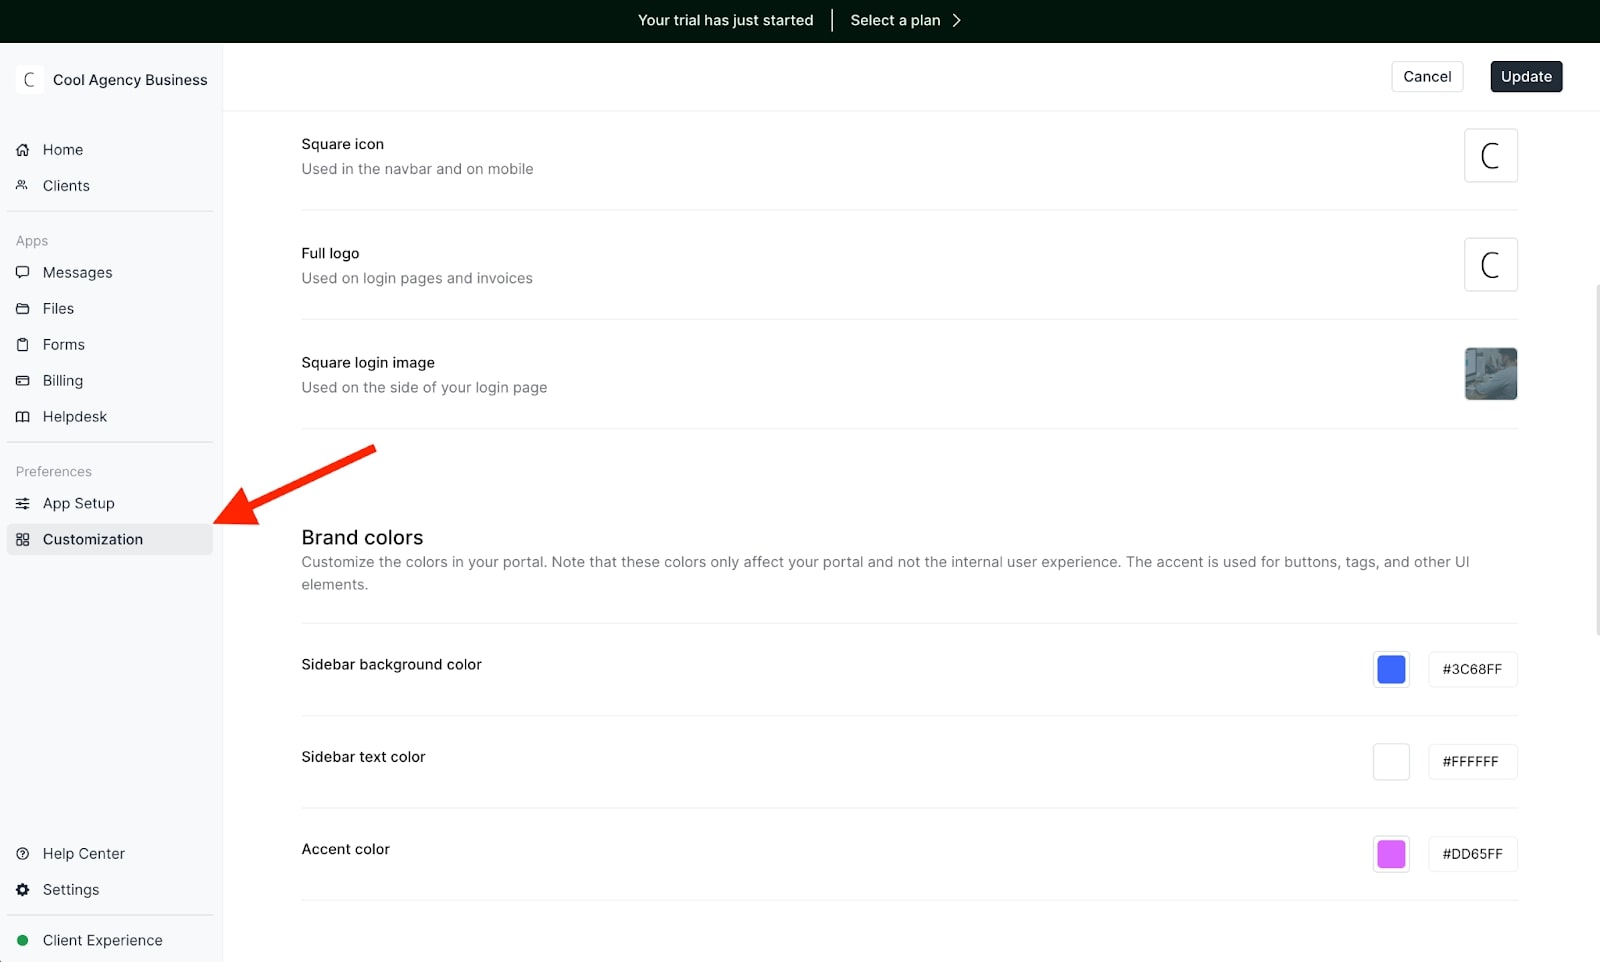
This will reflect what your login page will look like when new clients create an account and sign in to their own portal.
When you’re done adding your login image, fonts, logos, and brand colors, simply click “Update” in the top right corner.

These changes will now reflect on your login page. You can view your login page, and portal URL, by clicking on “Client Experience” in the bottom left sidebar of your dashboard. When you click on it, this window will open:
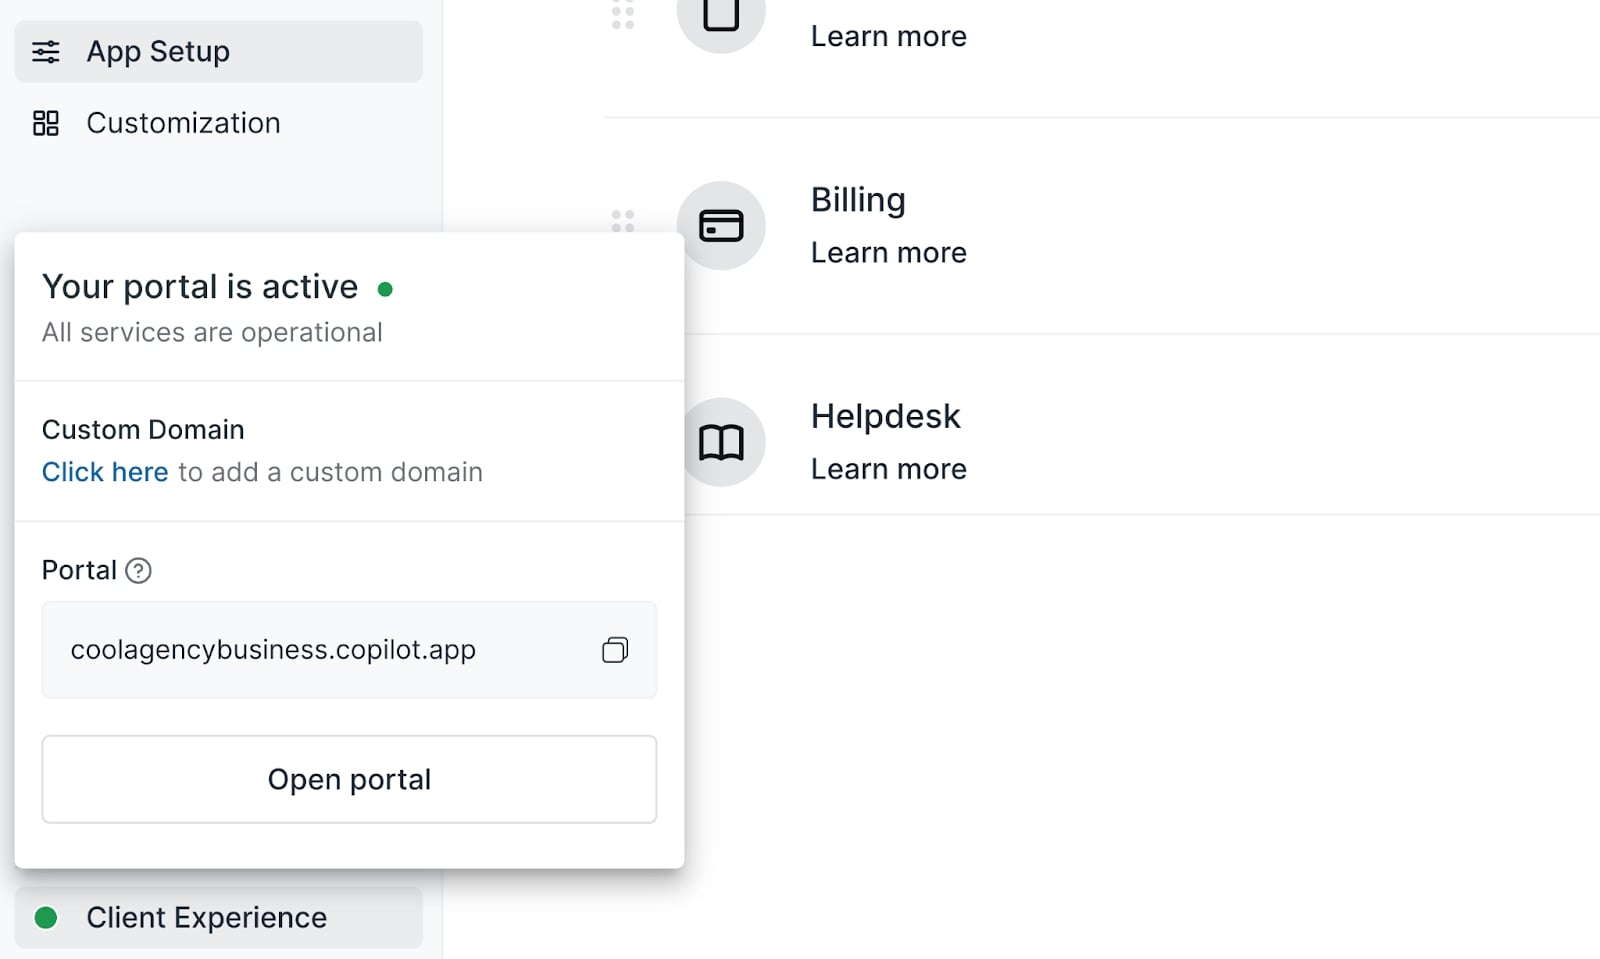
Click “Open portal” and you’ll be prompted to your portal’s login screen. This is what mine looks like after making the customization edits earlier:
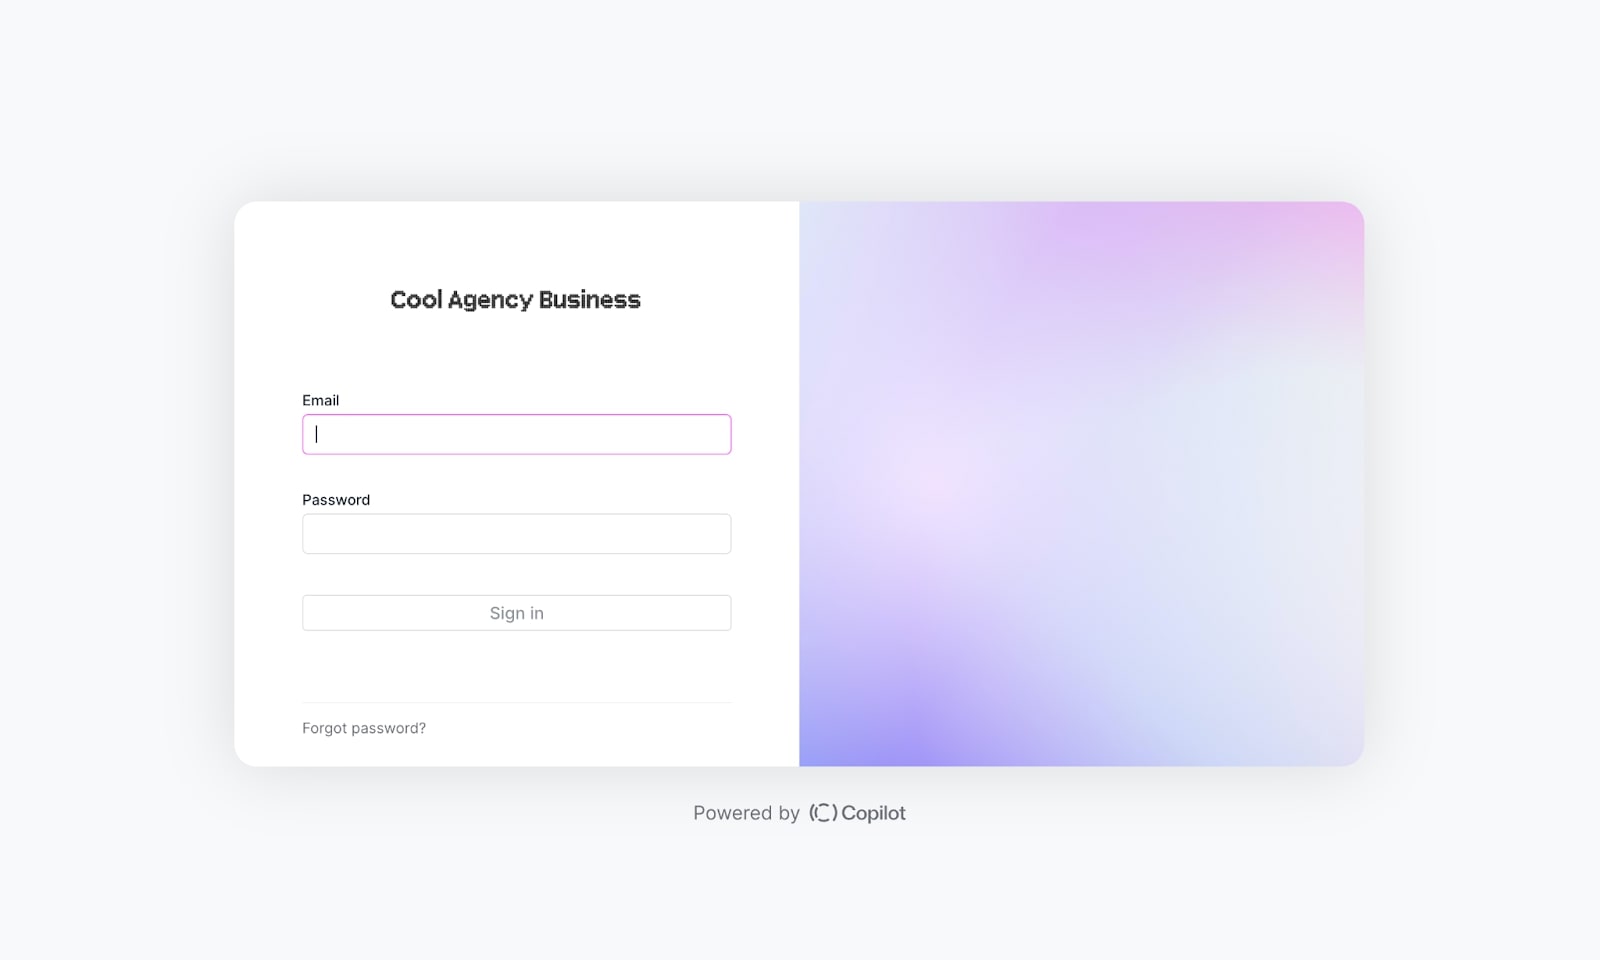
Pretty neat!
Now you can give customers access to their own portal using this login page.
Next up in the customization process is setting up your apps and making sure you have proper billing set up.
4. Integrate your apps and payment methods
Once you finished customizing the design of your portal, it’s time to integrate it with your existing tools and set everything up so you can invite clients and start collecting payments.
To do this, head over to the tab called “App Setup.”
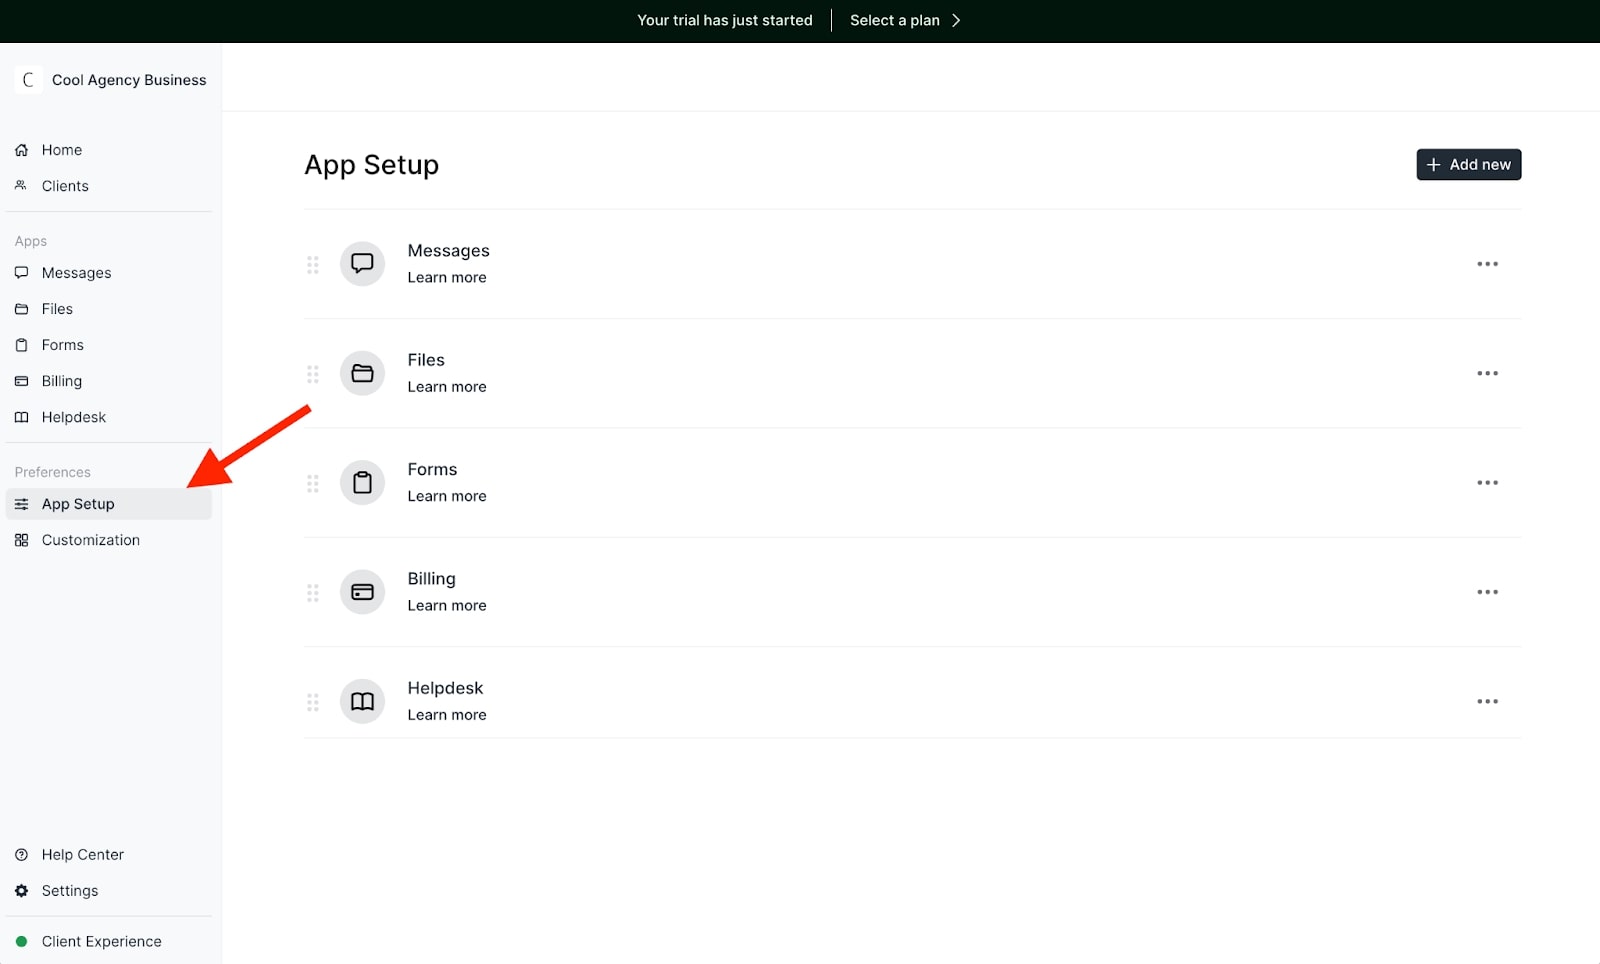
By default, Copilot has a few built-in apps you can use. These apps include:
- Messages: A chat interface where you and your client can communicate in real-time.
- Files: A “dropbox” style drive where you can upload and store files and contracts.
- Forms: Where you can create surveys and client questionnaires when onboarding new clients.
- Billing: Where you can create invoices, launch subscriptions, and collect payments (Copilot partners with Stripe for billing).
- Helpdesk: This is your own internal knowledge board. Think of it like an internal blog for you and your client. You can create guides like “How to give access to Google Analytics” or create weekly updates and resources for your clients.
Of course, you don’t need to use these default apps, but they are nice to have. If you want to add a new app, which I definitely recommend, click on “Add new” in the top right corner.
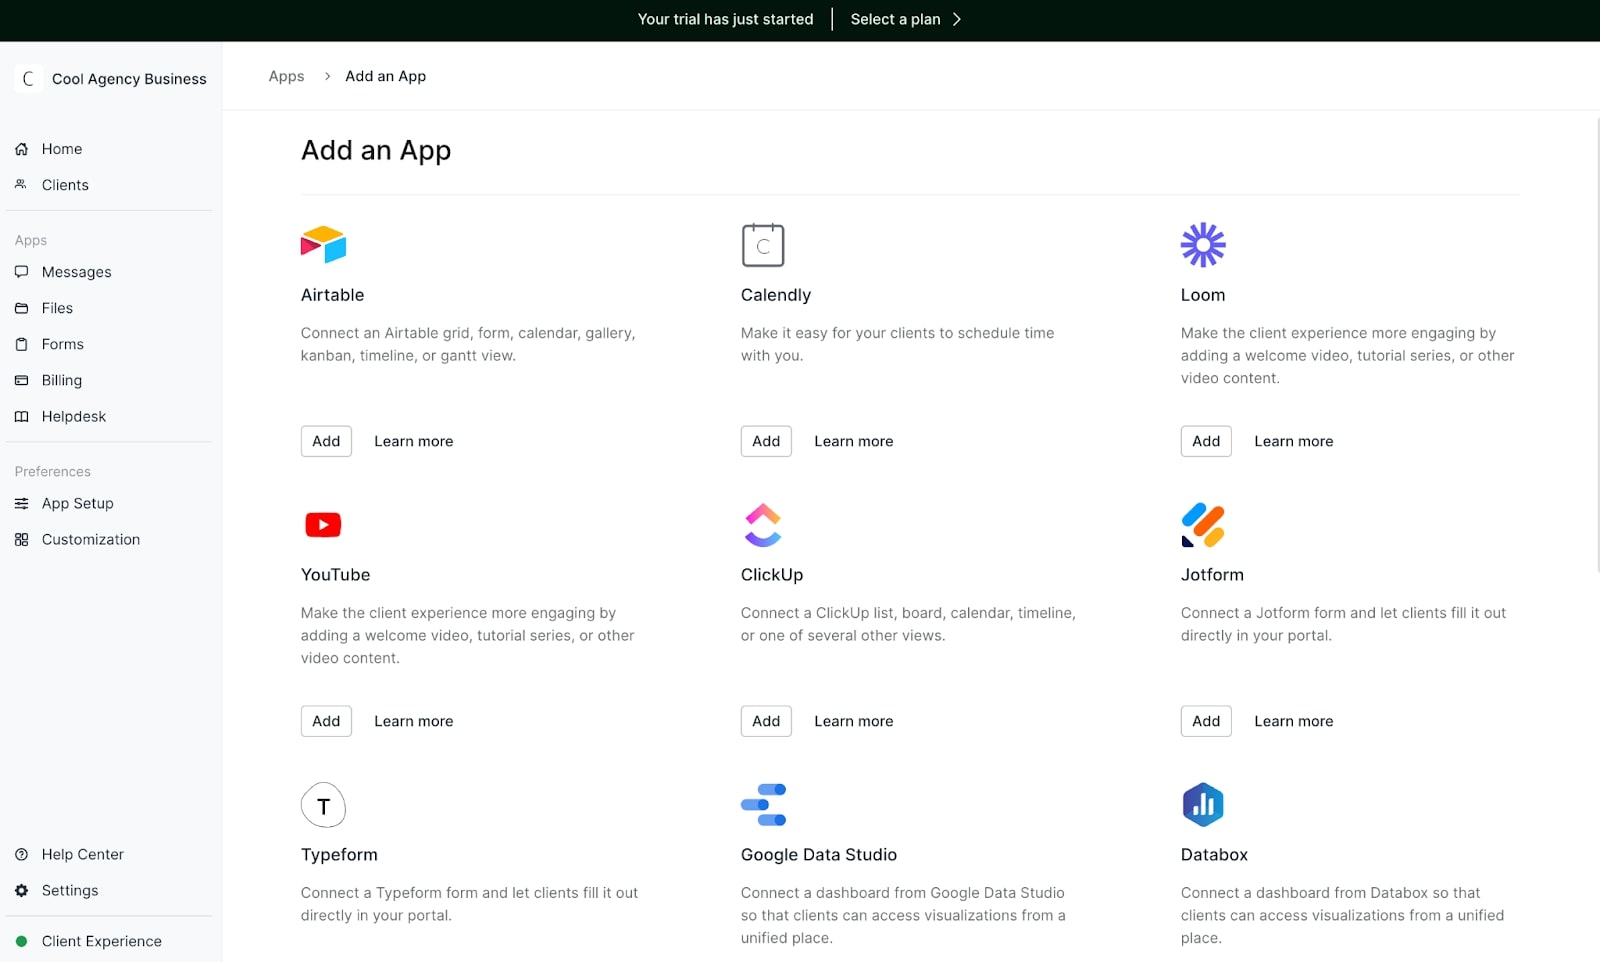
Here, you can browse through the app marketplace and add any of the existing apps you may be using. For example, I use Airtable for task management and client content calendars. I also use Google Data Studio (now called Looker Studio) for SEO dashboards. So, I’m going to add those.
When adding a new app, like Airtable, you’ll be prompted to this screen:

Here, you can add a name to this view and edit some settings.
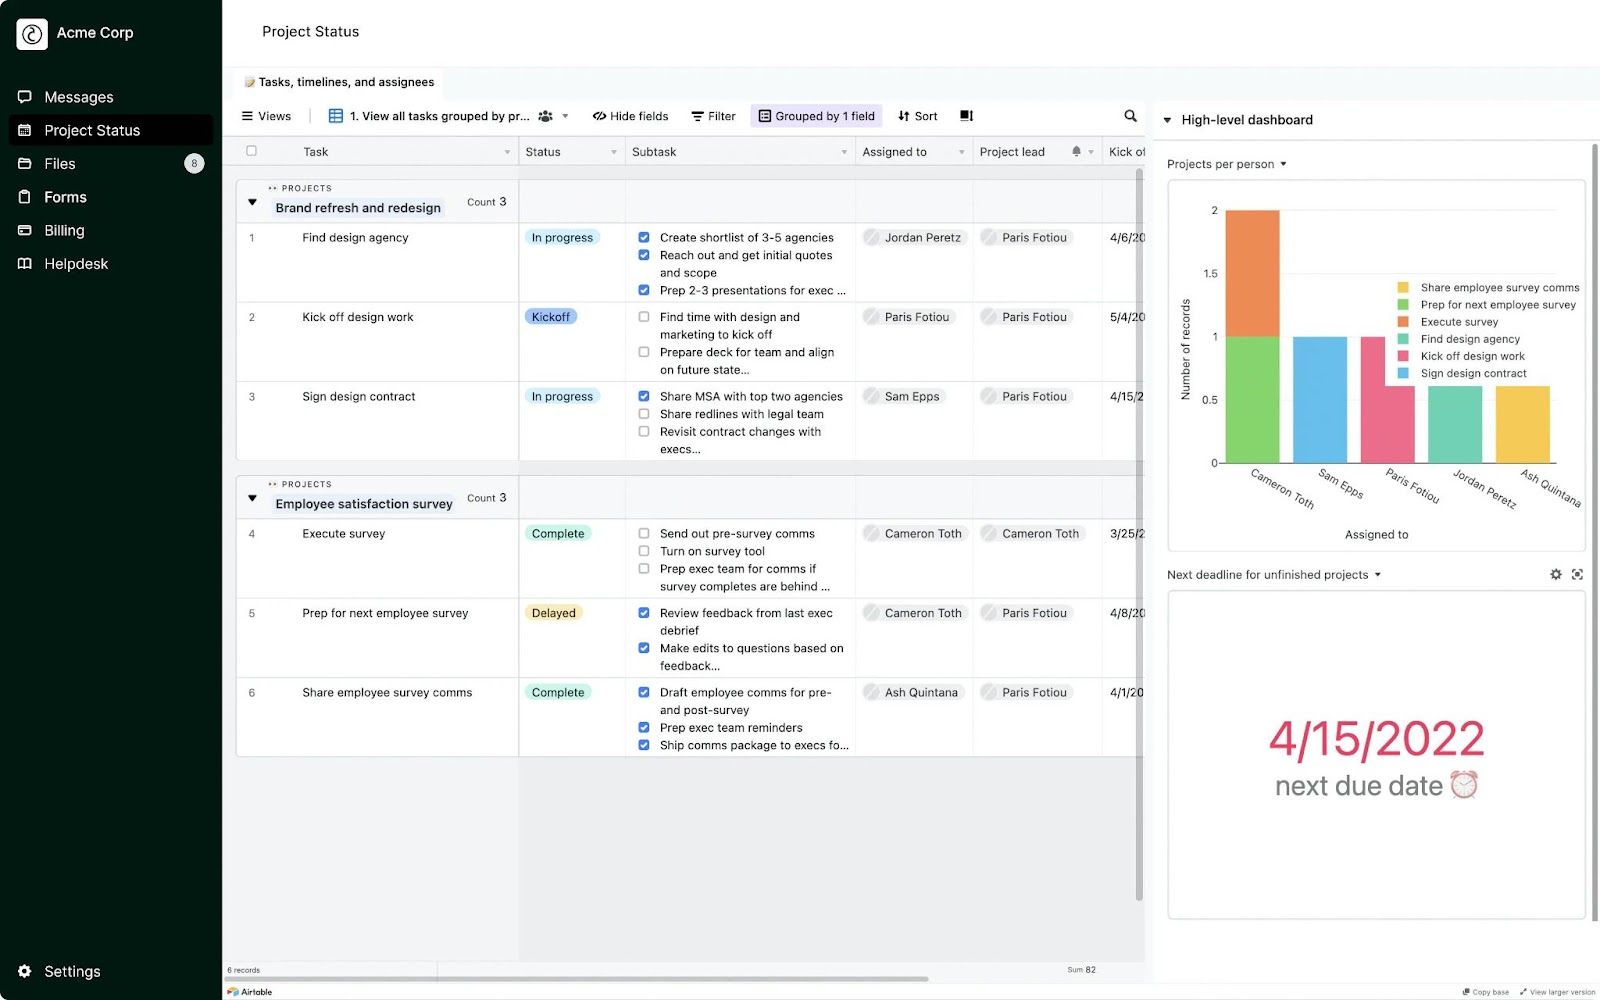
Each of these apps will be reflected in the left-hand sidebar of your client's portal. So in this case, I want to add an Airtable content calendar so my client can see the status of content ideation and production.
For example, the best way to integrate an Airtable is to embed it straight into Copilot. Here is an example of a content calendar in Airtable:
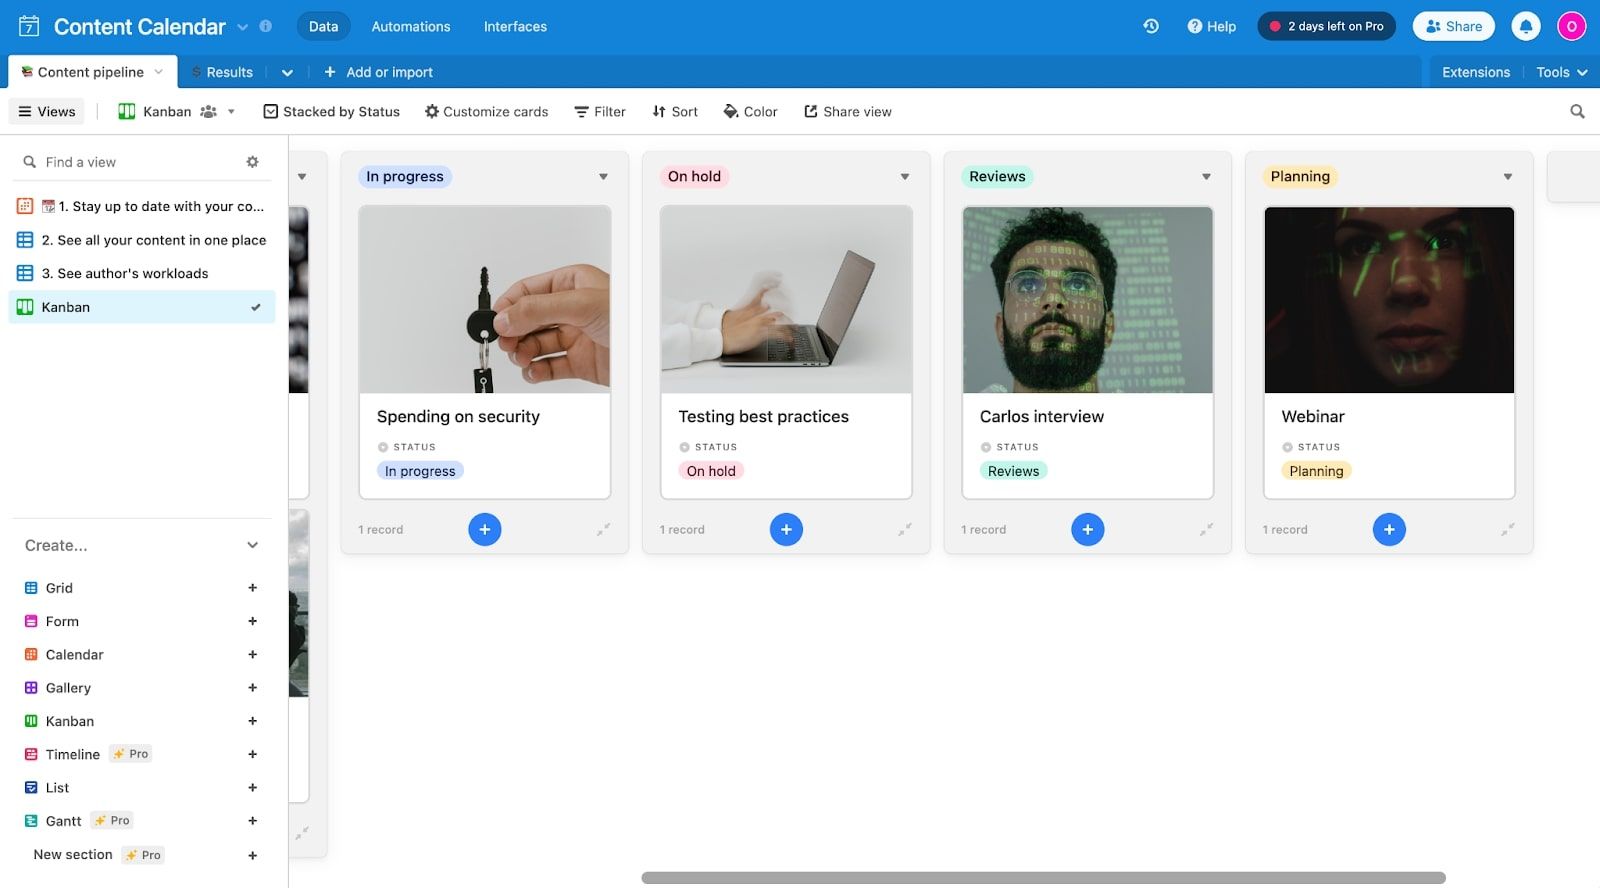
In Airtable, you can click “Share” and get the URL of your board. Then, all you need to do is paste the URL in the “Content” section within your app settings in Copilot.
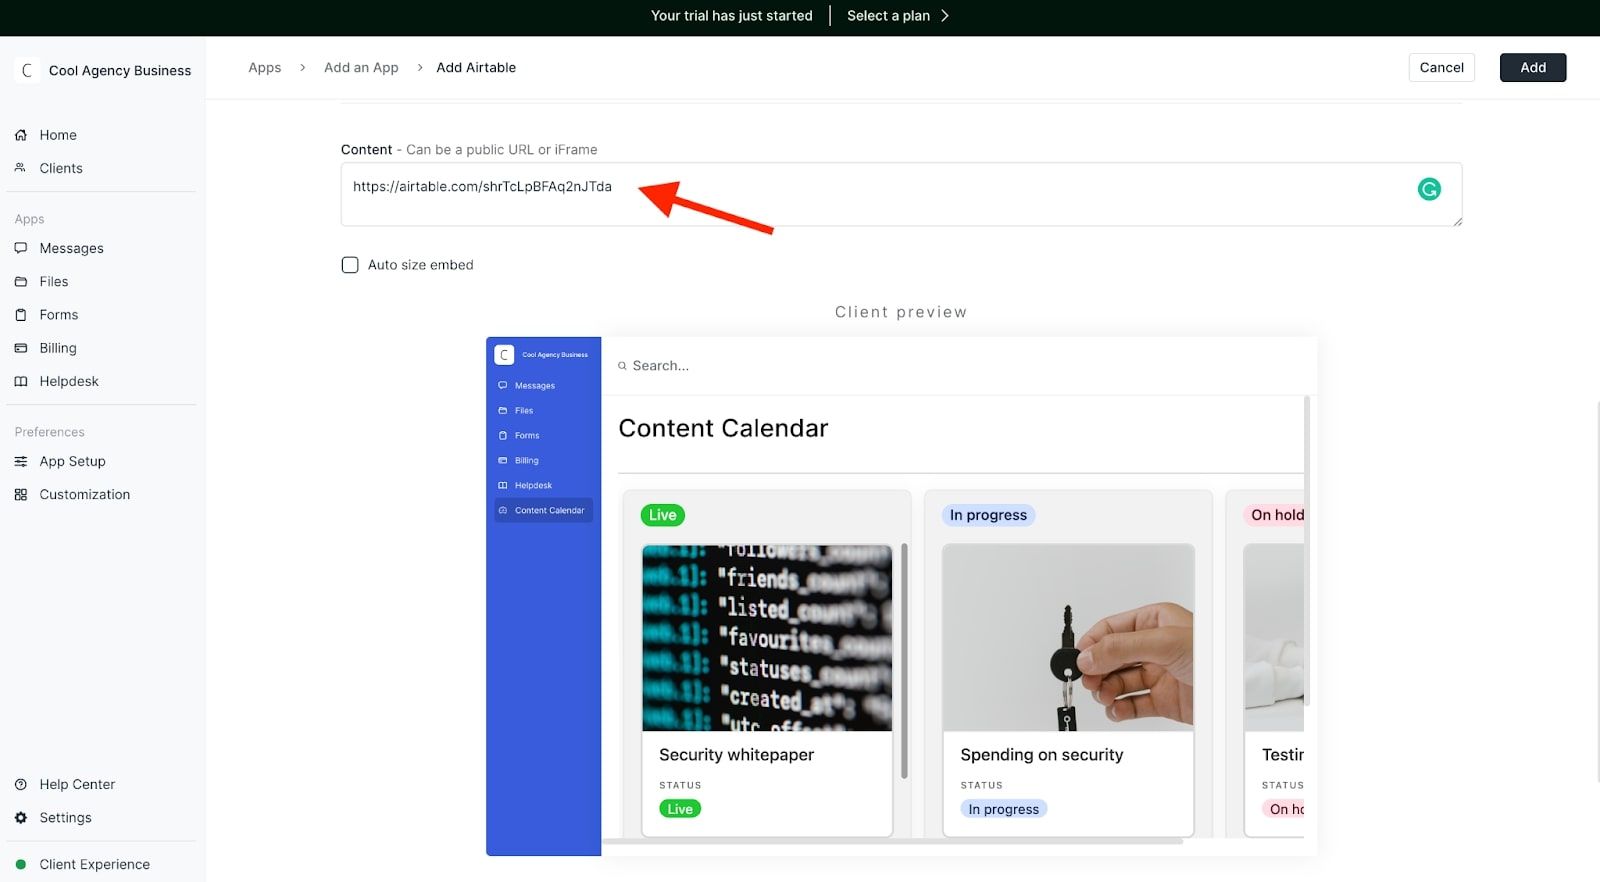
As you can see, Copilot will then generate a preview of what your client will see in their dashboard. They will have a tab called “Content Calendar” and when clicked on, it will show your Airtable embed.
Now, anytime you make edits within Airtable, it will automatically reflect in your client’s dashboard in real-time!
As mentioned, this is not limited to just Airtable. There are tons of other apps you can integrate with to create a seamless workflow experience.
If you want to learn more about other app integrations, check out Copilot University for in-depth video tutorials on connecting different apps to your customer portal.
Payments
After integrating your tech stack, it’s time to set up payments and get paid. Head over to the “Billing” section on the left sidebar.
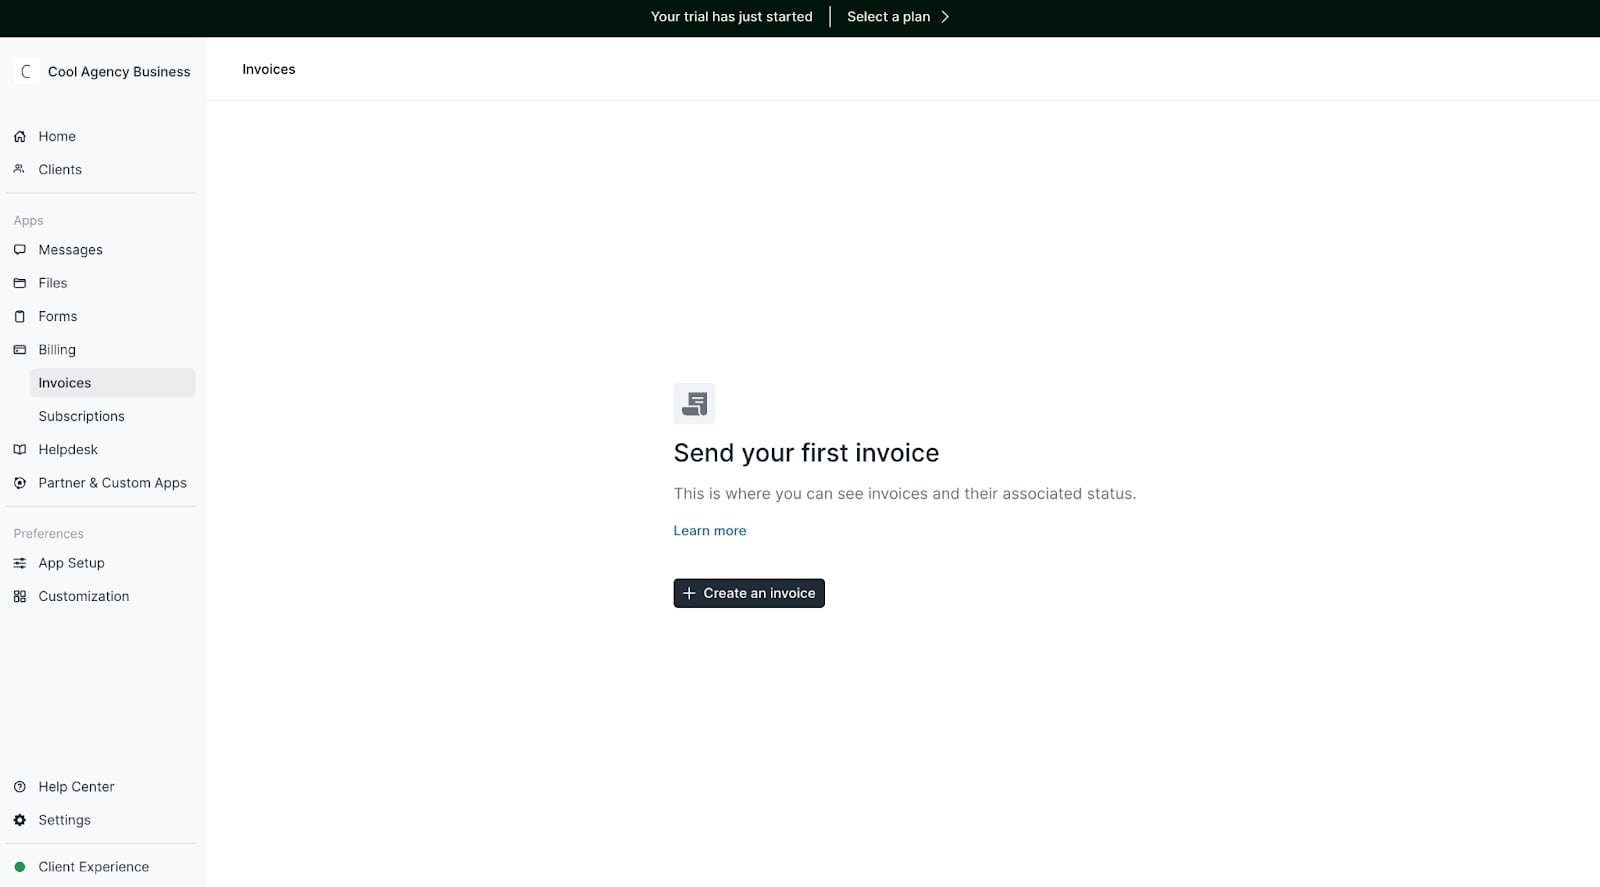
Here, you can create invoices and subscriptions for recurring payments — making it great for those who want to productize their services.
When you click “Create an invoice,” you’ll be able to create a standard invoice that can be customized for any product or service you are selling.
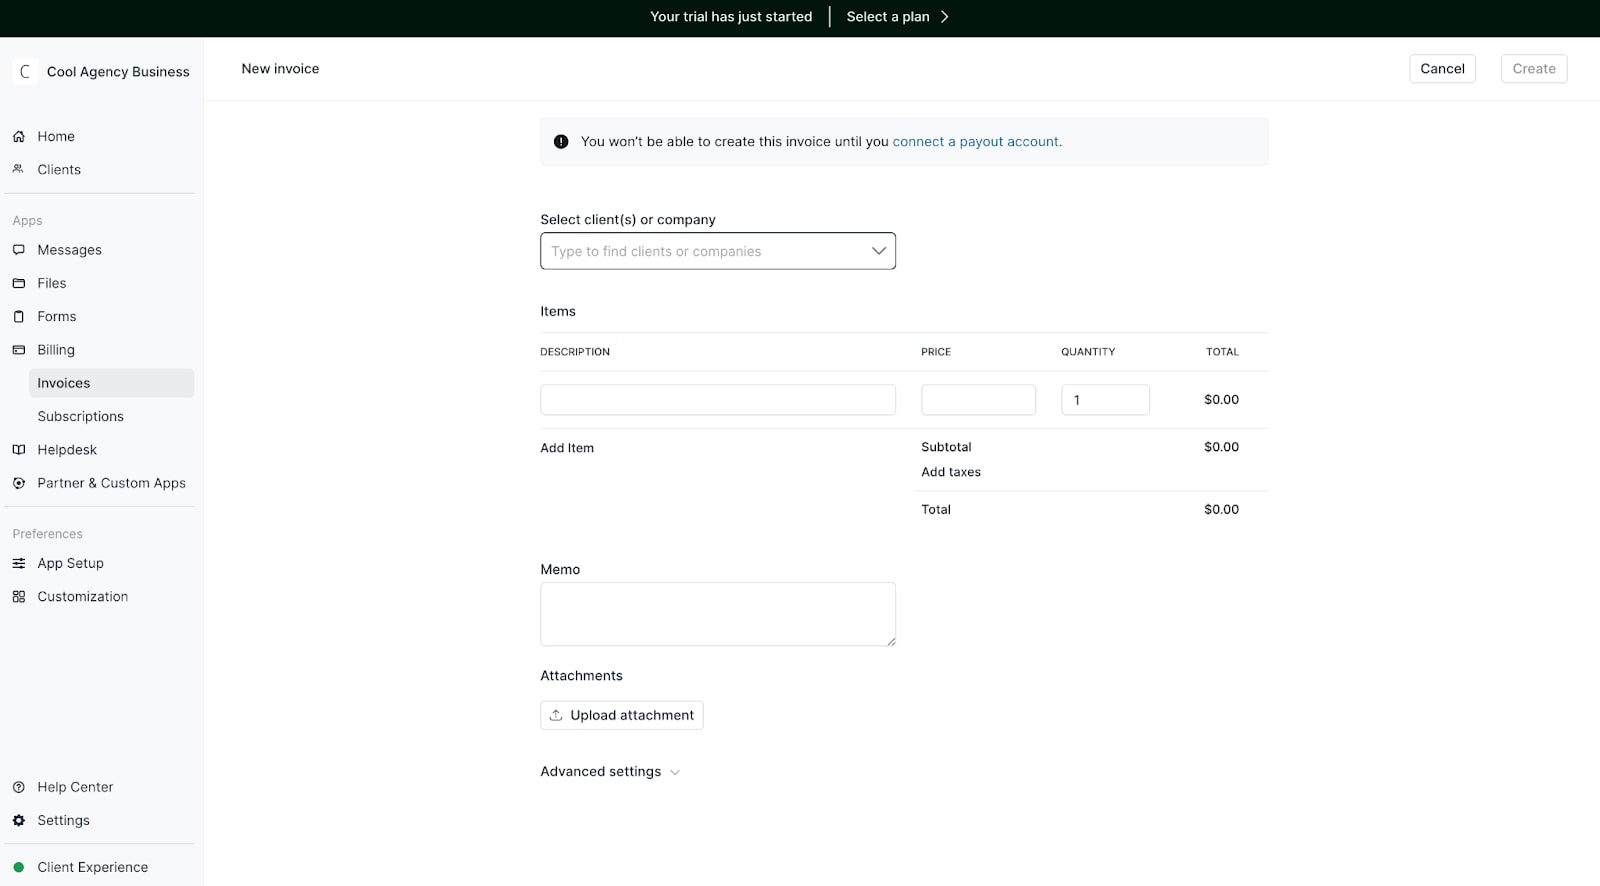
But, in order to finish creating your invoice, you first need to add a payout account — aka your bank account.
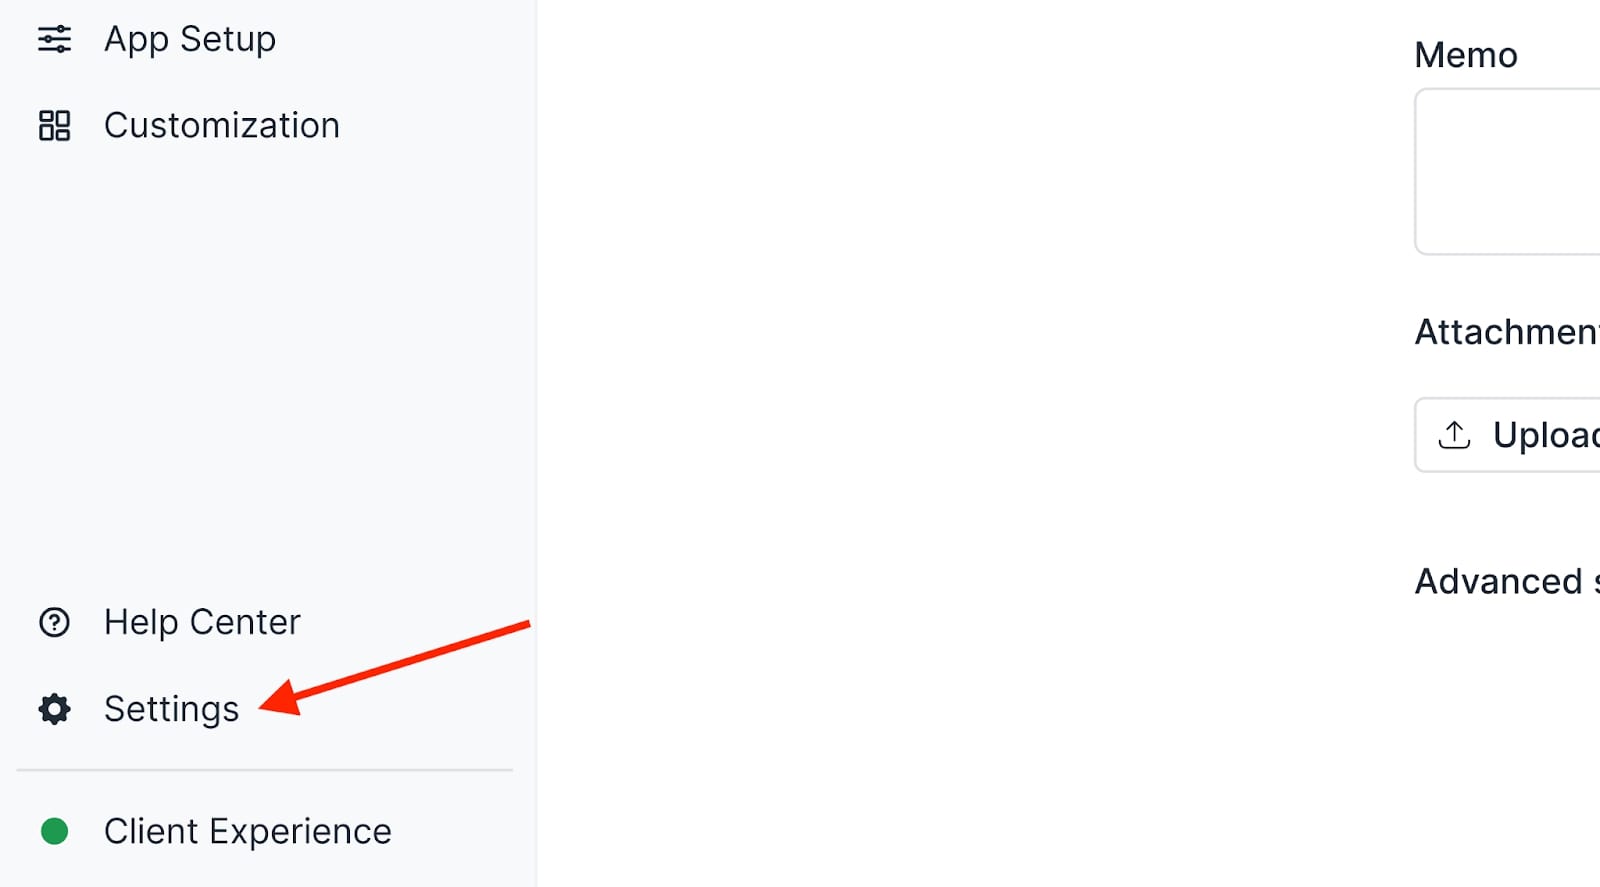
To add a bank account, you need to go to your profile settings (see the bottom left corner of your sidebar).
When you get to your settings, click on the “Billing” tab and you’ll see a screen like this:
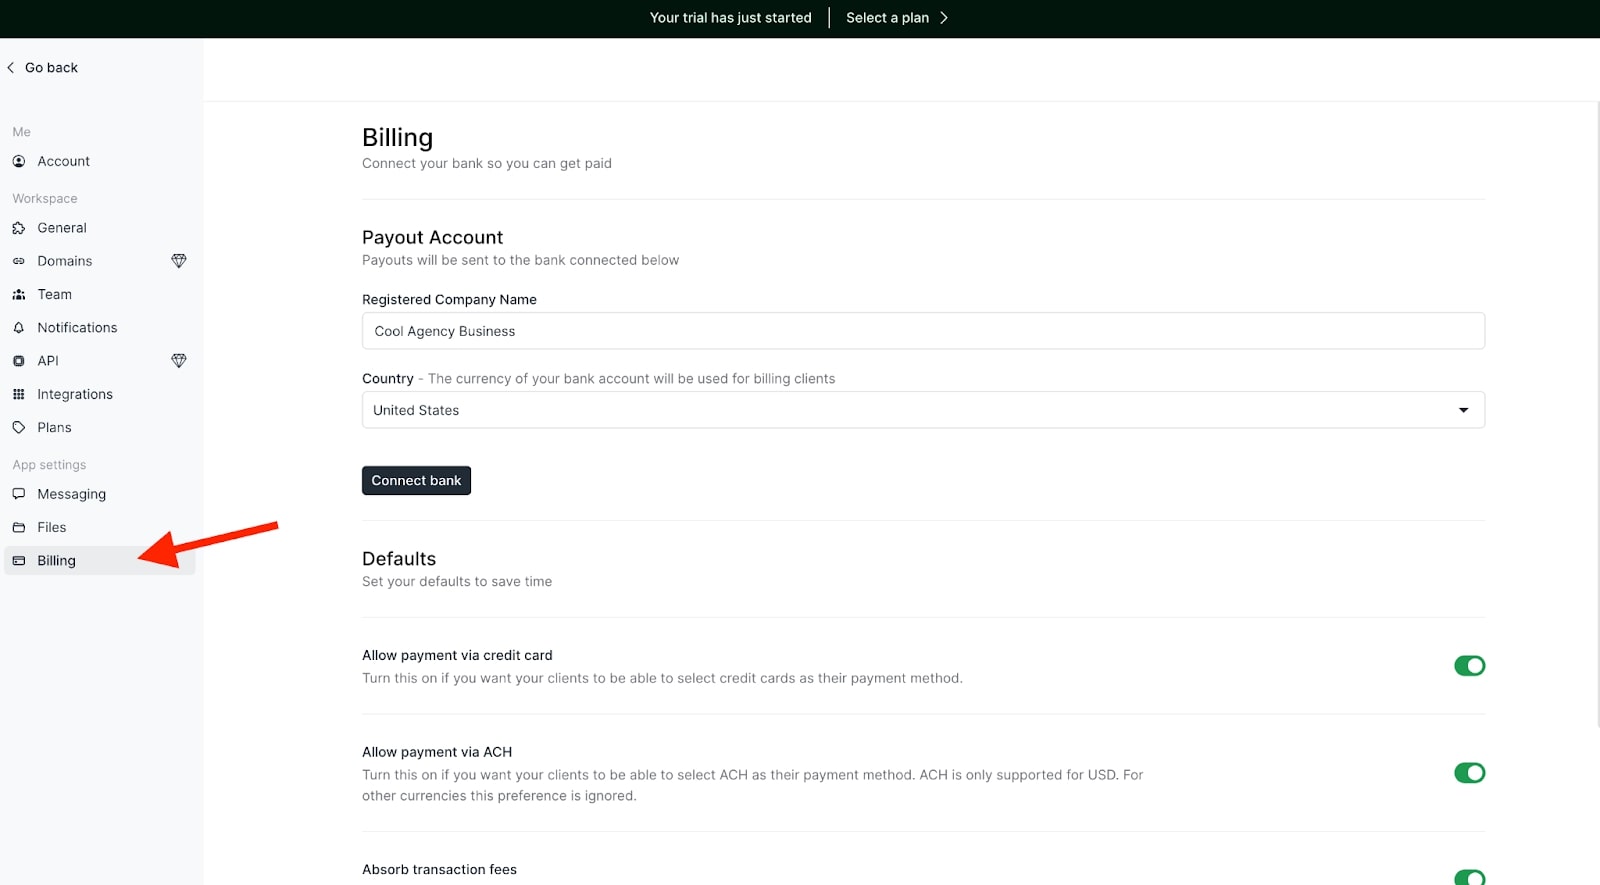
Here, you can connect a bank account and allow clients to pay via credit card or ACH payment. You can also check a setting that makes it so that your client absorbs any transaction fees.
In this settings tab, there are also a handful of other features you can edit — such as sending introduction messages that automatically send to new clients when they create an account, adjusting settings for uploaded files, giving permissions to what clients can and can’t access, APIs, notifications, and options to add a custom domain.
If you’d like to learn more about all of these features, be sure to check out the Get Started playlist on Copilot University:
With that, let’s get into how to invite clients to your customer portal.
5. Invite clients
Once you create your own client portal, it’s time to invite clients. If you prefer to watch, check out this video:
For the readers out here, let’s quickly go over how to invite and manage each of your client portals.
In your main dashboard, head over to the tab labeled “Clients.”

This is where you will add, edit, or delete any client. It’s also where you can manage each client relationship and view anything from messages, files, forms, invoices, or connected apps you have for a particular client.
The great thing about Copilot is that you can either invite clients on-by-one or bulk upload them with a CSV.
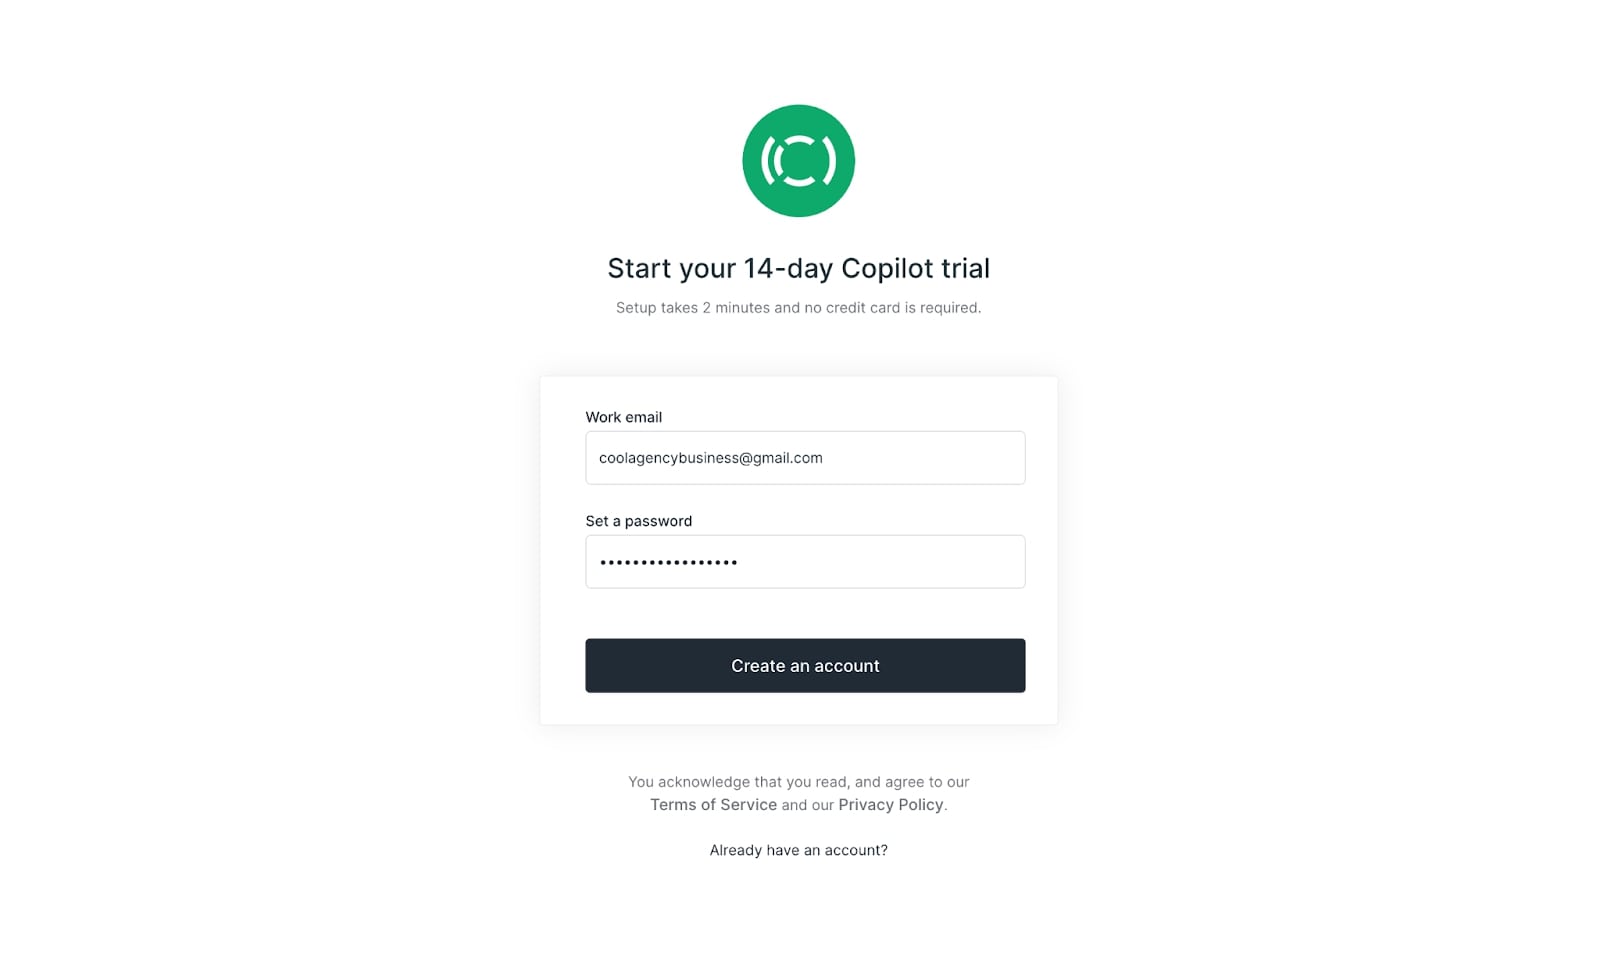
Creating a new client
When you click on “New client” in the top right corner, you’ll be prompted with a modal that will ask for your client's name, email, and company.
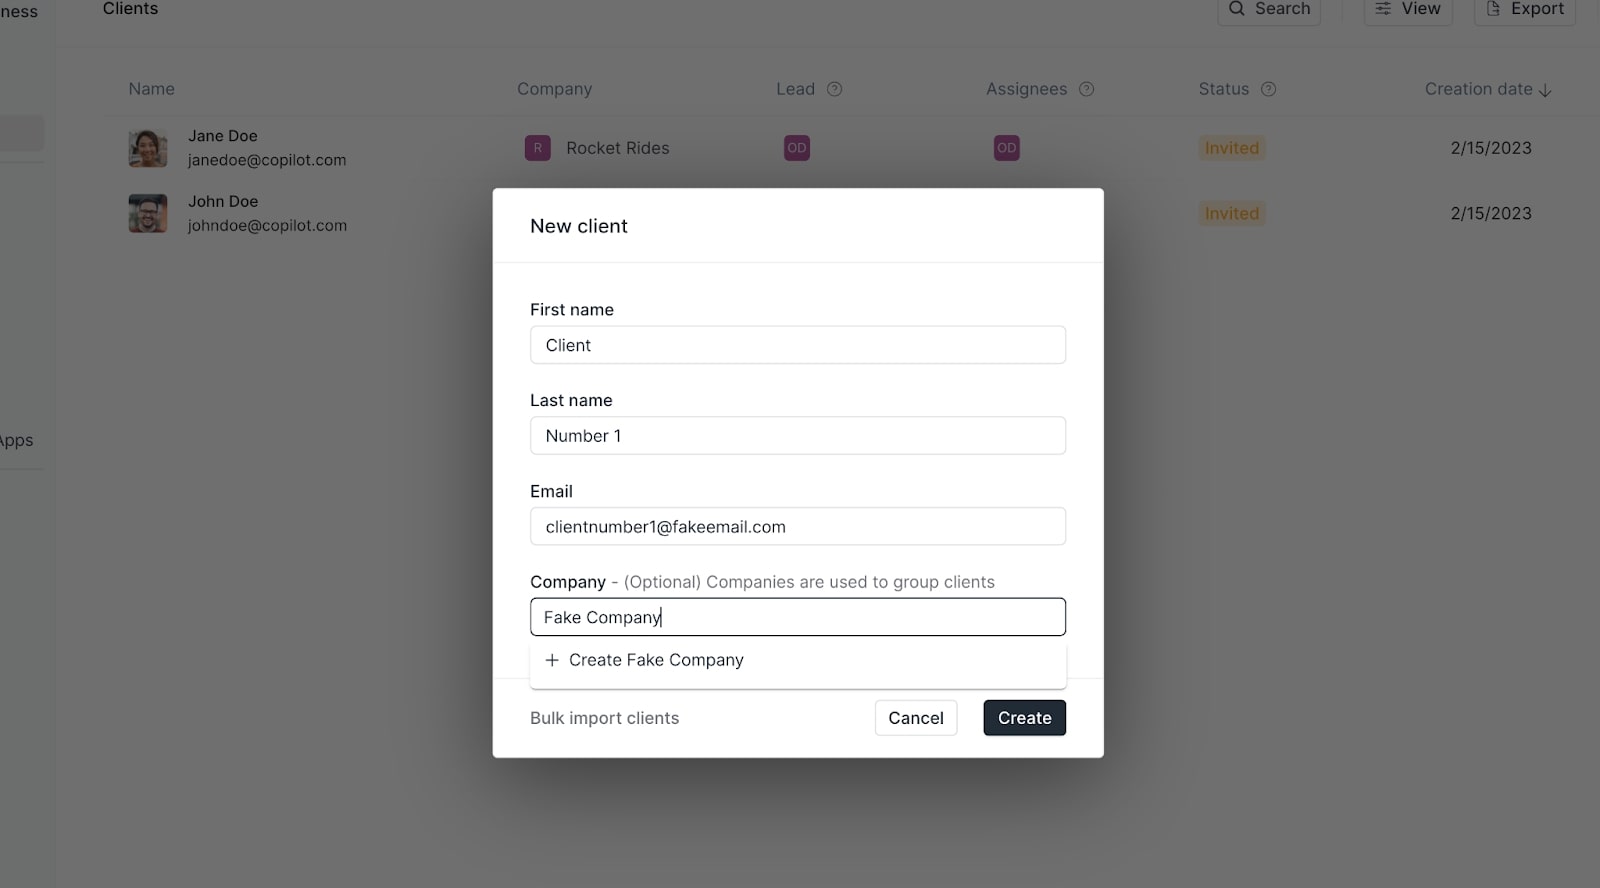
As you can see from the screenshot above, when you fill in the company name of your client, you can actually add the company as a profile. This way, you can add multiple users under a specific company if you have multiple points of contact.
Once you click “Create,” you’ll be able to send an invite email or give your client a link that they can use to create their account.
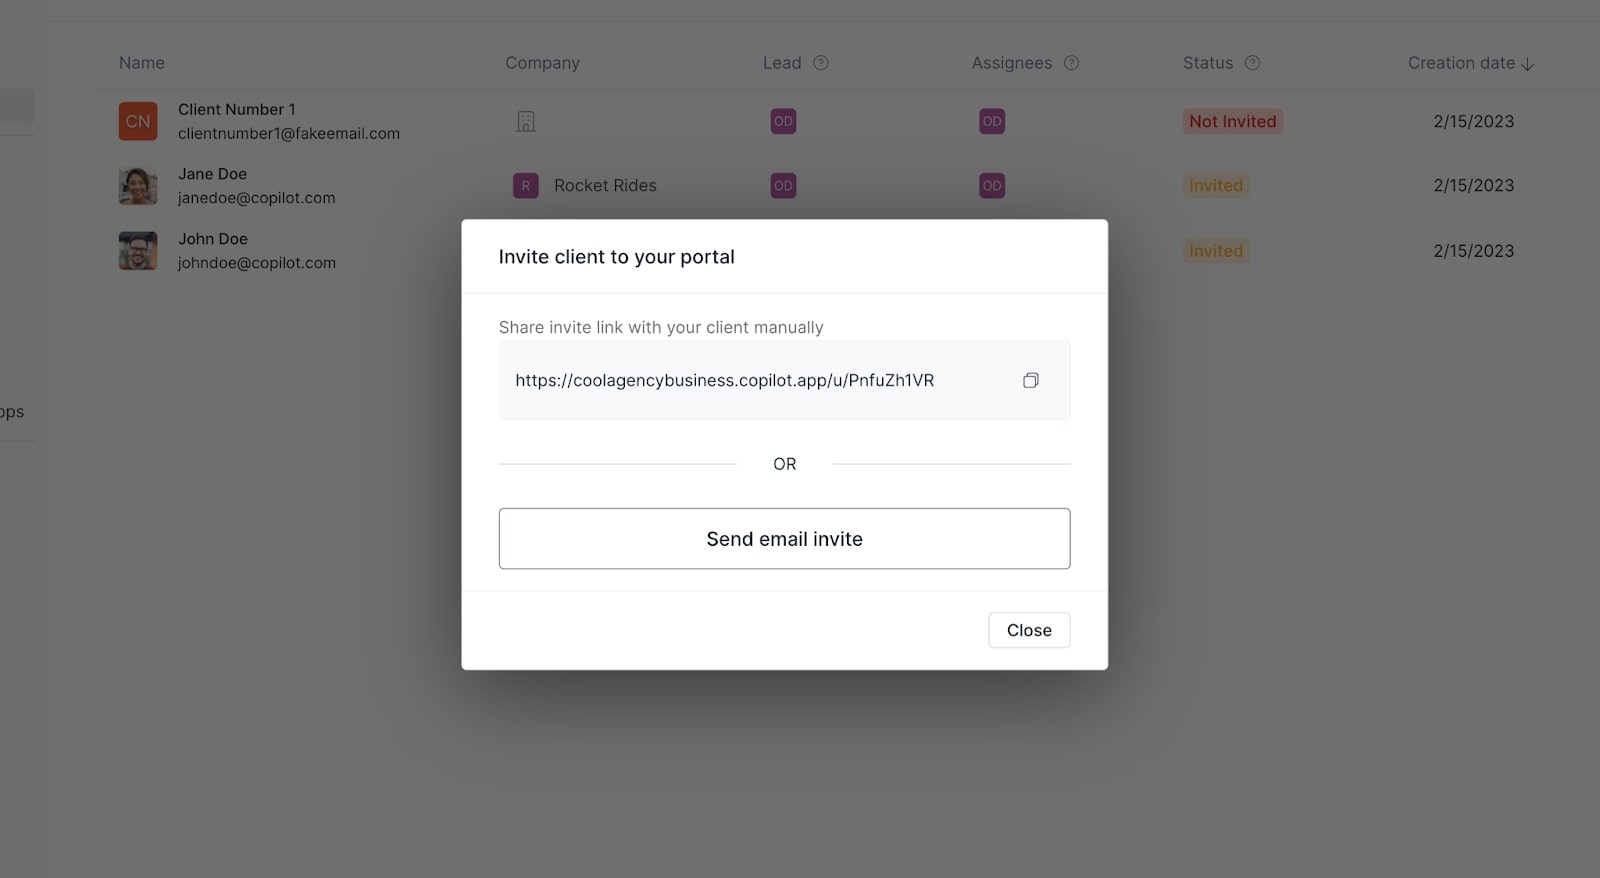
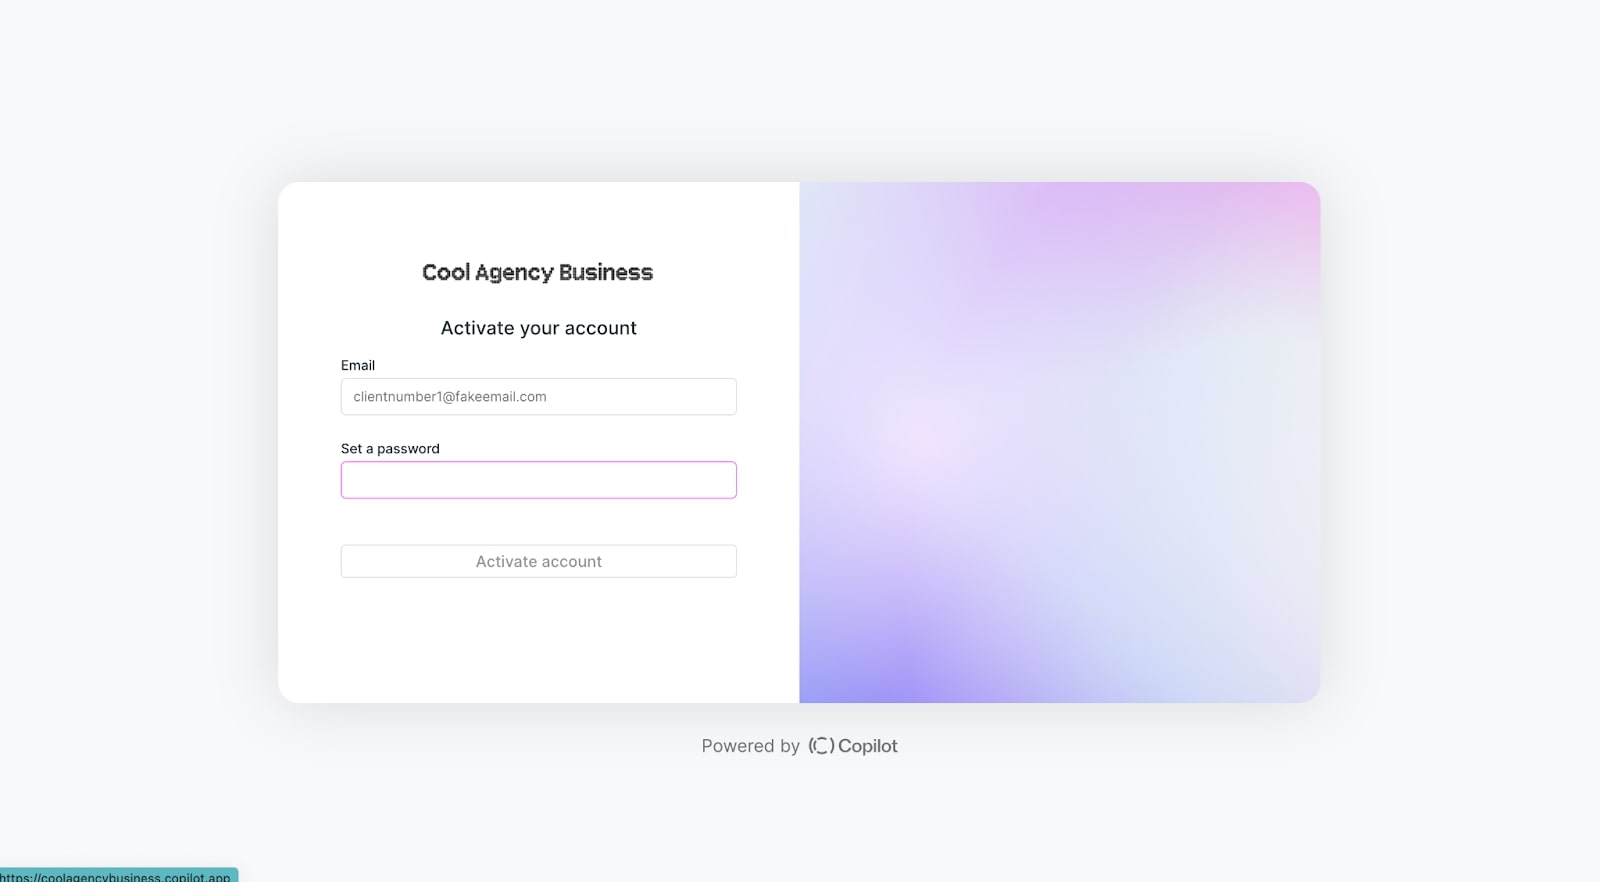
Whatever form of invitation you choose, it will send your client to your login page with their email pre-filled. All your client needs to do is create a password and activate their account.
Once your client logs in, they will have a client portal that will be customized for them (based on the branding colors and fonts we chose earlier).
The client portal and your own dashboard will look slightly different. Of course, your own portal will have more backend features you can edit. But your client will only get what they need and what you set up for their account to have.
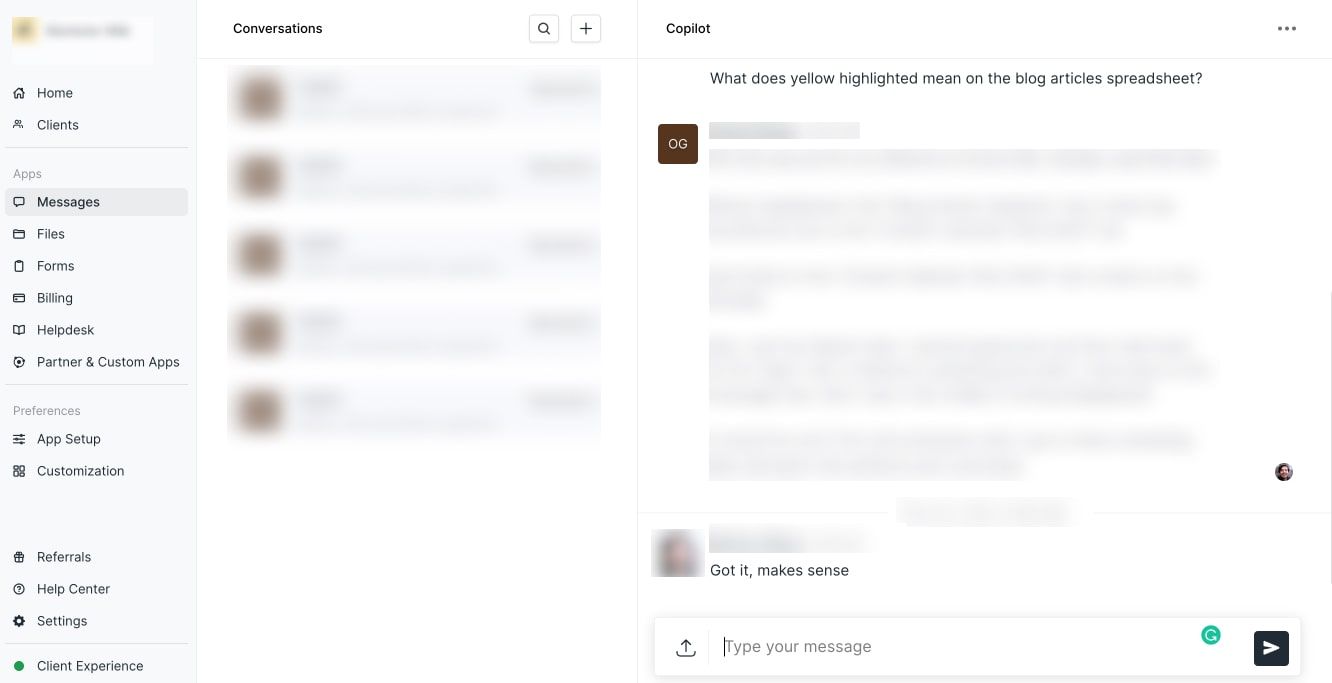
In this case, when a client signs up through my invitation link, their dashboard will look like this:
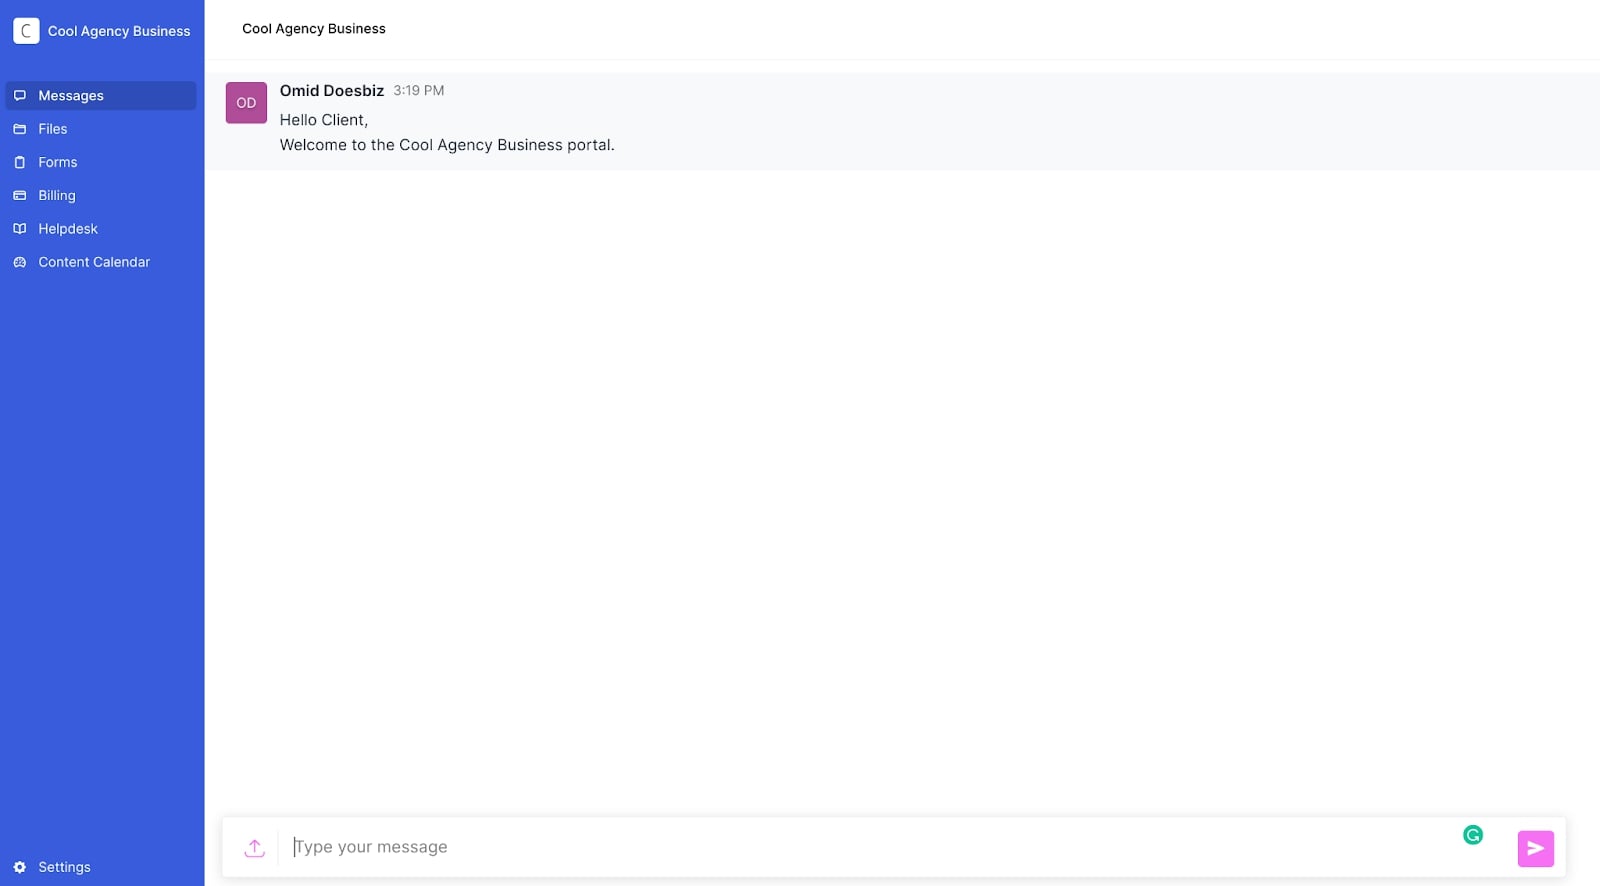
As you can see, right away they are greeted by a message from me (which you can edit), and they already have the Content Calendar (in the sidebar) we created earlier in this guide.
And that’s it! Now your client has their very own secure client portal.
But, if you want to look more professional, it’s a good idea to have your custom portal integrated with your website.
Let’s talk about that.
6. Integrate your portal with WordPress, Webflow, Wix, or Squarespace
You can integrate your Copilot portal with any website — yes, any.
All you need to do is take the URL of your main portal login, which you can access when you click on “Client Experience” at the bottom of the left side panel, and integrate this link with any button on your website.
On your website, in your navigation bar, you can create a link that says “Sign in” or “Log in” and simply route that link to your portal URL.
To make it look more professional, it’s a good idea to use your custom domain with Copilot. If your website is “coolagencybusiness.com,” you can easily create a subdomain like “portal.coolagencybusiness.com” or “app.coolagencybusiness.com.” Then, when someone tries to log into their portal from your main website, it will be more consistent with your domain name and branding.
That’s it!
Conclusion
Finding the right client portal for your customers can be a hard task. With many options out there limiting you to what tools you can use, it can be hard to find a platform that integrates with your existing software.
If you’re looking to create a custom client portal, that can integrate with any website and doesn’t require you to code it, I highly recommend checking out Copilot. I say this as a customer of Copilot myself, but I have yet to find a self-service portal as flexible as Copilot.
With a great client CRM, customer support, and amazing portal features, it can't hurt to give the free trial a go!
Share this post
Sign up for our newsletter
Subscribe to our newsletter to receive emails about important announcements, product updates, and guides relevant to your industry.
